
20 Best AI App Marketing Tools In 2026
Boost app growth with the 20 best AI marketing tools…
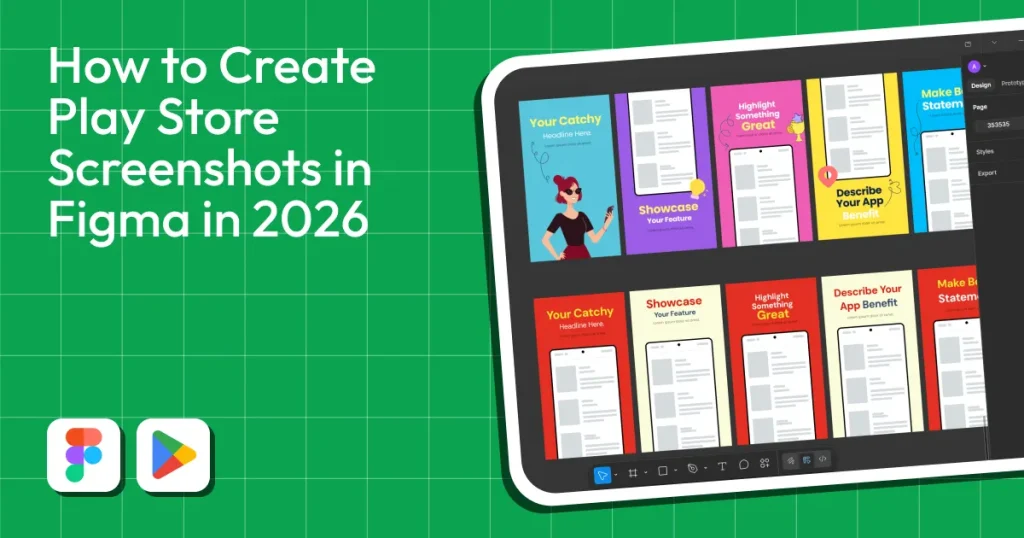
To stand out in a crowded marketplace, you need to know how to create Play Store screenshots in Figma that look professional.
While Figma can act as a powerful free Play Store screenshot generator, relying solely on basic Figma Play Store screenshot templates without a strategy will lead to mediocre results.
That’s why it’s better to use a dedicated Google Play Store screenshot generator like AppLaunchpad, which simplifies the process with its drag-and-drop editor, 1000+ screenshot templates, and auto-resizing. Which means no manual configuration like Figma.
In this guide, we’ll cover how to choose the right Figma templates, follow Play Store screenshot guidelines, design visuals that drive installs, and when to switch to a specialized tool.
Before jumping into tools and techniques, it’s important to understand why screenshots matter in the first place. Once that clicks, learning how to create Play Store screenshots in Figma feels more natural and purposeful instead of just another task. Let’s start by looking at the impact.
Most users decide whether to install or leave within 3–7 seconds of checking your Play Store screenshots. That’s not a lot of time to explain what your app does, which means you need to make the most out of it.
Well-optimized Play Store screenshots alone can improve install conversion rates by 20–40%, even when ratings, reviews, and keywords stay the same. That’s why ASO specialists obsess over visuals, including the Google Play Store itself.
Users scan screenshots from left to right, giving the most importance to the first 2-3 images. If your first screenshot fails to explain the core value, most users won’t bother swiping further.
At a glance, users want to understand:
Apps with consistent, well-structured Play Store screenshots are perceived as more polished, more reliable, and more actively maintained.
This is the primary reason why teams invest time into learning how to create Play Store screenshots in Figma, as the return on their effort is pretty high.
Google Play Store screenshot requirements are strict and often misunderstood. Even when Play Store screenshots get approved, incorrect sizing can kill readability and conversion. Designing Play Store screenshots without understanding these crucial requirements almost always leads to rejection and redos.
The good news is you can use a pre-built Figma Play Store screenshot template, which saves you from researching dimensions, aspect ratios, and compliance details manually.
Now that you understand the stakes, let’s get into the technical side. Before you learn how to create Play Store screenshots in Figma, you need to know Google’s strict requirements.
Google Play Store doesn’t allow random canvas sizes. Play Store Screenshots must follow specific Google Play Store screenshot guidelines. If your Play Store screenshots use the wrong aspect ratios, Google Play may automatically crop or scale them, causing distortion.
| Requirement | Details | Notes / Best Practice |
| Minimum Screenshot Dimension | 320 px (shortest side) | All screenshots must meet 320px on the shortest side to be accepted |
| Maximum Screenshot Dimension | 3840 px (longest side) | The longest side must not exceed 3840 px. |
| Max Ratio Between Sides | ≤ 2:1 (e.g., a 2400×1200 screenshot is valid) | Ensures Google Play doesn’t distort or reject the image. |
| Recommended Portrait Ratio | ~9:16 (e.g., 1080×1920 px) | Most common size for phone screenshots; looks sharp on modern devices. |
| Recommended Landscape Ratio | ~16:9 (e.g., 1920×1080 px) | Ideal for games or apps where landscape orientation matters. |
| Format | JPEG or 24-bit PNG (no alpha) | PNG with transparency isn’t supported on Play. |
| Max File Size (General Best Practice) | ≤ 8 MB per screenshot | Not explicitly enforced, but recommended for upload performance. |
| Number of Screenshots Allowed | 2–8 per device type | Google Play Console allows multiple screenshots per device group. |
| Tablet / Large Screen Guidance | Consider 1080–7680 px | For tablets/Chromebooks, higher resolutions and consistent 16:9/9:16 ratios help display quality. |
These rules are not suggestions. They are the foundation of how to create Play Store screenshots in Figma that get approved. Ignore them, and you will waste hours on redesigns.
Here are the most common pitfalls people encounter when learning how to create Play Store screenshots in Figma, and how to avoid them.
Figma is a general-purpose UI and product design tool used by most Android teams today. Since most designers use Figma for app screens, it makes sense that they would want to know how to create Play Store screenshots in Figma itself.
To be honest, Play Store screenshots creation in Figma is flexible, powerful, and mostly manual. The results depend heavily on the Figma Play Store screenshot templates and how well you understand the layout, spacing, and hierarchy of Play Store screenshots.
Play Store screenshots in Figma can be created in 2 ways: starting from scratch or using a pre-designed Play Store screenshot template from the Figma Community.
Starting from scratch gives maximum freedom, but it also comes with maximum responsibility. You need to set Play Store-compliant canvas sizes manually. Aspect ratios and resolutions must be researched beforehand. App screens must be exported from Android builds and imported manually.
From spacing, alignment, and hierarchy to Play Store-ready screenshots, everything is on you.
This approach works best for experienced designers and teams with strong design understanding. But at the same time, this approach is highly time-consuming, error-prone, and difficult to scale.
Starting from scratch can feel heavy, but there is a faster way. Understanding how to create Play Store screenshots in Figma with pre-made Figma Play Store screenshot templates is how most teams work because it gives you complete creative control.
Pre-built Figma Play Store screenshot templates can significantly reduce setup time. Most templates include preset frames for multiple screenshots, helping you skip manual efforts on spacing and layout. Play Store screenshot templates also help create visual consistency; they are designed to tell a story.
However, even the best Figma Play Store screenshot template requires manual effort. App screens and text captions still need to be replaced individually.
Template quality varies depending on the source; if the original Play Store screenshot template isn’t Play Store compliant or has significant quality issues, there’s nothing much you can do.
Here’s the step-by-step walkthrough of how to create Play Store screenshots in Figma using Figma Play Store screenshot templates.
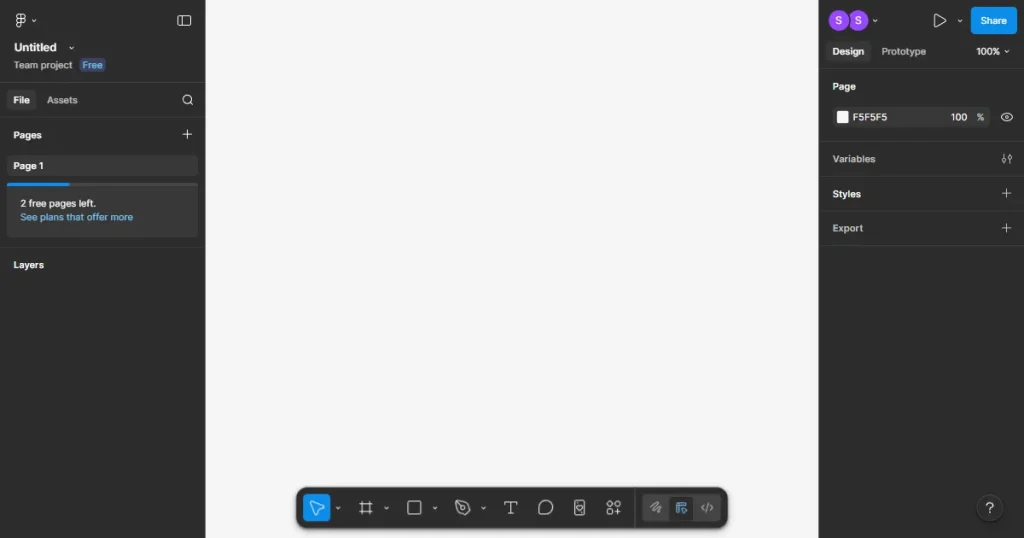
Start by creating a Figma account or logging in with saved credentials.
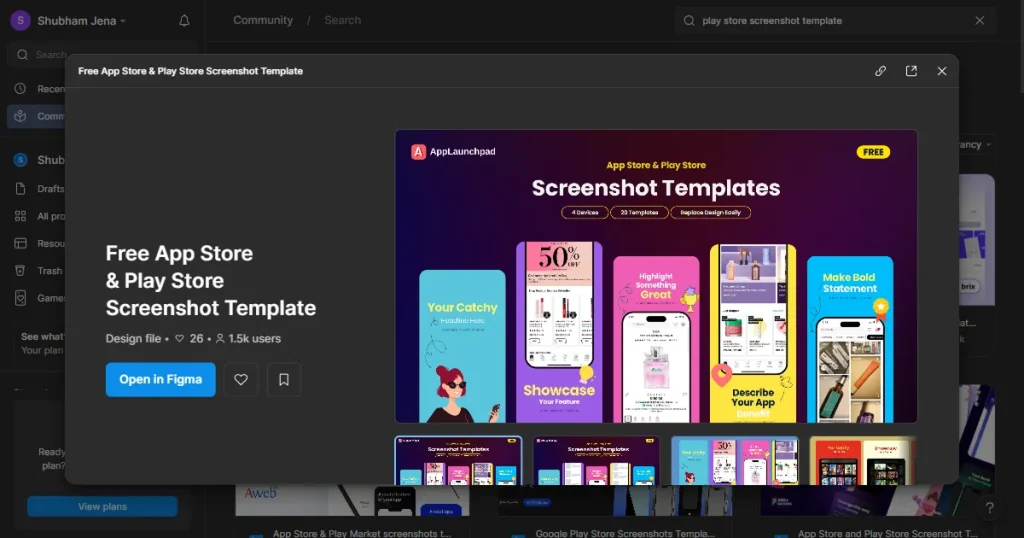
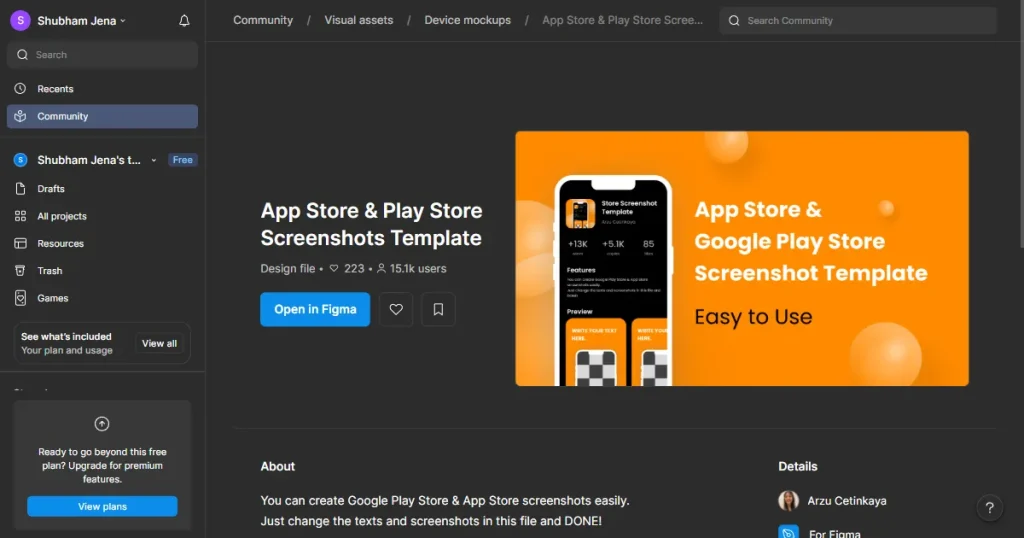
Open the Figma Community and search for “Play Store screenshot templates.” Click Open in Figma to clone a version of the original file in your Figma file.
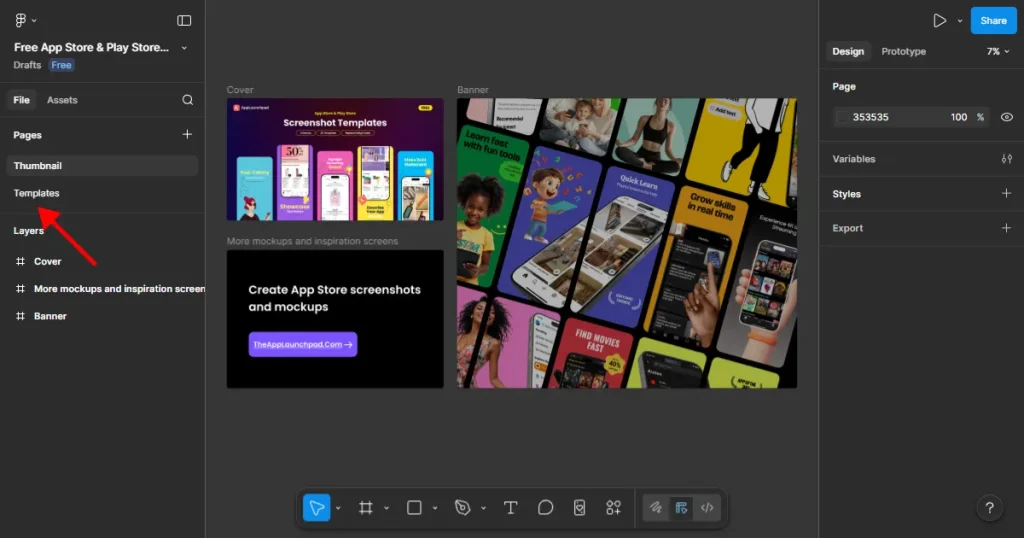
Once you are inside the Figma file, locate the pages section on the left panel. Navigate to the templates page where editable designs exist. Most Figma Play Store screenshot template files follow the same structure, which makes them easier to navigate once you know where to look.
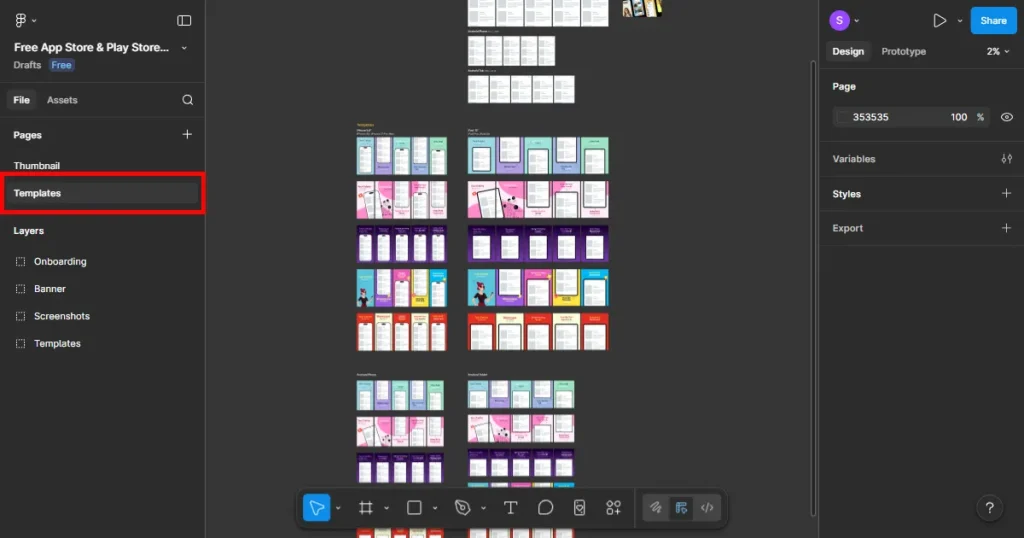
Just below the pages, you will see a layers section. Navigate to the screenshots section to find the editable placeholder screens.
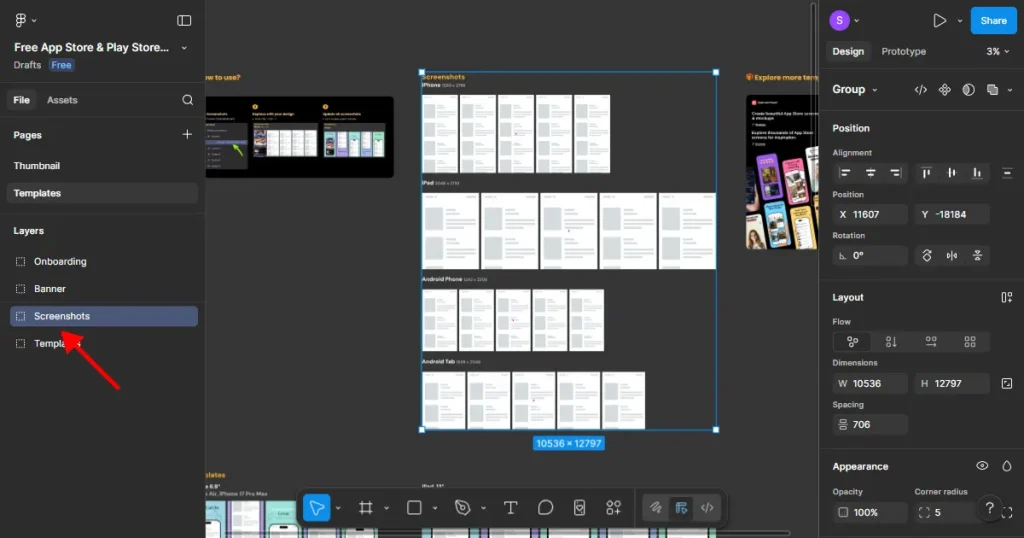
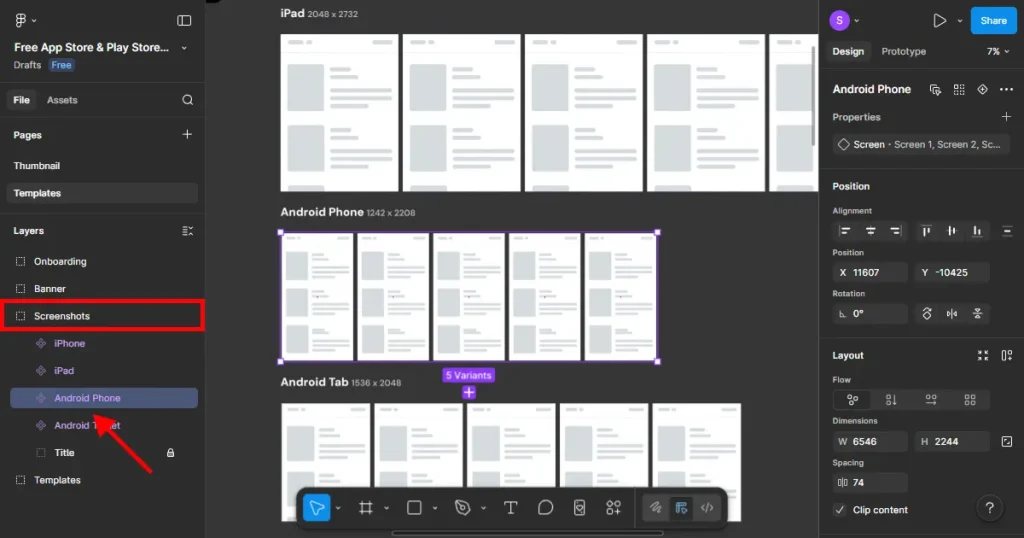
Click the screenshots layer and expand it to find the Android phone. This will highlight all the placeholder screens for Android.
To add your app screens in placeholders, first copy and paste all app screens into the Figma file.
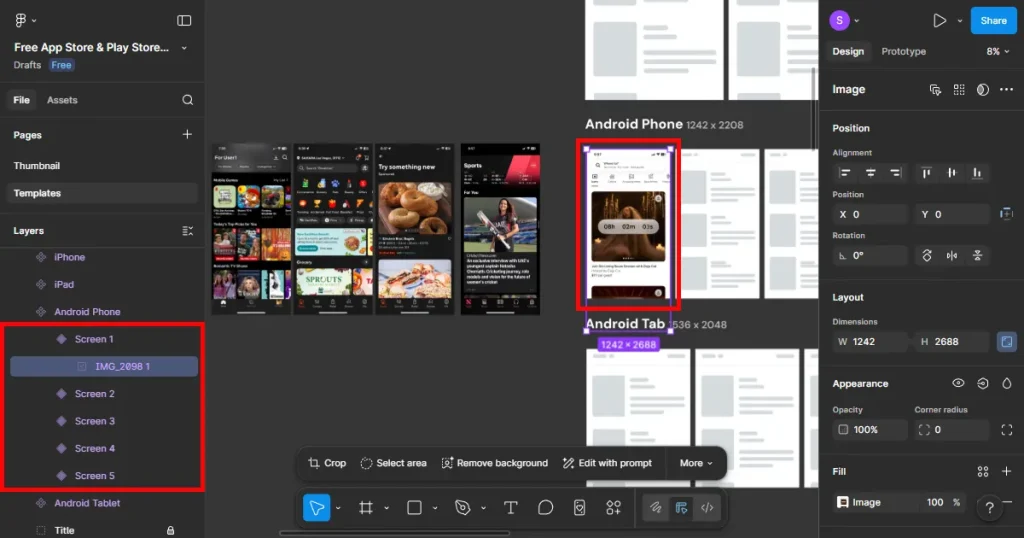
Each placeholder screen represents a Play Store screenshot. Click on Screen 1; Screen 1 will get selected. Copy and paste your app’s real UI into each placeholder screen.

Repeat until all placeholder screens are filled.
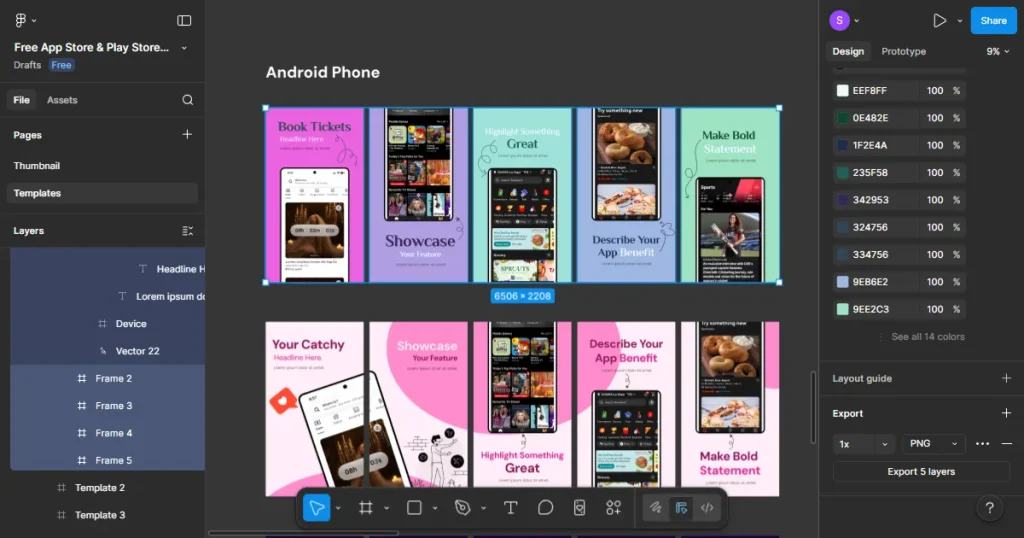
Next, move to the templates layer. Click the Android phone. You will see the template is automatically updated with your added app screens.
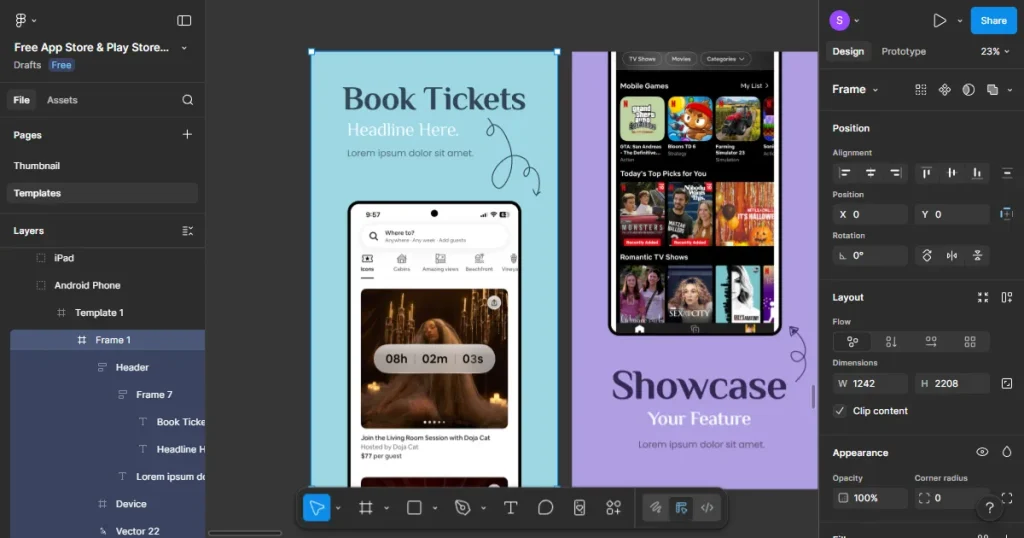
Each template consists of multiple frames (frames 1-5). Each frame represents a single Play Store screenshot
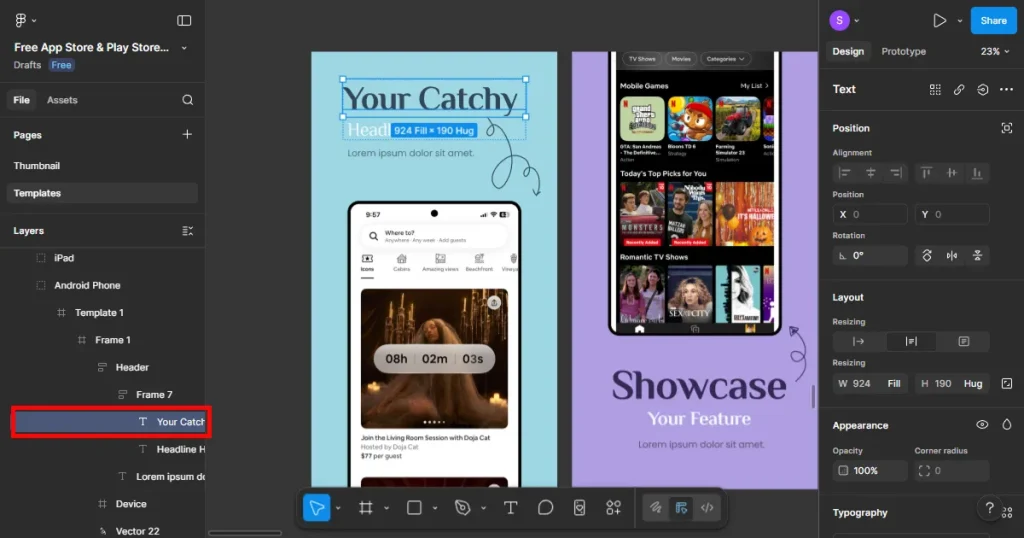
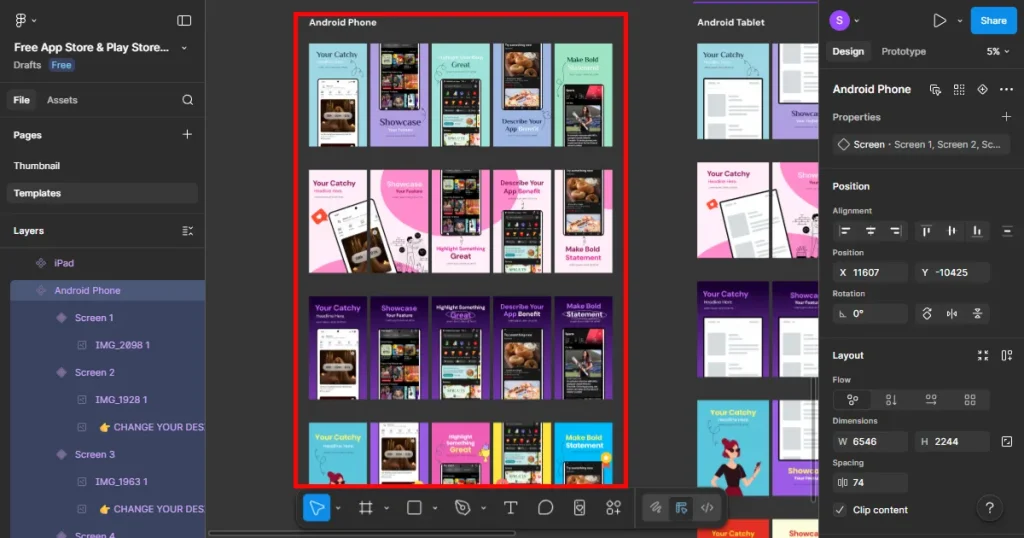
Replace the text on screenshots with your own benefit-focused headings. To do this, click on Template 1 and then click on Frame 1. This will select the first screenshot, double-click the text you want to replace, and type the new text.
Keep the text copy short and readable on small Android screens. Apply consistent font styles and sizes and avoid decorative fonts.
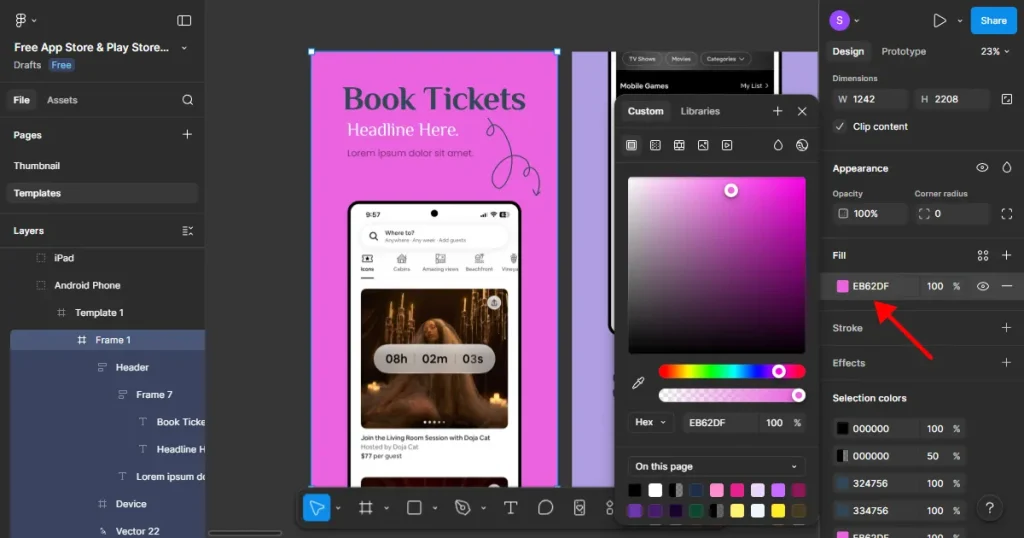
To change the background color, Select Frame 1, double-click it, and use the fill option in the right-side panel settings. Use high-contrast background colors to attract more attention and maintain consistent color themes.
When finished, select the entire template 1.
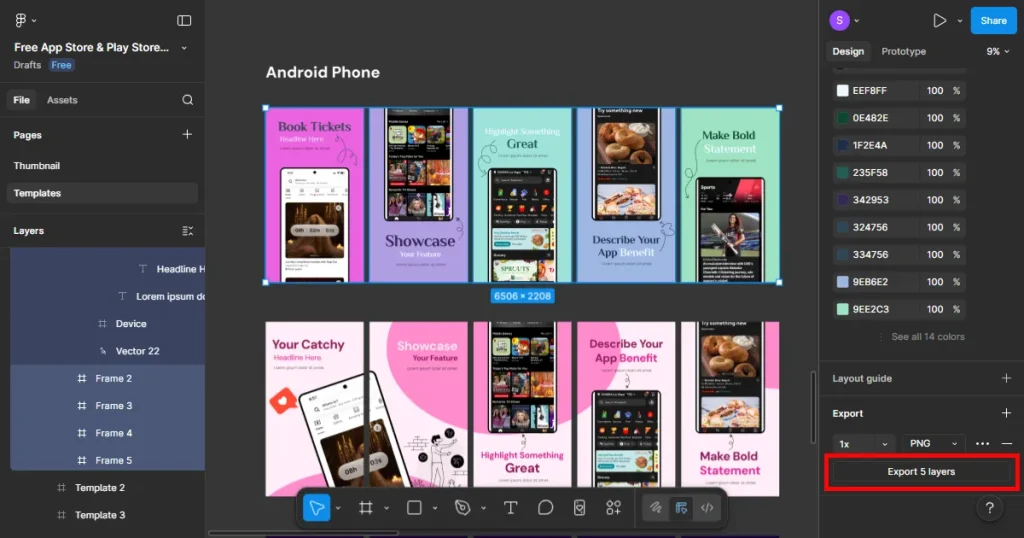
Click on the Export option at the bottom of the right-side panel settings. Export screenshots in JPG or PNG. Avoid SVG or PDF formats. Preview exports on real Android devices before uploading.
Now that you’ve gone through the mechanics, it’s worth understanding why Figma is still the go-to choice for teams figuring out how to create Play Store screenshots in Figma.
This is the biggest advantage when learning how to create Play Store screenshots in Figma. There’s no new tool to learn. Your design team already knows the interface, which means faster adoption.
App screens can be reused directly. Designers and developers collaborate in the same environment. This familiarity is especially helpful when you are designing Play Store screenshots in Figma for the initial app launch.
If you are obsessed with having complete freedom over layout, spacing, and composition, as well as advanced design options, then learning how to create Play Store screenshots in Figma will be your biggest advantage.
Because there will be no enforced structures or restrictions, it makes it a highly flexible and popular tool among expert designers.
The Figma Community offers a large number of Play Store screenshot templates. These lower the barrier for early-stage teams and make experimentation easier. Play Store screenshot templates help teams test different styles before committing to the final option.
Figma’s real strength shows up when multiple people need to review screenshots. Designers, developers, marketers, and founders can all work together simultaneously. This shortens review cycles, reduces misunderstandings, and makes early changes faster compared to sharing static images back and forth.
Figma works best when screenshot creation is a one-time or infrequent task. For first-time Play Store launches or early-stage products, the manual effort is manageable. You get flexibility without committing to a new tool, which makes Figma a practical short-term solution before screenshot updates and localization come into play.
Although Figma is a pretty good tool, learning how to create Play Store screenshots in Figma does take time and effort. And if you want to skip the steep learning curve and create Play Store screenshots without sacrificing on quality, then AppLaunchpad is your best bet.
AppLaunchpad is a leading screenshot generator specifically designed to create Play Store screenshots. Unlike Figma, on AppLaunchpad, Play Store Requirements are handled automatically. Layouts are structured. Templates are Google Play Store compliant, and repetition is removed.
Choosing AppLaunchpad over Figma is less about design preference and more about time and workflow efficiency. As apps grow, screenshot creation shifts from a creative task to a repeatable operational task.
AppLaunchpad is purpose-built around Google Play requirements. No manual research. No guessing. Play Store screenshot templates align with how screenshots actually appear on the Play Store, reducing compliance issues and rejection risks.
Ready-made Play Store screenshot templates eliminate the need for manual canvas setup. You can start creating screenshots within minutes. AppLaunchpad offers Play Store-compliant Play Store screenshot templates, which remove guesswork and layout decisions.
AppLaunchpad offers features such as smart cloning, which can copy Play Store screenshots across multiple devices without recreating a new Play Store screenshot template from scratch. App screens can be replaced without redesigning layouts. This way, screenshot updates after new releases become realistic rather than painful.
AppLaunchpad comes with a unique in-built feature: AI-powered localization. With AI-powered localization, you can translate all the text on your Play Store screenshots templates into multiple languages in one click. This is especially helpful if you are planning to localize your Play Store screenshots or if your app has global users.
On AppLaunchpad, you can get store-ready screenshots without any design skills. From layout and visual hierarchy to text captions, everything is handled by Play Store screenshot templates. You just need to upload your app screens and make basic changes.
AppLaunchpad is built to handle multiple apps and screenshot projects from a single interface. Projects stay organized, maintenance effort drops, and screenshot management becomes predictable with time as your app grows.
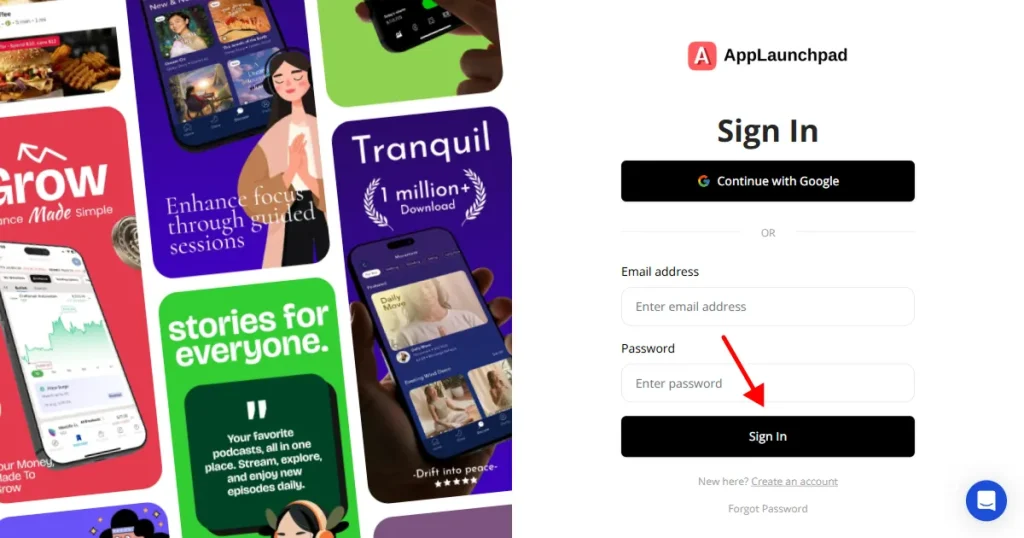
Visit AppLaunchpad and sign up using your Google or email account. If you already have an account, log in with your saved credentials. All projects are saved automatically, so you can always return later.
Once inside the dashboard, you’ll see two options: Start from scratch or Use pre-designed templates. For most developers, templates are much faster. They reduce manual work and already follow Play Store-compliant layouts, which is what we will focus on.
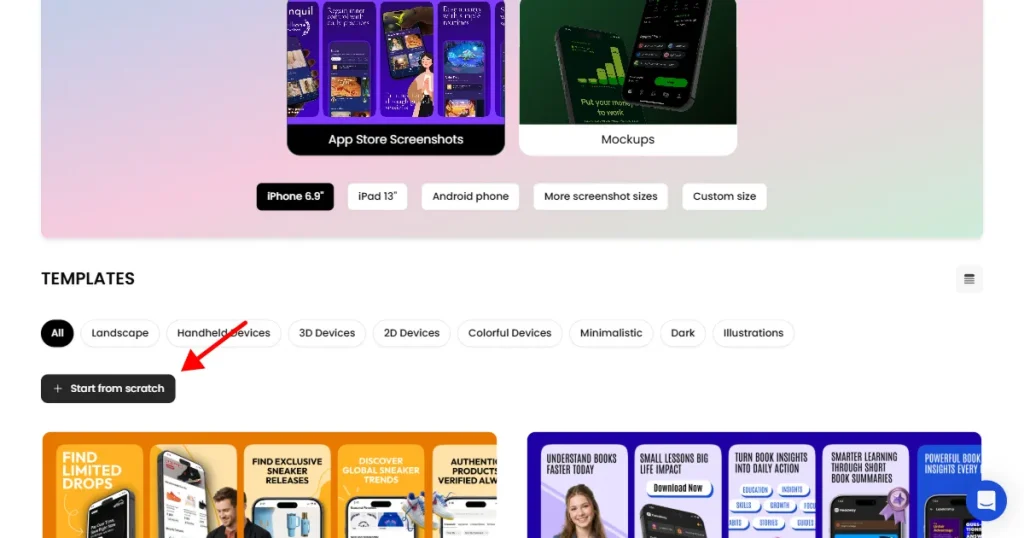
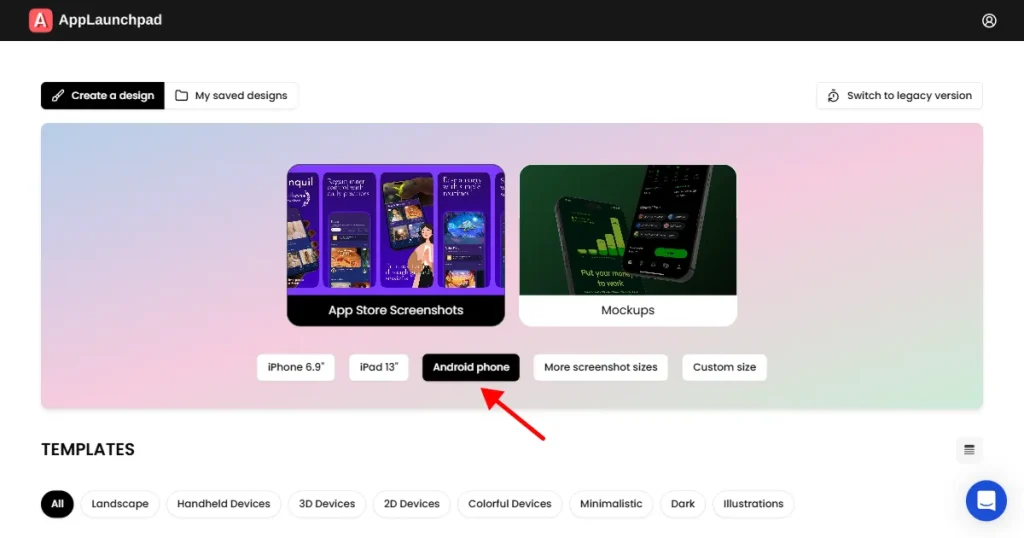
Choose an Android device. AppLaunchpad supports the latest Android devices by default, and if you want older device models, you can easily select them using the “More screenshot sizes” option.
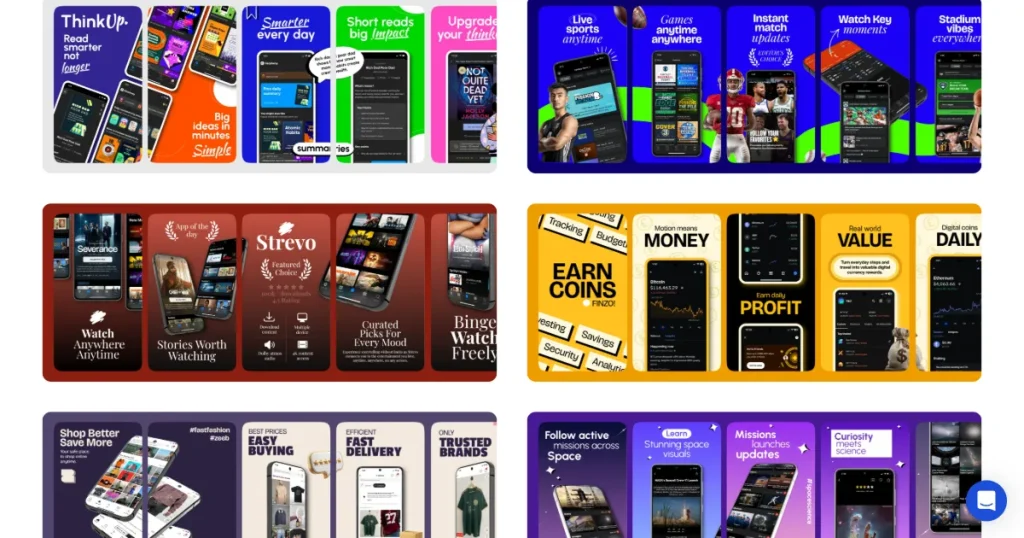
Once you have selected a device, browse templates and choose one that matches your app’s category or style. If you’re on a free plan, look for templates labeled “free.”
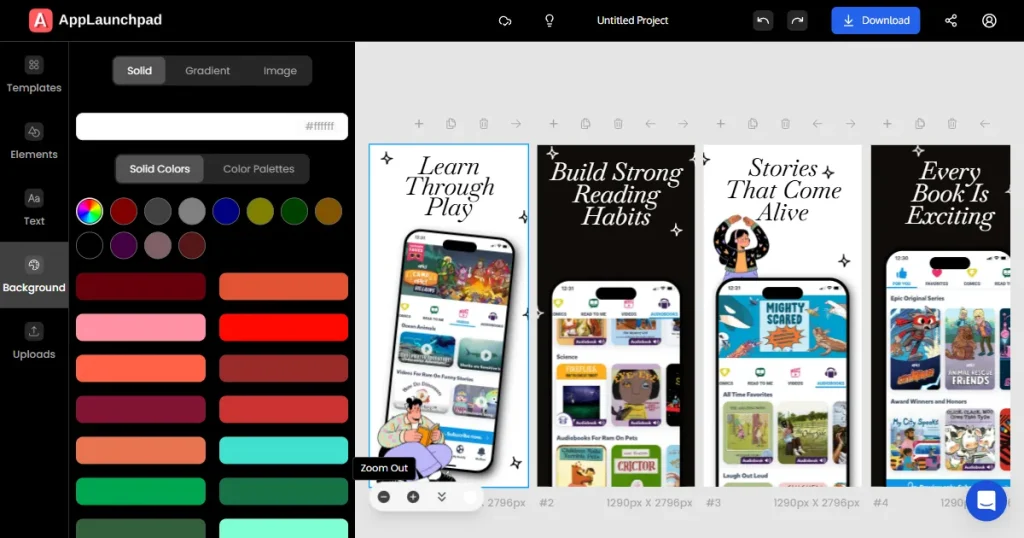
Once inside the editor, start customizing the selected template

Upload your app screens and place them into each screenshot frame
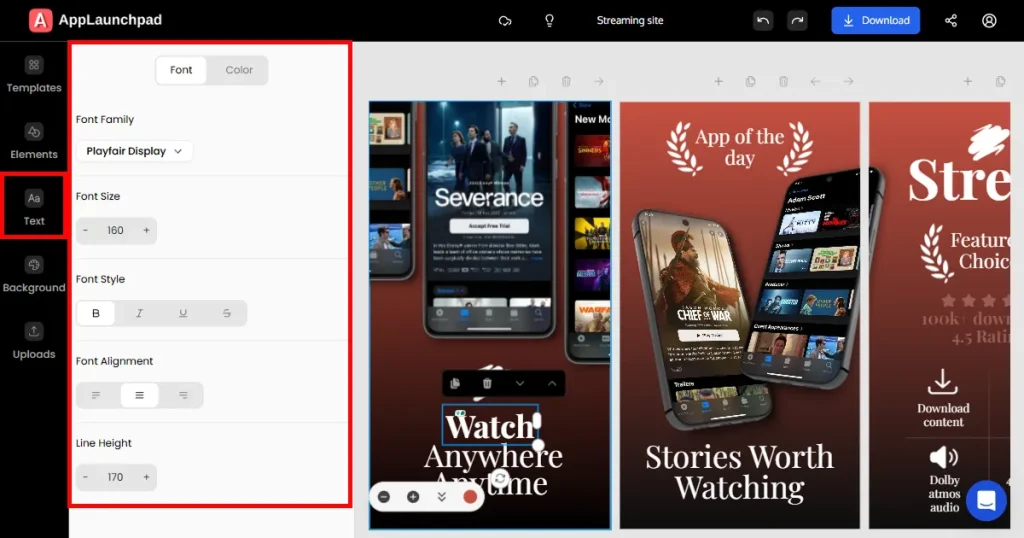
Add, remove, or edit text inside the template. Customize font size, alignment, and spacing for better readability.
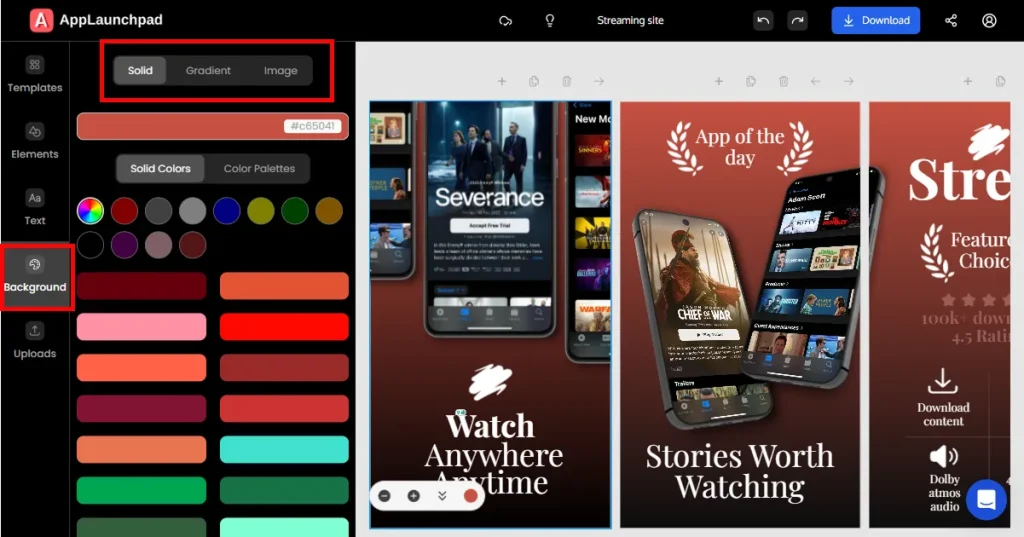
Apply background customization if needed. Choose a background color, gradient, or upload a background image.
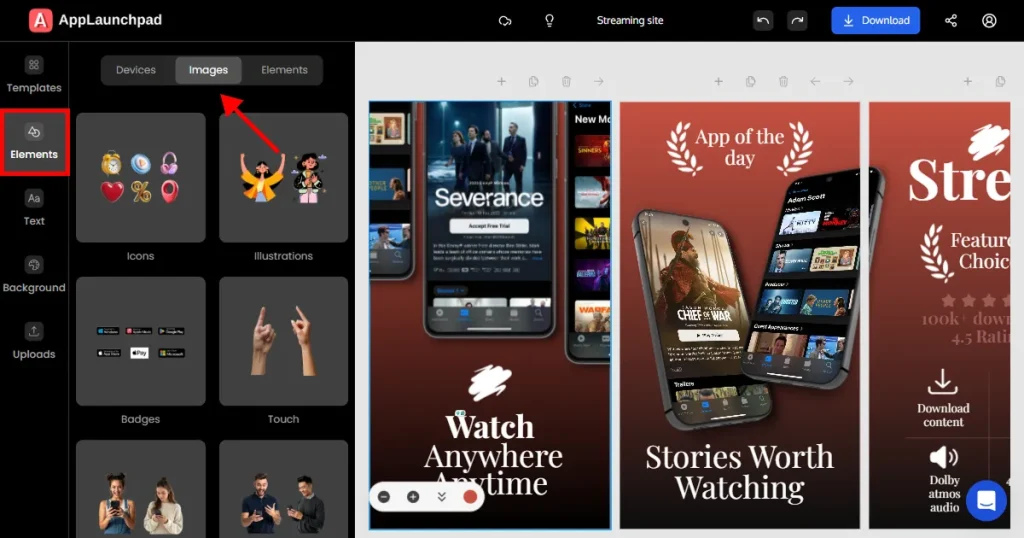
Add extra elements like Google Play Store icon or Google Play badges, App icons, Illustrations, or design elements
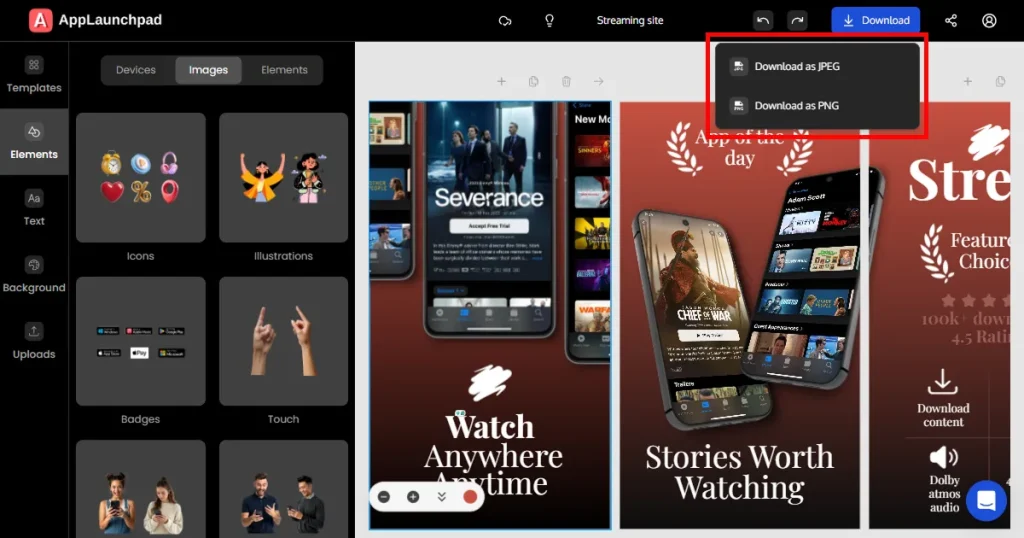
Export your screenshots as JPG or PNG. Screenshots will be downloaded as a ZIP file to your local computer.
Note: All projects are automatically saved. You can return at any time to make edits or revisions without starting over.
Figma is a very capable tool, but that does not mean it is the right fit for Play Store screenshots. In the end, the real question is whether learning how to create Play Store screenshots in Figma is worth it for you.
If you already use Figma for UI design, have decent design skills, and only need screenshots occasionally, Figma is worth giving a shot. It gives you complete creative control and keeps everything in one place, which works well for early-stage apps or one-time app launches.
That said, Figma’s weaknesses become apparent the moment screenshots become a repetitive task. Frequent UI updates, localization, multiple versions, and ongoing ASO work make screenshot creation a time-intensive maintenance task.
The real cost of Figma isn’t money spent. It’s time, attention, and dependency on design expertise.
If Play Store optimization is part of your growth strategy and you value speed, consistency, and scalability, a purpose-built tool like AppLaunchpad is simply a better long-term fit.
Figma is the right choice if you already use it daily for UI design, create screenshots once in a while, and are comfortable handling layout, sizing, and exports manually.
AppLaunchpad makes more sense if screenshots are a part of your growth or ASO strategy, you update them often, plan to localize in multiple languages, or want professional results without relying on design skills.
Figma is a general-purpose design tool that offers flexibility but no guidance specific to the Play Store. AppLaunchpad is explicitly built for Play Store screenshots and handles sizing, structure, and consistency for you. With Figma, quality depends on discipline, design skills, and time, with AppLaunchpad, it’s all in the workflow.
Yes, but only if you set everything manually. Figma doesn’t explicitly support Play Store resolution or aspect ratio rules, so compatibility depends entirely on whether you create frames correctly, export at the right scale, and verify correct dimensions before upload. There are no built-in checks or warnings in Figma.
You need at least beginner-to-intermediate design expertise. Understanding visual hierarchy, basic typography, screenshot layout, spacing, and contrast is essential. Figma won’t fix poor layout decisions, so screenshot quality varies greatly depending on who’s designing.
Yes. Figma’s free plan is enough to create Play Store screenshots. You can use a free Play Store screenshots template from the Figma community. Or use AppLaunchpad, a free Play Store screenshot generator with over 1,000 ready-made store-compliant templates.
To create Play Store screenshots in Figma, use a Figma Play Store screenshots template, insert your app UI, customize the layout and text, and export in the required sizes.
When selecting a Figma Play Store screenshot template, look for one that includes the latest device frames and follows the Play Store screenshot size guidelines.


