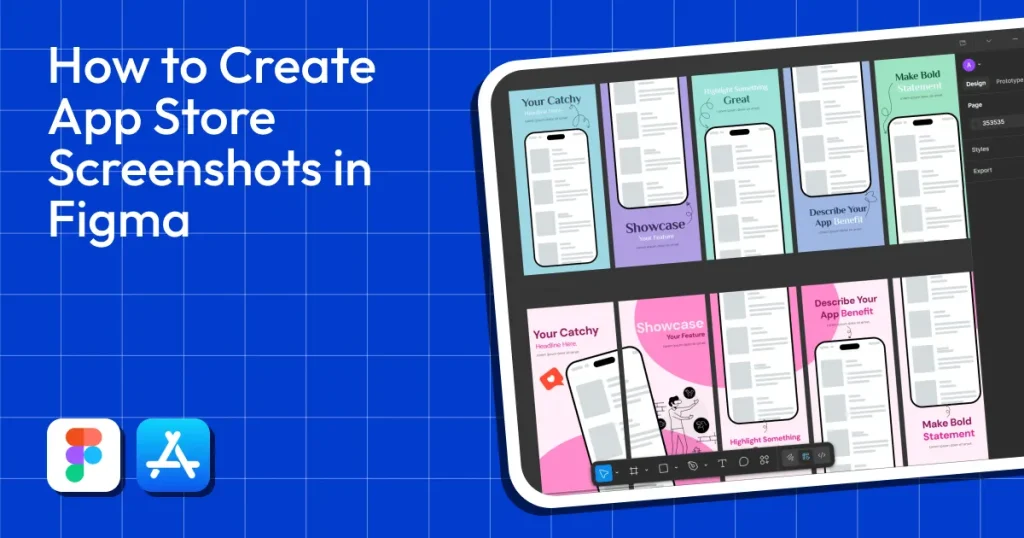

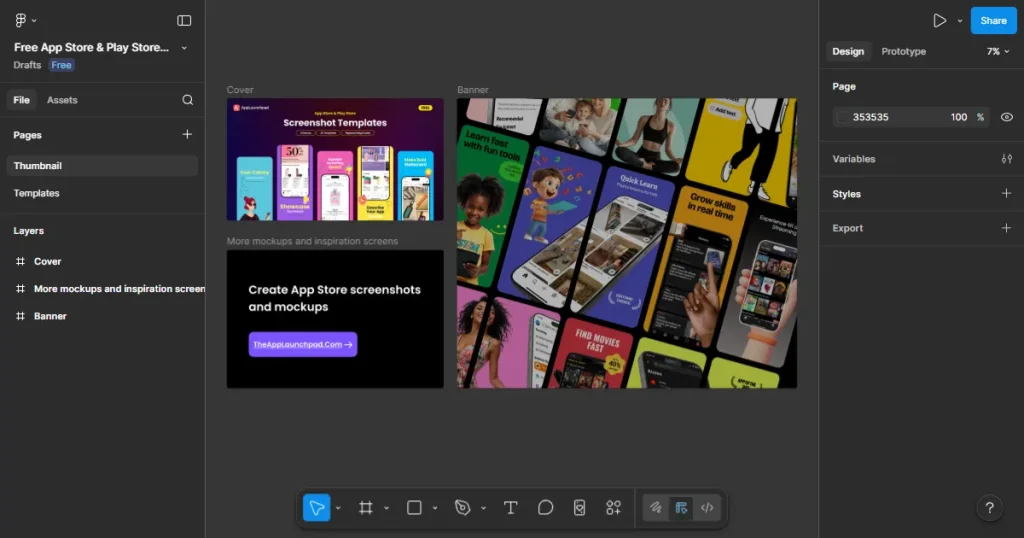
How to create App Store screenshots using…
A complete guide to creating App Store screenshots with AppLaunchpad,…
If you are looking for how to create app store screenshots in Figma, the process involves designing layouts manually, aligning elements, and maintaining consistency across multiple screen sizes.
This can quickly become time-consuming. This is precisely why AppLaunchpad is the best app store screenshot generator for busy teams. It lets you choose from 1,000+ ready-made, guideline-compliant professional app store screenshot templates and create them quickly with its simple drag-and-drop editor.
With that being said, in this guide, we will explore how to create app store screenshots in Figma, identify where the manual process hits a wall, and show you when it’s time to switch to a specialized tool.
Before we can answer How to Create App Store Screenshots in Figma, you need to know what Figma is in the first place. Figma is a web-based design tool that runs directly in the browser. You don’t have to worry about heavy installation or external setup.
This is precisely why Figma is so popular. Unlike Photoshop, you can use any device to create app store screenshots in Figma.
Before we get started, here are a few basic terminologies so we are on the same page.
Understanding these basics is the foundation of mastering how to create app store screenshots in Figma efficiently.
Remember: Figma won’t guide you. Expect no help on how to create app store screenshots in Figma or basic structure hierarchy. Knowing what makes a good App Store screenshot comes from experience and following best practices.
Here is a detailed step-by-step guide on how to create app store screenshots in Figma.
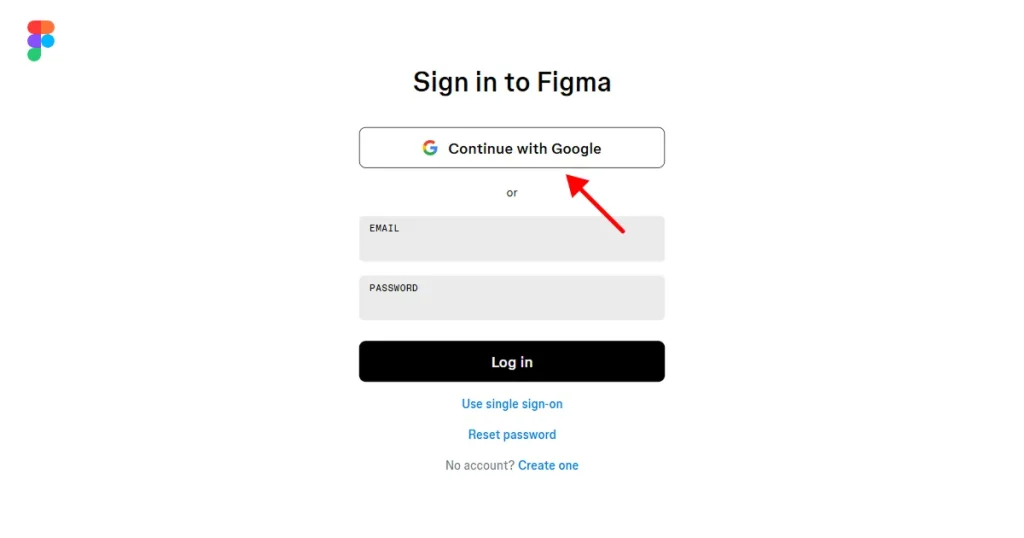
Step 1: Create or Log into Figma. The first step to learn how to create app store screenshots in Figma is to create an account on Figma using Google or email. If you already have an account, log in with your existing credentials. If you’re new, the free plan is enough for creating App Store screenshots in Figma.
Step 2: Search for a template. Open the Figma Community and look for an App Store screenshot template. Start with search terms like “App Store screenshot template” or“iOS app screenshots.” Finding the right template is half the battle when figuring out how to create app store screenshots in Figma.
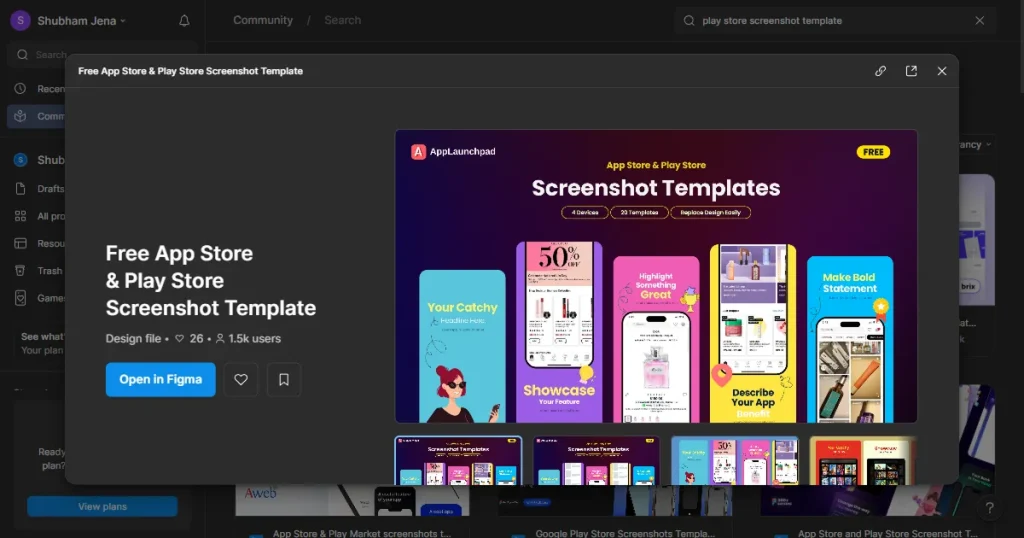
Step 3: Open the template in Figma. Click Open in Figma to open the app store screenshot template in your Figma file. Before you start editing, you must ensure the template is set up to match the current app store screenshot size guidelines.
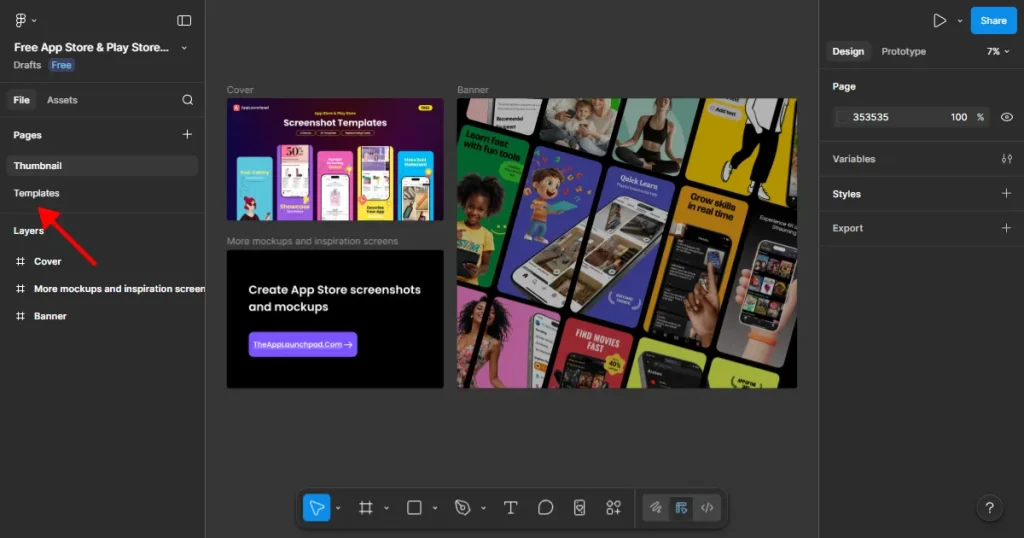
Step 4: Navigate to Pages: Click on the Templates page, which is where you will find editable App store screenshot templates
Step 5: Navigate to Layers. Under the Layers section, you will see components such as onboarding, banner, screenshots, and templates. Click on Screenshots.
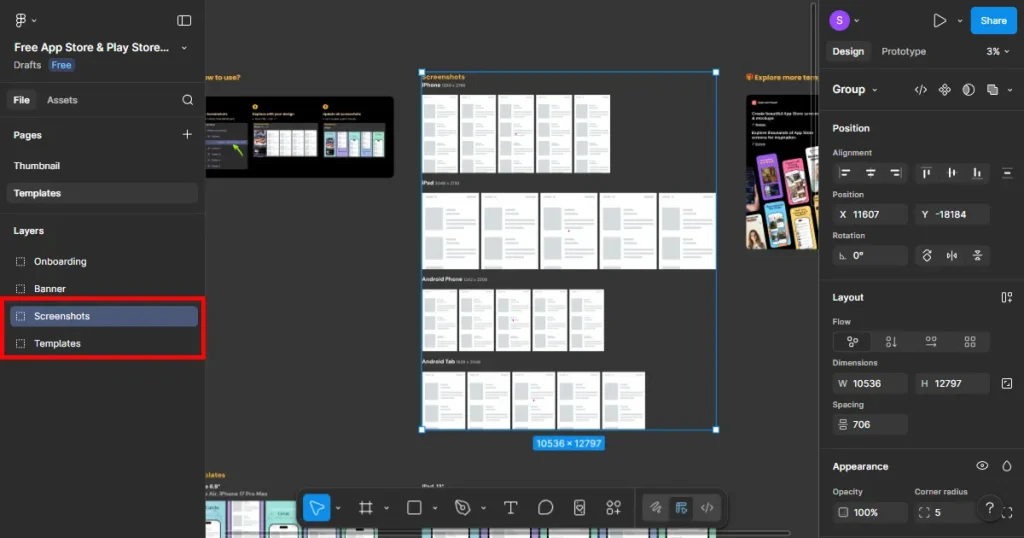
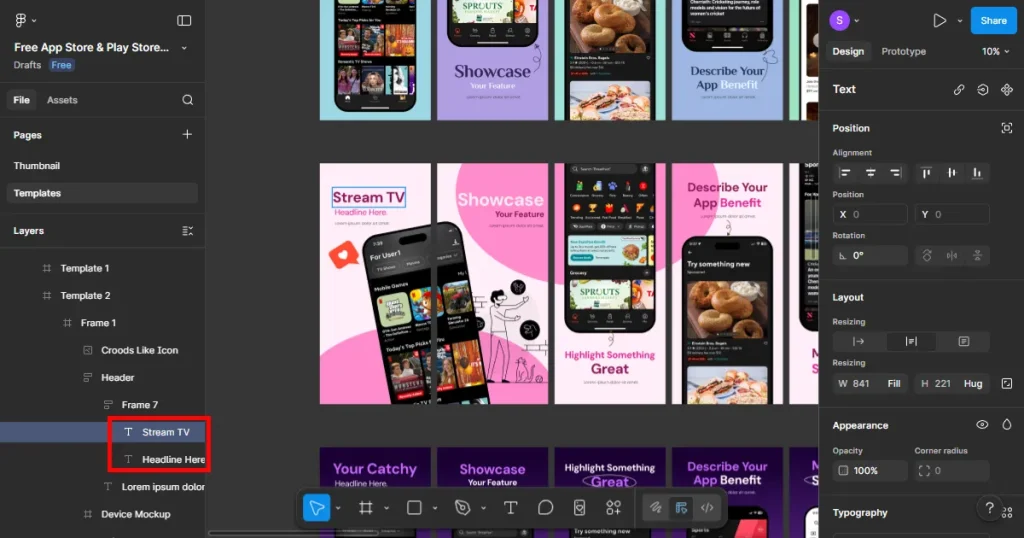
Step 6: Add app screens. Click on Screenshots. You will see multiple devices, such as an iPhone, iPad, etc. Select iPhone, then select Screen 1, and click Change your design here. This placement of real UI screens is the core part of how to create app store screenshots in Figma that look authentic.
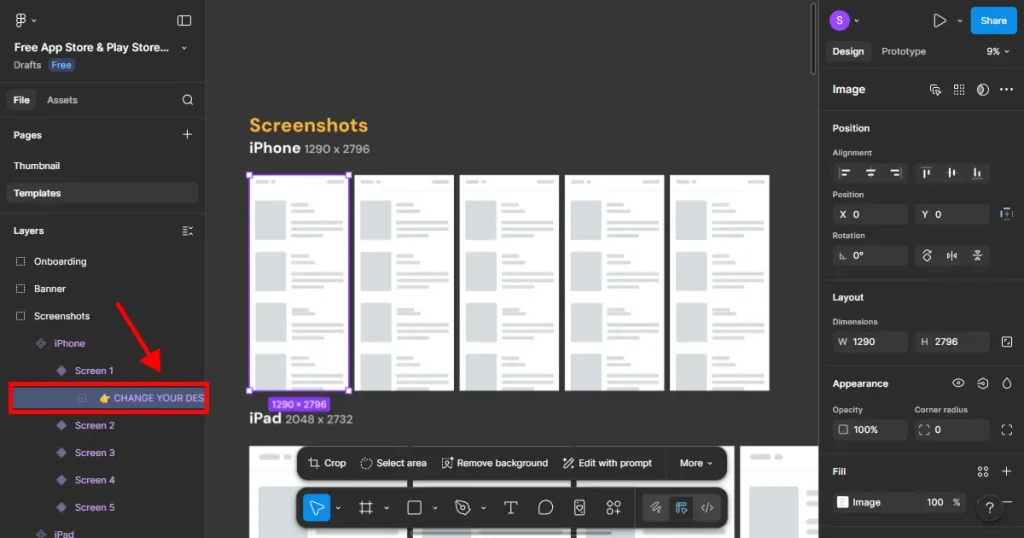
This will select the first placeholder screenshot in iPhone screenshots. Copy your app screen and paste it over the selected screen 1.
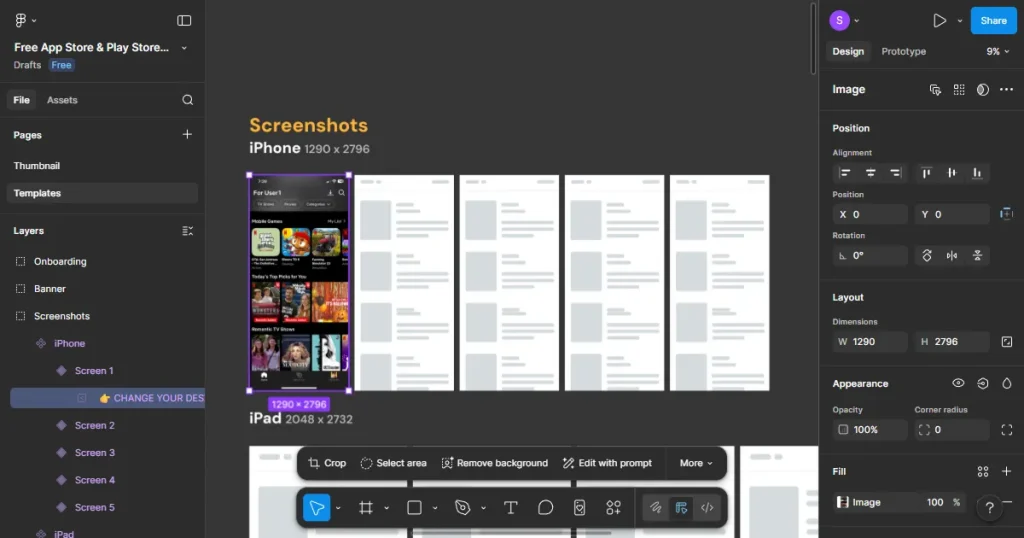
Repeat this process for all five screens.
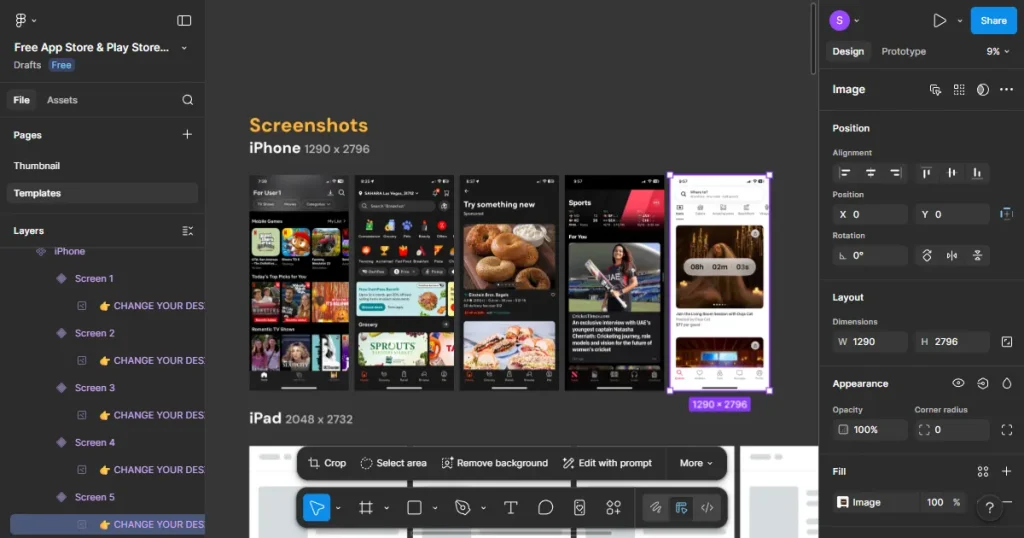
Step 7: Select a template to edit: After you are done adding your screens, click on Templates, select iPhone.
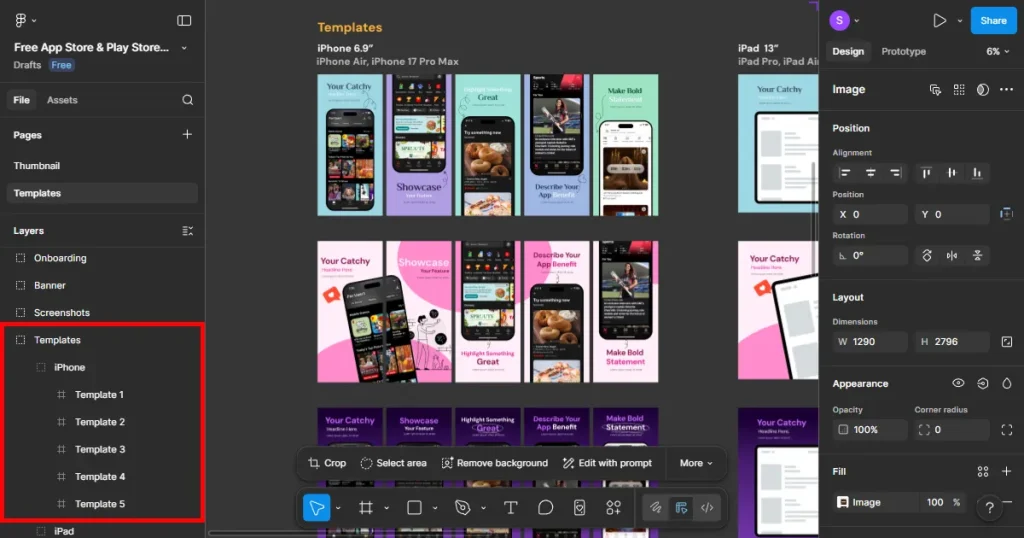
You will notice all iPhone templates have been updated with the app screens you added. Select a template of your choice. All templates are marked as template 1 to template 5.
Step 8: Customize text captions: select the template you wish to edit. In our case, select template 2. You will see multiple Frames (Frame 1 to 5). These frames represent one set of iPhone screenshots.
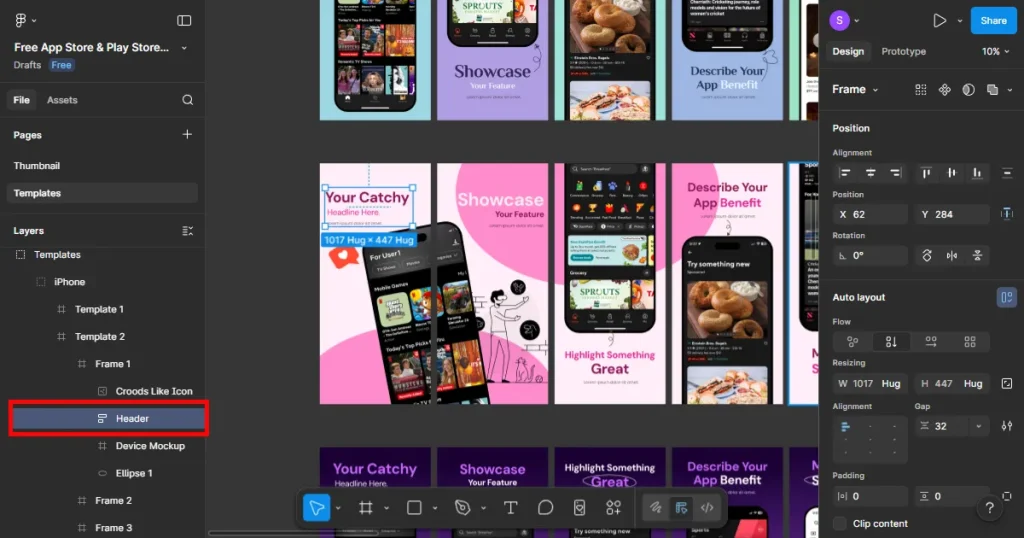
Select Frame 1, click on Header, double-click, and start editing the text caption. Repeat this process for all Frames.
Step 9: Customize the background color: To change the background color, click Frame 1. Look for the Fill option in the right-side panel and choose a color of your choice.
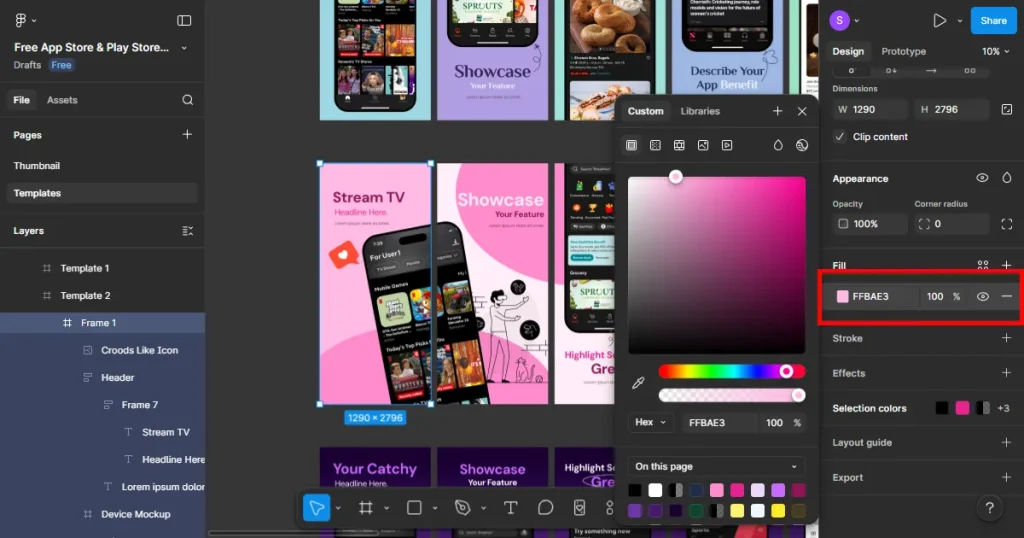
Zoom out and check consistency across all frames. Make sure spacing, colors, and tone are uniform and well-aligned.
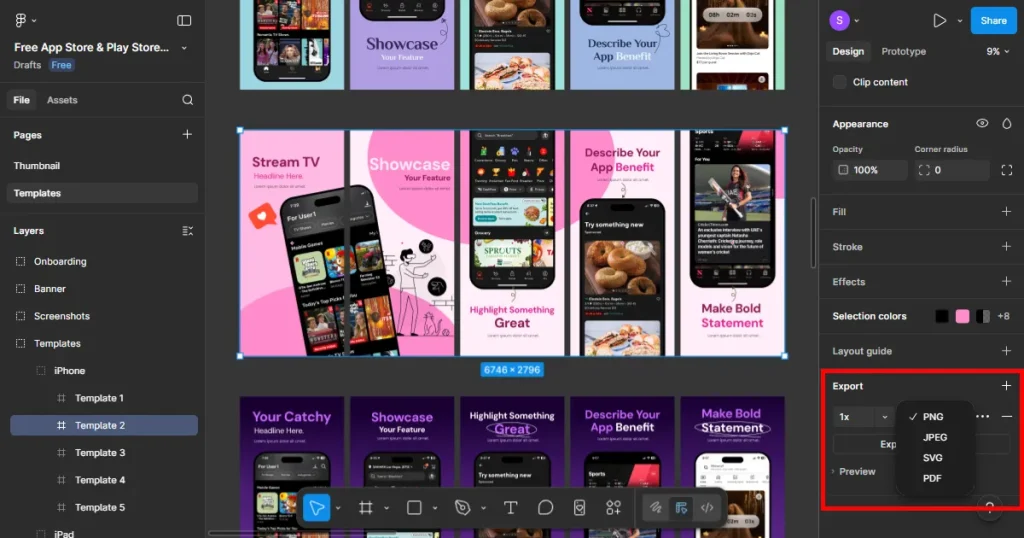
Step 10: Export the template: Select the entire template, rename it to an appropriate name, and export it as a PNG or JPG. Double-check that your exported files meet the exact app store screenhot sizes pixels requirements to avoid upload errors in App Store Connect.
Figma works best when you want complete creative control. If you care more about how your app store screenshots will turn out, regardless of how much time it will take, Figma is a solid choice. Developers who are comfortable tweaking text captions, colors, and spacing usually feel at home here.
It’s handy when you’re:
Where Figma gives you some trouble is scale. Using Figma for frequent updates, design experiments, or localizing app store screenshots requires significant manual work. At which point, you realize the importance of speed and automation.
While the guide above shows how to create app store screenshots in Figma, the tool does come with a few trade-offs. For many app developers and small startups, Figma starts to show limitations when app store screenshots become a regular task. Below are a few pain points of Figma designers.
Creating app store screenshots in Figma involves multiple small and repetitive steps. Even if you know how to create app store screenshots in Figma, manually creating them for 10 different screen sizes is exhausting.
Figma doesn’t offer automation features for App Store screenshots. Unlike the top app store screenshot generators, Figma doesn’t offer automation features to instantly apply a single design change across all your device frames. Localizing app store screenshots in Figma is also manual, which slows down the scaling.
While Figma is relatively easier than Photoshop and other traditional design tools, it’s still pretty much a design tool. Non-designers often spend more time watching tutorials on how to create app store screenshots in Figma than actually designing them.
They often struggle with basic Figma elements like frames, layers, and constraints. This can create significant pressure, especially if you are shipping an app for the first time.
Beginners often run into:
Figma doesn’t tell you how to optimize screenshots for conversions. It won’t suggest headline length, screenshot order, or visual hierarchy based on App Store screenshots best practices. You rely on your own knowledge and experience. You may find yourself asking an AI agent how to create app store screenshots in Figma.
As your app grows, screenshots need to be updated, too. In Figma, each update will require you to revisit every frame and navigate an endless list of editing options. Managing multiple screenshot variants, experiments, or releases can become messy in no time.
Creating app store screenshots in Figma becomes a big headache when:
Remember what I said earlier, Figma is a general-purpose design platform. Which means you can design anything and everything on Figma. App Store screenshots in Figma are a much smaller use case. As a result, Figma workflows are not optimized for speed or repetitive tasks. The result:
In simple words, Figma works well for control and customization, but it lacks speed, automation, and scale. If you need to make frequent screenshot updates or you are a complete design rookie, don’t ignore these red flags.
While Figma is a great design tool, sometimes you need a tool built specifically for App Store screenshots. AppLaunchpad is one of the best app store screenshot generators. Instead of starting from a blank canvas on Figma, you get ready-made templates that are already optimized for the App Store screenshot guidelines.
AppLaunchpad works on a simple philosophy:
For teams that update screenshots often or want consistent, high-quality visuals with minimal effort, AppLaunchpad can save significant time compared to Figma. It’s a solid alternative for anyone who doesn’t know much about design but wishes their app store screenshots looked as good as those created by designers.
You no longer have to worry about how to create app store screenshots in Figma’s generic workspace because AppLaunchpad is tailor-made for the job. Unlike Figma, which serves many design use cases, AppLaunchpad focuses entirely on app store visuals.
This specialization removes confusion and guesswork around layout, spacing, and device sizing. Because it is built as a specialized app store screenshot generator, every menu and button is there to help you design your app visuals faster.
Speed is where AppLaunchpad outperforms Figma. In Figma, you manually place screens, align text, and repeat the same steps again and again. AppLaunchpad simplifies this process.
You upload your app screens, choose a template, and start editing immediately. What usually takes hours in Figma can be done in minutes here.
Moreover, AppLaunchpad also handles the heavy lifting by automatically adjusting your designs to fit all required app store screenshot sizes with a single click.
Whether you are a designer, marketer, or Startup founder, AppLaunchpad has got you covered. You don’t need to understand complex concepts like frames, layers, or constraints. You just need to know textbook editing: change text, swap images, adjust colors, and you are good to go.
The templates in AppLaunchpad are explicitly created for App Store conversion. AppLaunchpad includes App Store-compliant templates with a clear visual hierarchy, readable text sizes, and layouts that scale well on mobile and desktop screens. App store screenshot templates in Figma vary in quality and often require manual adjustments.
As apps grow, screenshots need frequent updates. AppLaunchpad makes it easier to duplicate projects, test new copy, or prepare screenshots for feature launches. You can create variations quickly without rebuilding everything from scratch. This is especially useful for developers who often run experiments.
AppLaunchpad streamlines the entire process from start to finish. You go from app screen to downloadable screenshot in a single flow. Projects are saved automatically, exports are App Store–ready, and there’s less room for mistakes.
Step 1: Create an account. Visit AppLaunchpad and sign up using Google or email. If you already have an account, log in with your saved credentials.

Step 2: Choose how you want to create screenshots. Once inside the dashboard, you’ll see two options: Start from scratch or Use pre-designed templates. For most developers, templates are much faster. They reduce manual work and already follow App Store-compliant layouts, which is what we will focus on.
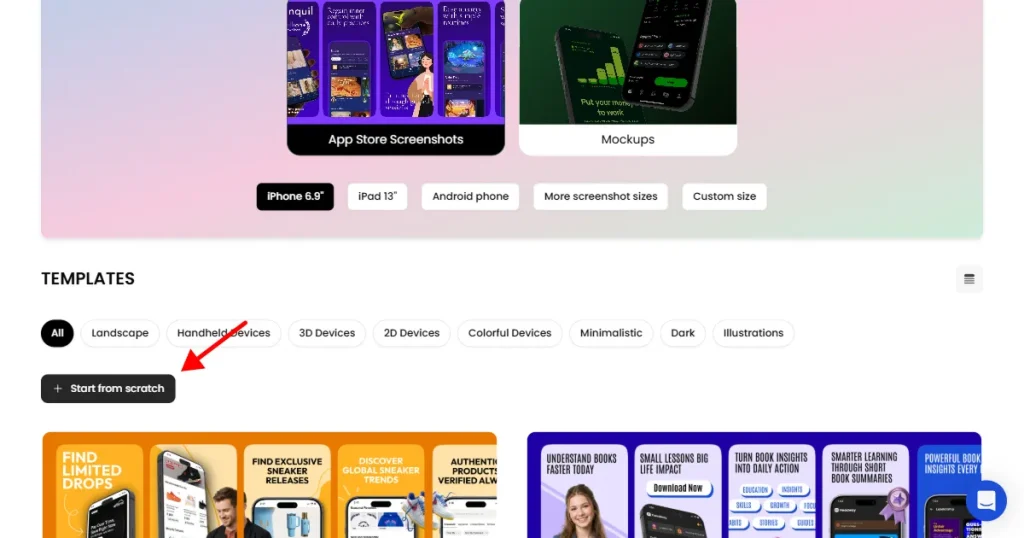
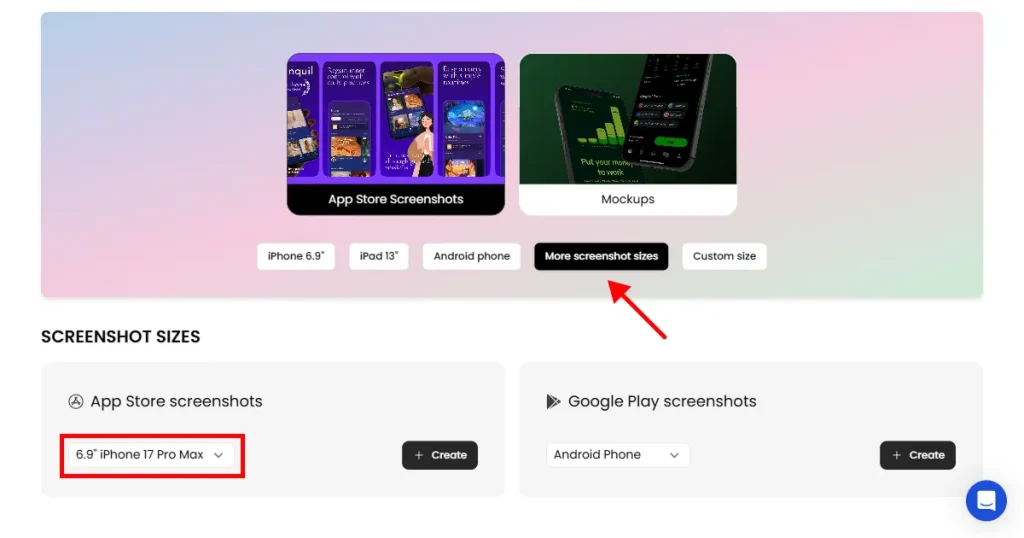
Step 3: Choose an iPhone or iPad device. AppLaunchpad supports the latest iPhone models by default, and if you want older device models, you can easily select them using the More app store screenshot sizes option.
Step 4: Select a template. Once you have selected a device, browse templates and choose one that matches your app’s category or style. If you’re using a free plan, look for templates labeled “free.”
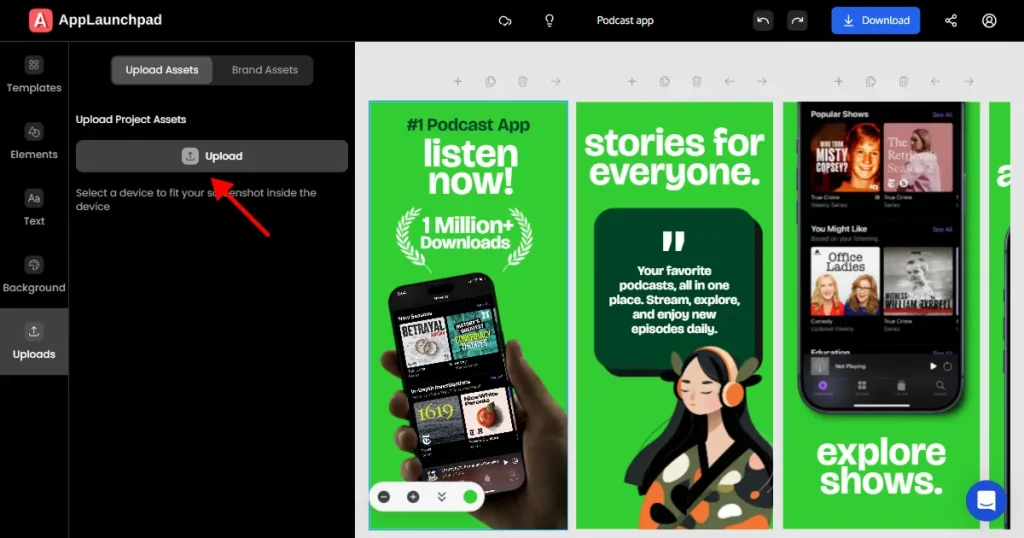
Step 5: Upload your app screens. Once inside the editor, start customizing the selected template. Upload your app screens under the Uploads tab and place them into each screenshot frame.
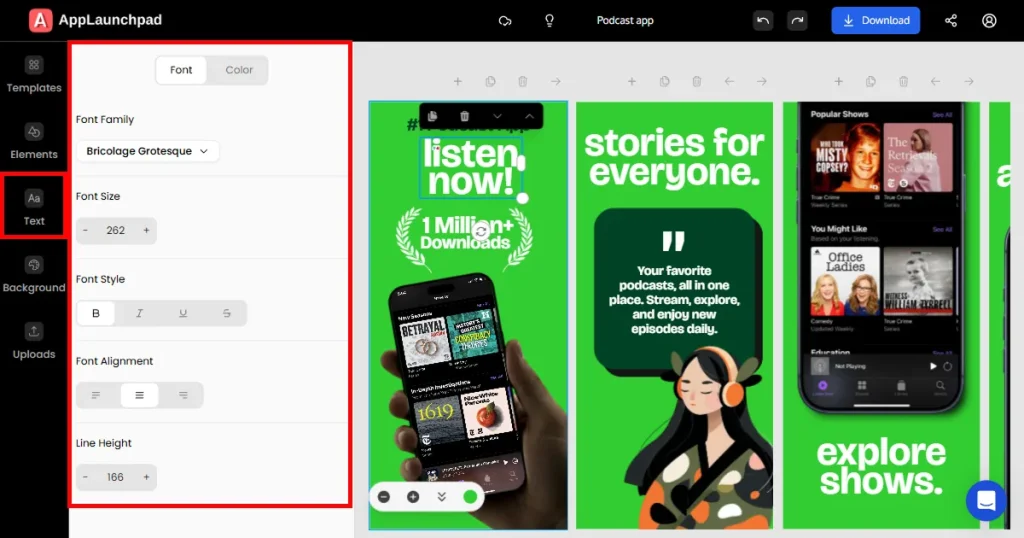
Step 6: Add, remove, or edit text inside the template under the Text tab. Customize font size, alignment, and spacing for better readability.
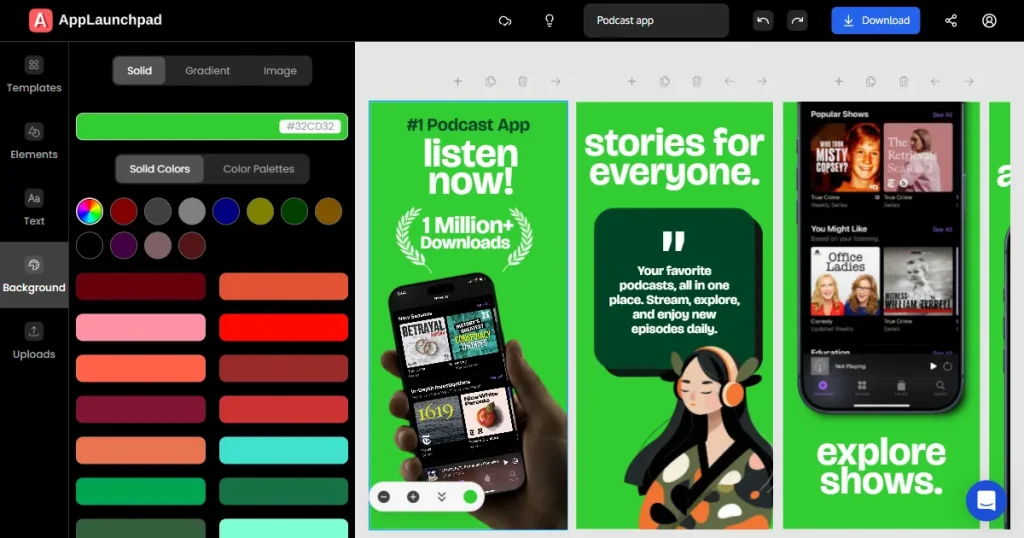
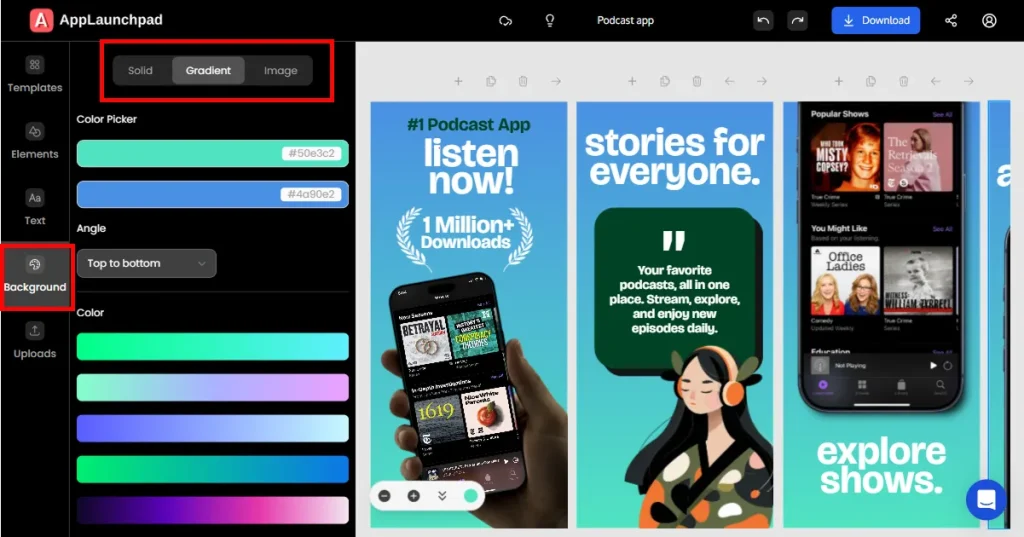
Step 7: Apply background customization if needed. Click on the Background tab and choose a background color, gradient, or upload a background image.
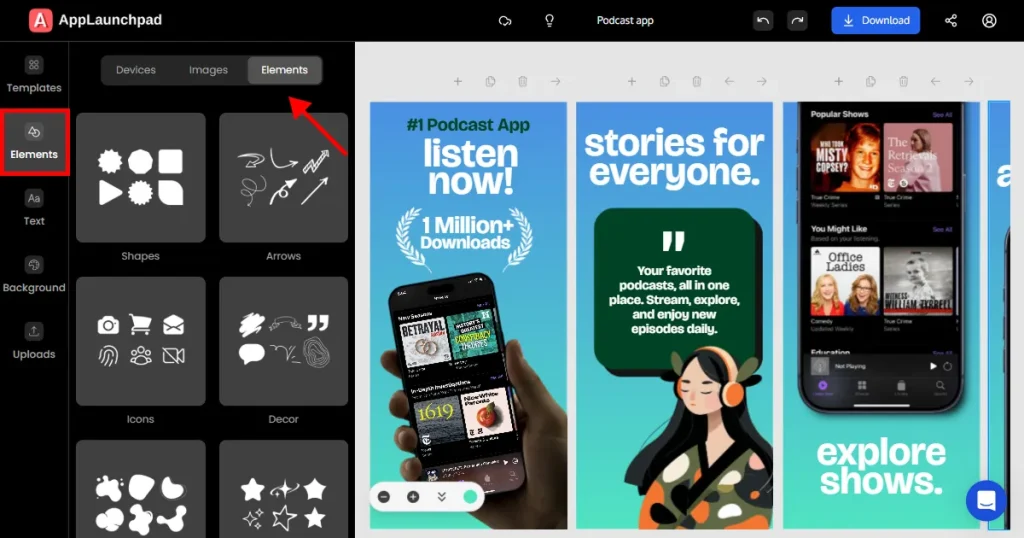
Step 8: Add design elements. Add extra elements like App Store or Google Play badges, App icons, Illustrations, or design elements. You will find design elements inside the Elements tab.
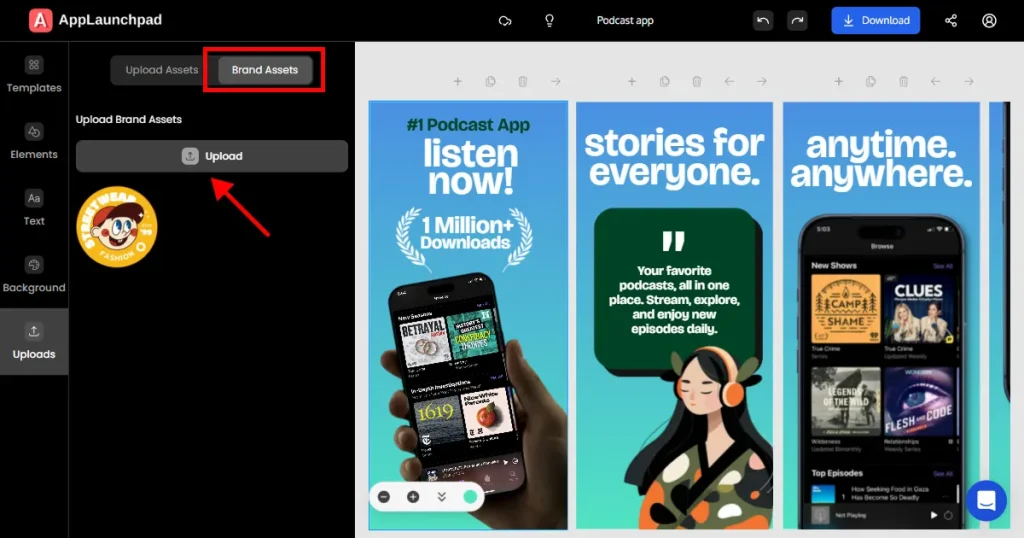
You can also add brand assets, such as the brand logo.
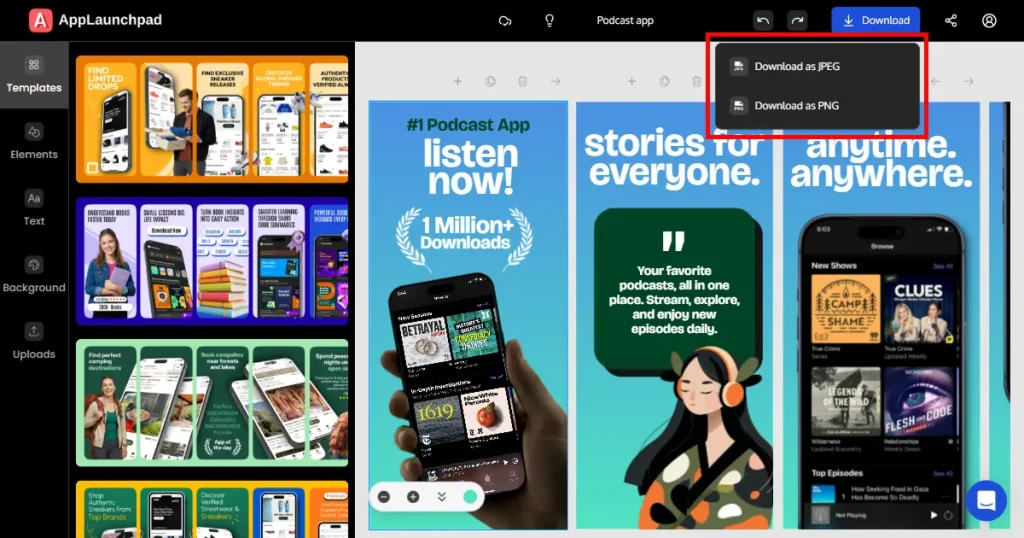
Step 9: Export your screenshots as JPG or PNG. After all editing is done, click on the Download button and select JPG or PNG format. Screenshots will be downloaded as a ZIP file to your local computer.
Note: All projects are automatically saved. You can return at any time to make edits or revisions without starting over.
App Store screenshots play a significant role in how users perceive your app and whether they decide to install it. Clear benefit-focused messaging, readable text, and consistent visuals can make all the difference. Many guides explain how to create app store screenshots in Figma, but few mention the time investment required.
As apps grow and updates are needed more frequently, creating manual app store screenshots in Figma can slow teams down. This is where developers switch to a purpose-built screenshot tool like AppLaunchpad.
Regardless, the right choice depends on your workflow. If you enjoy hands-on control and are already familiar with Figma, using app store screenshot templates in Figma is the right option.
If speed, scale, and compliance are your expectations, AppLaunchpad is a better option. The key is to treat app store screenshots as a growth asset, not a mandate, and choose the tool that doesn’t give you second thoughts.
At first glance, Figma appears cheaper because you can start for free. But the real cost is time. AppLaunchpad, on the other hand, is priced based on features and results ($15/month billed annually). You pay to get App Store-ready screenshots faster, with no design skills and fewer redos.
AppLaunchpad offers a few unique features, such as smart cloning and AI-powered localization. Cloning makes it easy to create variations of a single screenshot on various devices, while localization helps you translate your app screenshots into multiple languages.
Figma works well for developers with some design comfort or teams that already use it for UI work. For beginners or solo founders, the learning curve can slow things down. Simple edits, such as spacing or alignment, may take longer than expected. Figma is fine for one-time launches, but frequent updates can quickly get out of hand.
Yes, the Figma Community offers several free app store screenshot template options that you can duplicate to your workspace. Moreover, AppLaunchpad also provides free templates that speed up the creation of app store-compliant screenshots.
In Figma, you need to manually check whether the screenshots meet app store guidelines, but AppLaunchpad ensures that all its templates are app store guideline-compliant. You can also use AppLaunchpad’s clone feature to instantly recreate your design across all required dimensions automatically.
Log in to Figma and find a free app store screenshot template in the Community. Once added, swap placeholders with your app screens and update the headlines. Finally, customize colors and backgrounds before exporting as a PNG or JPG for App Store Connect.
Yes! AppLaunchpad is a superior alternative to Figma when it comes to app store screenshots, because it was designed specifically to create high-converting app store visuals.
Localization in Figma requires duplicating frames and manually editing text for each language, or using a localization Plugin (external tool). AppLaunchpad simplifies this process with one-click AI-powered localization.