Step by Step Guide to Upload an App to Google Play Store
Step by Step Guide to Upload an App to Google Play Store
Learn how to upload your app to the Google Play Store with this step-by-step guide. From account setup to publishing, get your app live effortlessly.

Introduction
Getting your app on the Google Play Store is a crucial step in reaching millions of Android users worldwide. It's the most popular app store, and having your app there means more visibility, more downloads, and more success for your project.
By the end of this guide, you'll have a clear understanding of how to upload your app to the Google Play Store. You'll learn each step of the process, from preparing your app for submission to hitting that final publish button.
Here's a brief look at the steps we'll cover. First, we'll prepare your app and set up a Google Play developer account. Next, we'll configure your app's listing, including its title, description, and visuals.
Then, we'll upload the APK file and provide the necessary details for publishing. Finally, we'll go through the review and release process to get your app live on the Play Store. Each step will be detailed to ensure you don't miss anything important.
Step 1: Prepare Your App
1. Finalize App Development
- Complete Development: Make sure all features and functionalities you planned are implemented. Your app should be fully functional and ready for use.
- Thorough Testing: Test your app extensively. Check for any issues or bugs on different devices and operating systems. Make sure everything works as expected.
2. Perform Beta Testing to Gather Feedback and Fix Bugs
- Select Beta Testers: Choose a small group of users to test your app. These can be friends, family, or members of your target audience. - Collect Feedback: Ask your beta testers for detailed feedback on their experience using your app. Pay attention to any problems or suggestions they have.
- Fix Bugs: Use the feedback to identify and fix any bugs or issues. Make improvements based on the suggestions to enhance the user experience.
Step 2: Set Up a Google Play Developer Account
1. Creating a Google Play Developer Account
- Create a new Google account if you don’t already have one: If you don't already have a Google account, you will need to create one. Go to the Google Sign-Up page and fill in the required details such as your name, desired email address, and password. Follow the prompts to complete the sign-up process.
- Go to Google Play Console & sign up: Once you have your Google account. Visit the Google Play Console website. Sign in using your Google account credentials. This is where you will manage your app’s presence on the Google Play Store.
- Provide necessary details: You will be prompted to provide some essential information. Fill in your name, email address, and organization details if applicable. Make sure the information you provide is accurate and up-to-date.
- Pay the one-time registration fee ($25): To complete the registration process, you will need to pay a one-time fee of $25. This fee is non-refundable and can be paid using a credit or debit card. Enter your payment details and confirm the payment.
- Wait for account approval: After you have submitted your information and paid the registration fee, Google will review your application. The app review process can take up to 48 hours. Once your account is approved, you will receive a confirmation email. You can then start publishing your app on the Google Play Store.
2. Create a Google Merchant Account
- If you plan to sell paid apps or offer in-app purchases, you need to create a [Google
- Merchant Account. This account is essential for handling all financial transactions and payments related to your app.
- Visit Google Merchant Center: Go to the Google Merchant Center website and sign in with your Google account.
- Provide Business Information: Fill in the required details such as your business name, address, and contact information. Ensure that all information is accurate and up-to-date.
- Set Up Payments Profile: Follow the instructions to create a payments profile. This will involve entering your bank account details and other financial information necessary for receiving payments.
- Complete Verification: Google may require you to verify your business information. Follow any additional steps to complete this verification process.
3. Link the Merchant Account to the Developer Account
- Access Google Play Console: Once your Merchant Account is set up, log in to your Google Play Developer Account by visiting the Google Play Console.
- Navigate to Financial Settings: Go to the "Setup" section and click on "Payments profile" under "Financials." This is where you can link your Merchant Account to your Developer Account.
- Link the Accounts: Follow the instructions to link your Merchant Account to your Developer Account. This step is crucial to ensure that all financial transactions related to your app, such as payments for app purchases and in-app purchases, are properly managed and tracked.
- Verify the Link: After linking, check that the accounts are correctly connected. This ensures that payments from users will be processed smoothly and deposited into your bank account.
Step 3: Create App on Google Play Console
1. Access the Dashboard
- Open the Dashboard: Once logged in, you will see the Google Play Console dashboard.
- Select "All apps": From the left-hand menu, click on "All apps."
- Click on "Create an app": Select the "Create an app" button to begin the app creation process.
2. Fill in the "Create App" Form
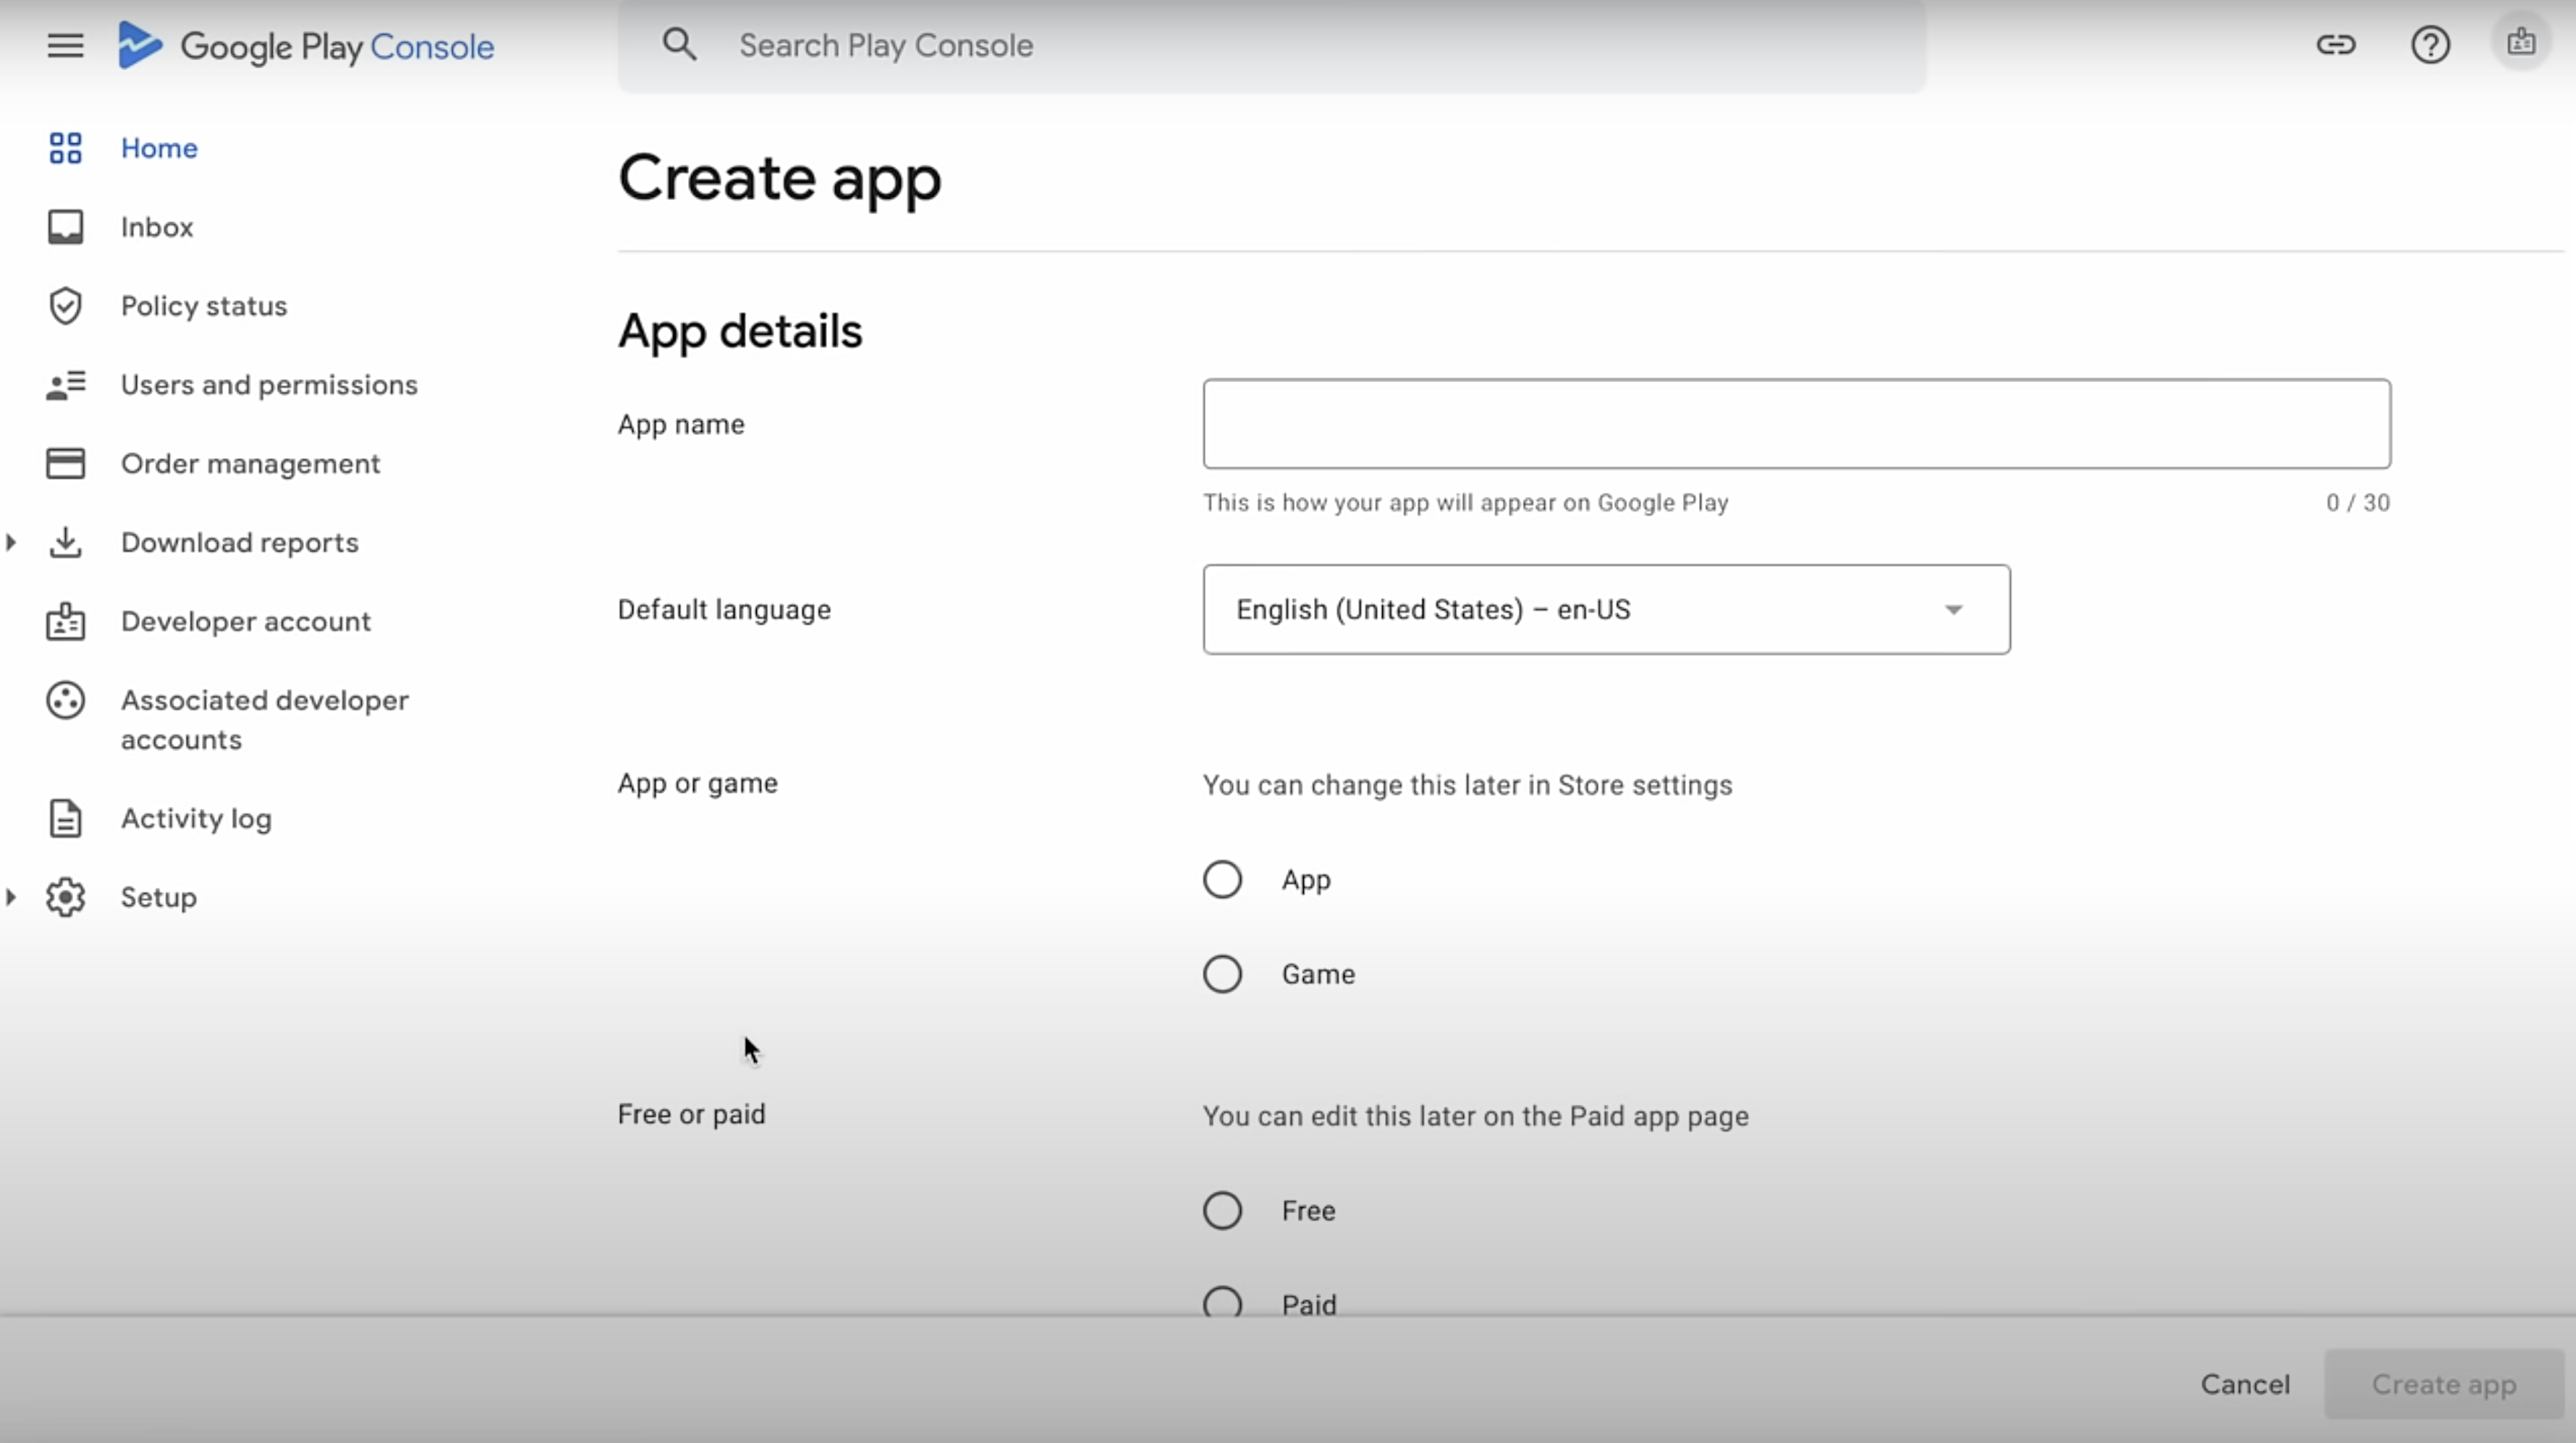
- Enter the App Name: Provide the name of your app in the appropriate field.
- Choose the Default Language: Select the default language that your app will use.
- Select App or Game: Indicate whether your app is an application or a game.
- Choose Free or Paid: Decide if your app will be free or paid. Note that if you choose free, you cannot change it to a paid app later.
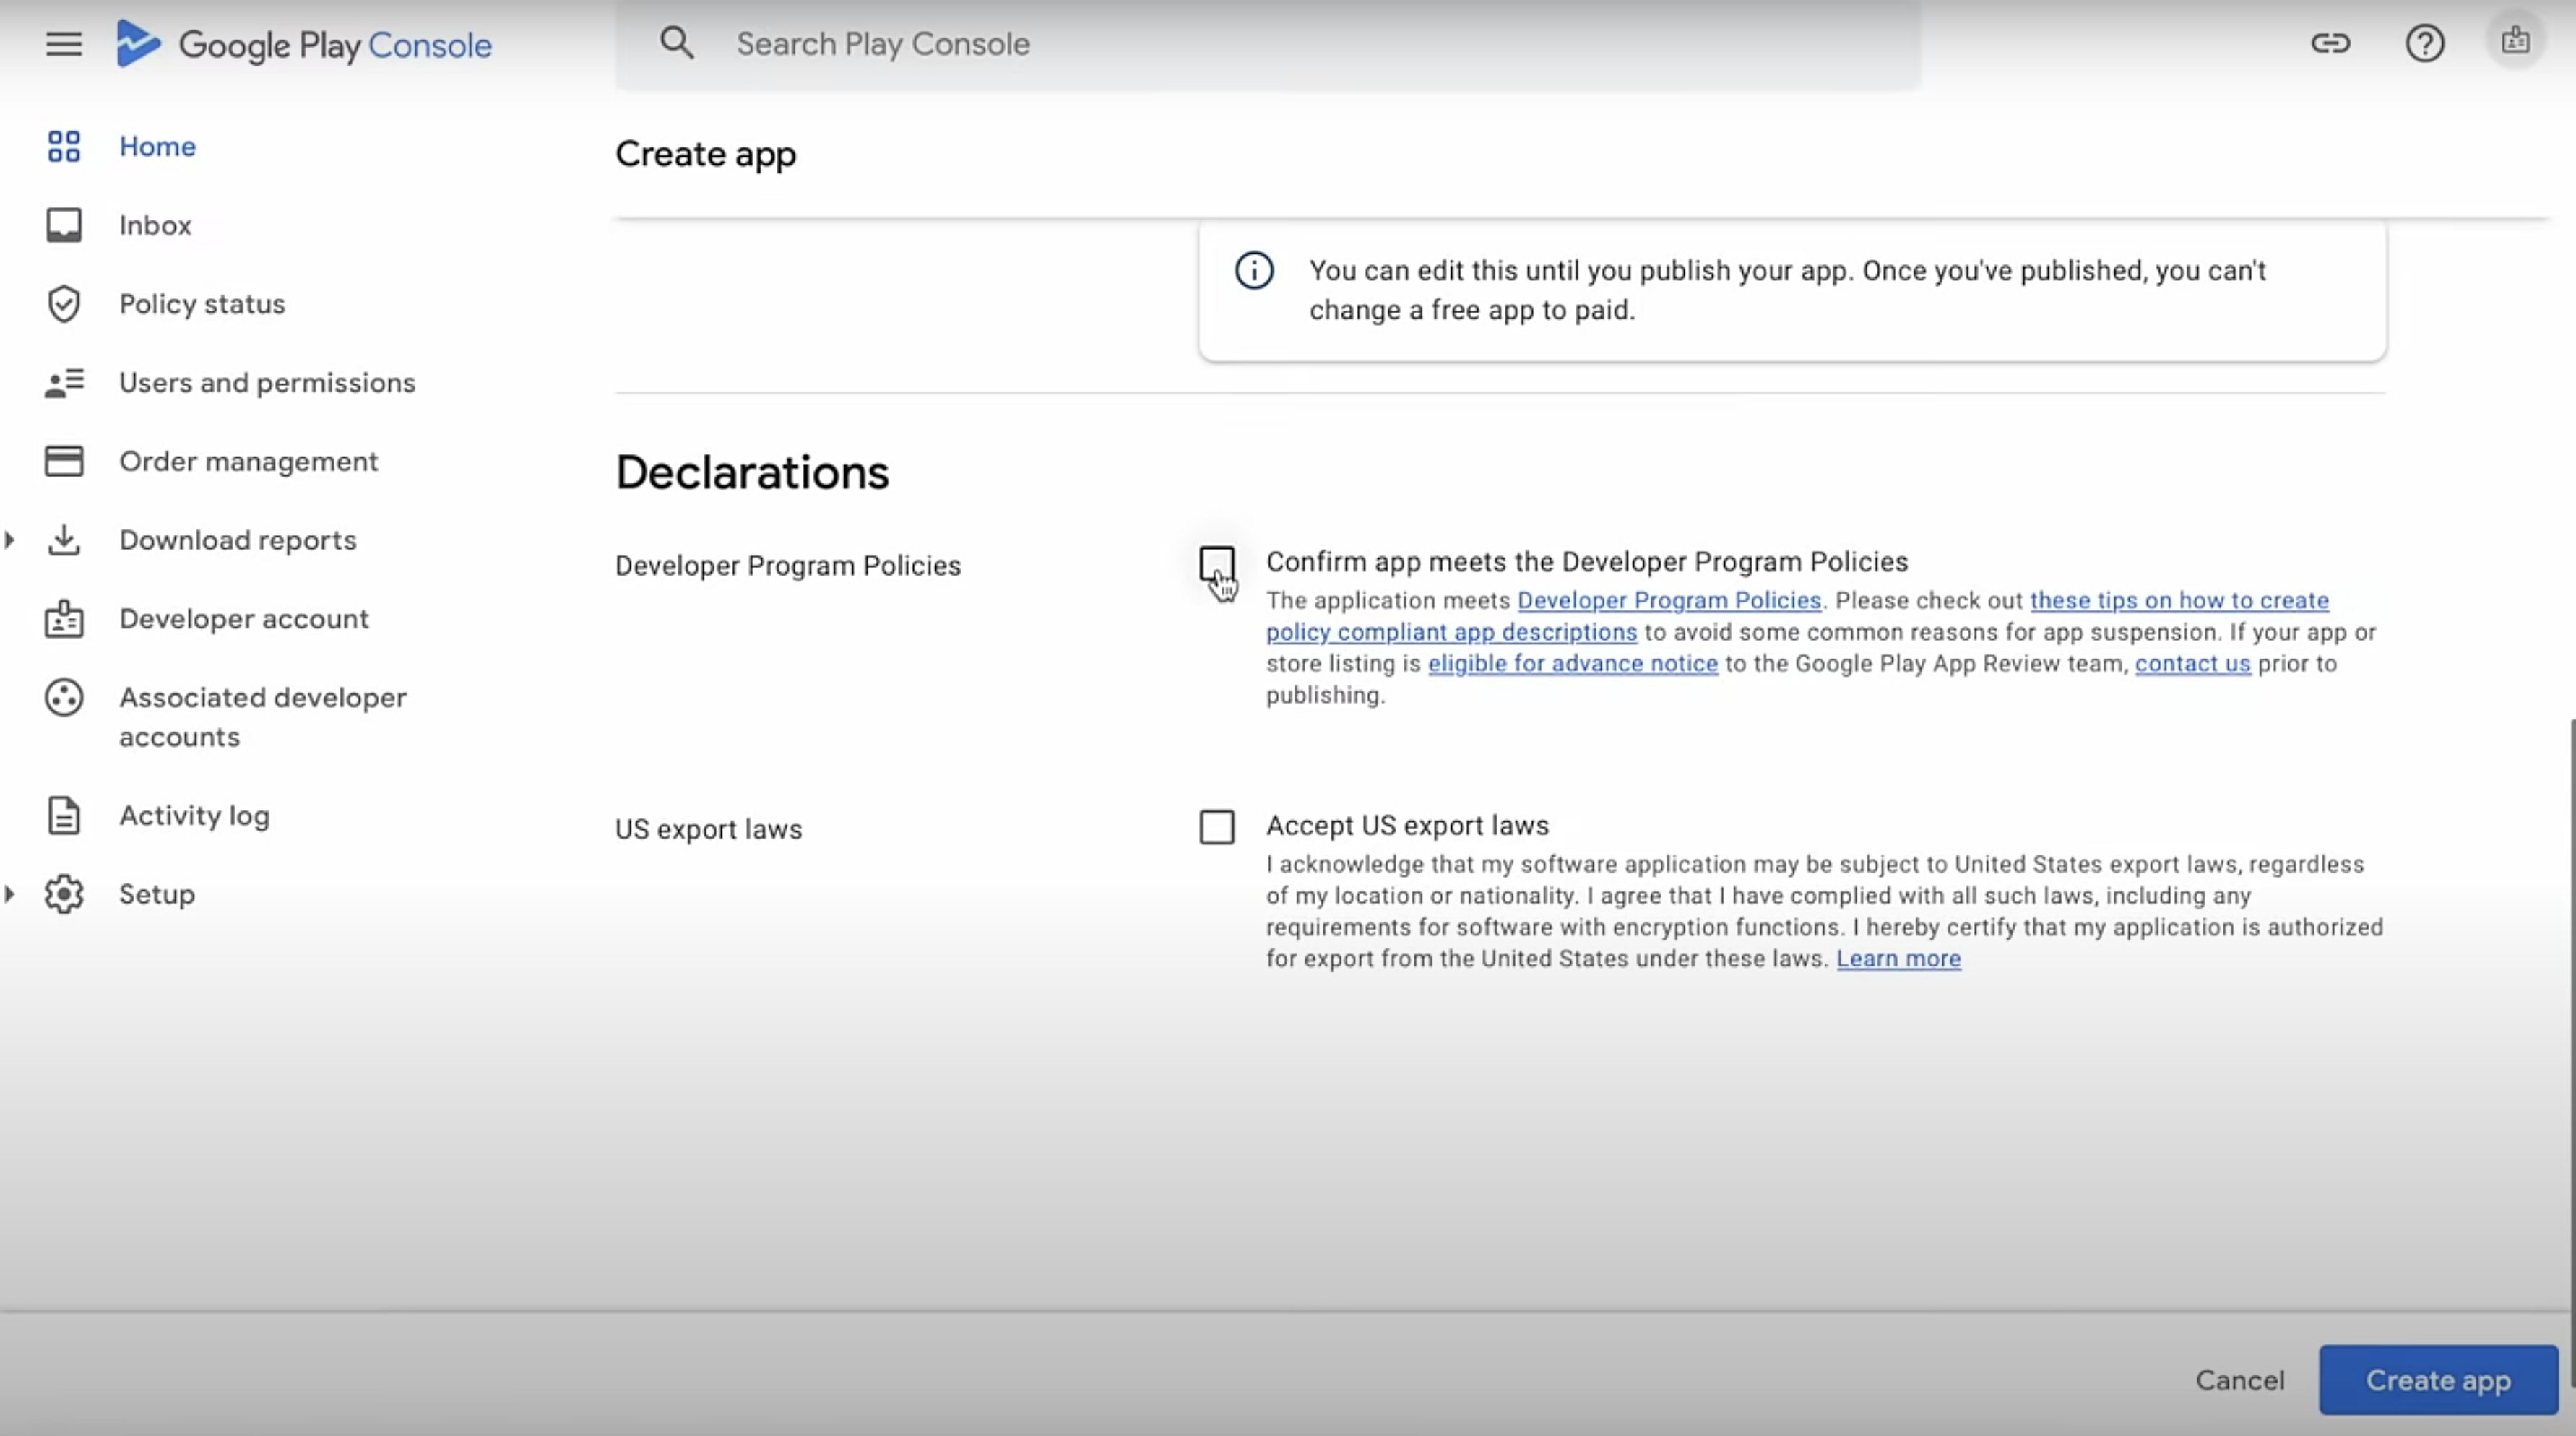
- Check Declarations: Review and check the necessary declarations to confirm that you agree with Google's terms and policies.'
3. Create the App
- Click "Create app": Once all details are filled in and declarations are checked, click the "Create app" button.
- Proceed with Configuration: Your app is now created in the Google Play Console, and you can move on to configuring and uploading your app.
Step 4: Set up App
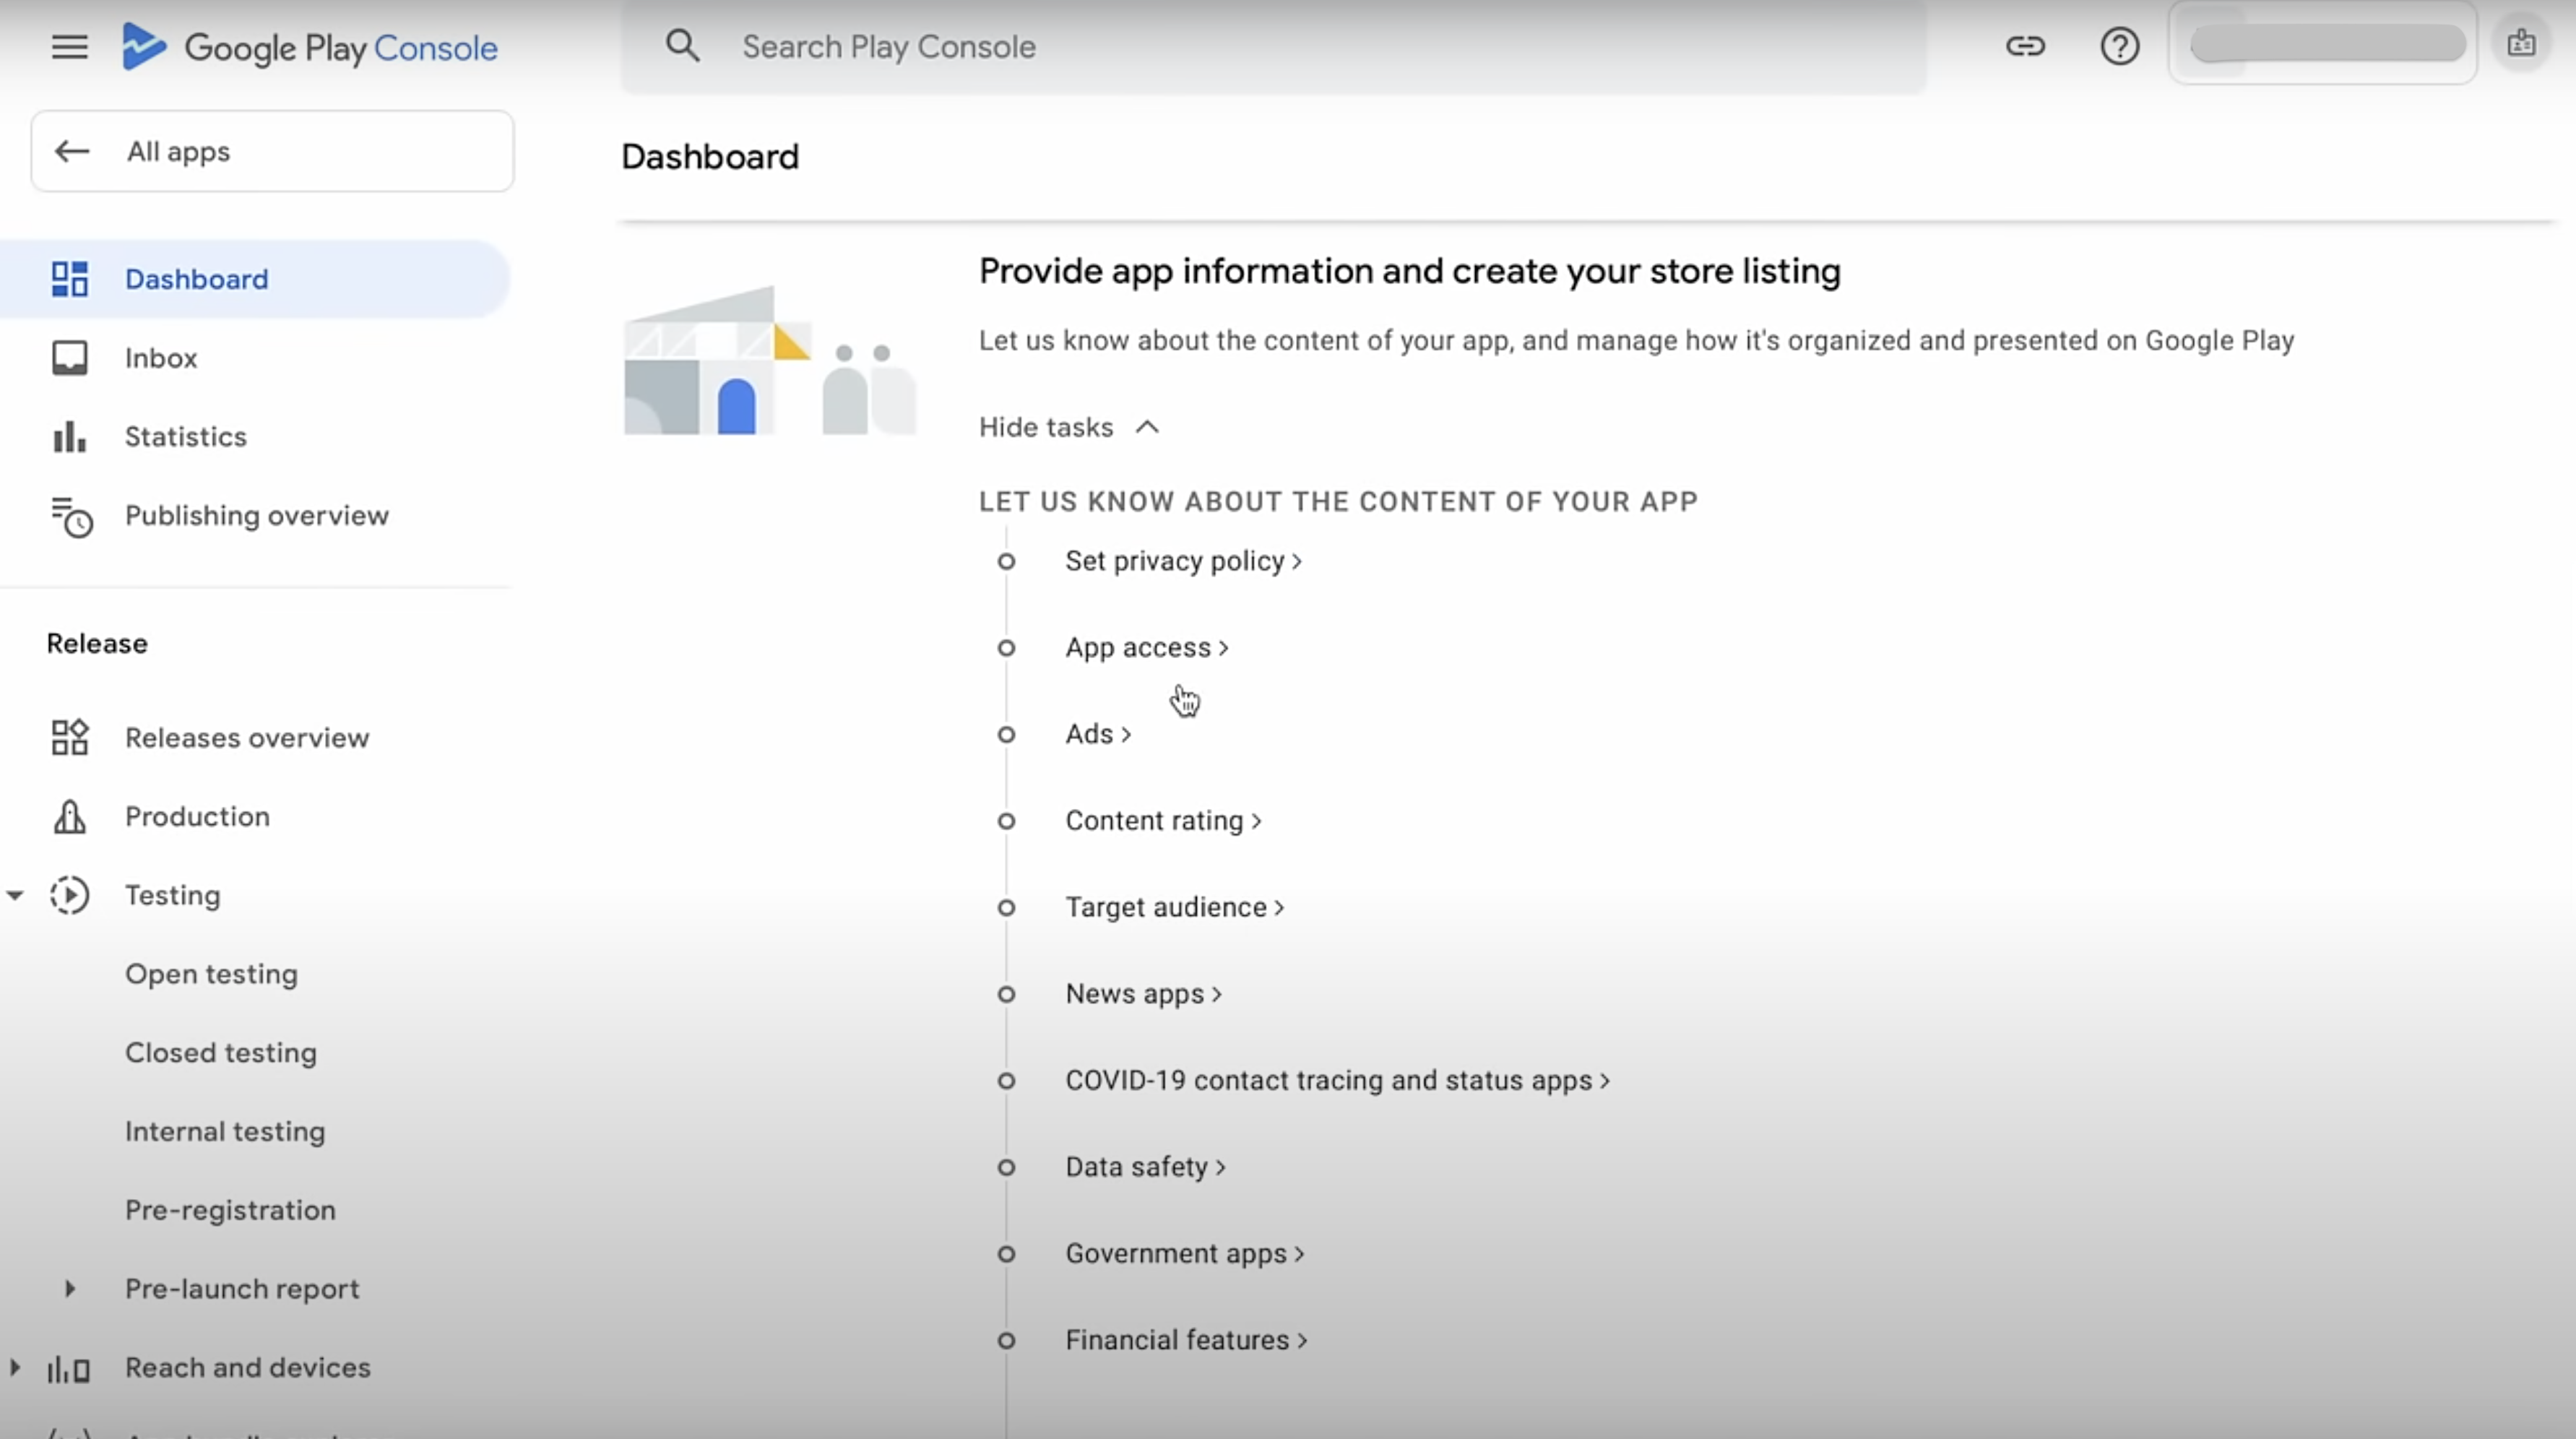
1. Specific Information
Google requires more detailed information to ensure your app meets their guidelines and to help users find it.
a. Privacy Policy
- Importance: Explain how you will handle user data.
- Templates and Legal Advice: If unsure, use online templates or consult a lawyer to draft a comprehensive privacy policy.
b. App Access
- Free or Paid: Decide if your app will be free or paid.
- In-App Purchases: If free, determine if you will offer in-app purchases.
c. Ads
- Declaration: Declare if your app will include ads.
- Transparency: Be honest; users appreciate knowing what to expect.
d. Content Rating
- Questionnaire: Complete a questionnaire about your app's content.
- Age Rating: Based on your answers, Google will assign an age rating to help users and parents determine if your app is suitable.
e. Target Audience
- Specify Audience: Indicate who your app is for (e.g., adults, children, both).
- Impact: This affects how Google categorizes and displays your app.
f. News Apps
- Special Guidelines: Follow special guidelines to ensure accuracy and transparency.
g. COVID-19 Contact Tracing and Status Apps:
- Strict Requirements: Comply with all necessary health and privacy regulations due to the sensitive nature of these apps.
h. Data Safety
- Transparency: Clearly state what data your app collects and how it will be used.
- User Concerns: Be transparent, as users are increasingly concerned about their data privacy.
i. Government Apps
- Verification: Provide verification of your authority to represent the government entity.
j. Financial Functions
- Regulations Compliance: Comply with financial regulations if your app deals with money (e.g., banking, investment).
- Additional Documentation: You may need to provide extra documentation to meet regulatory requirements.
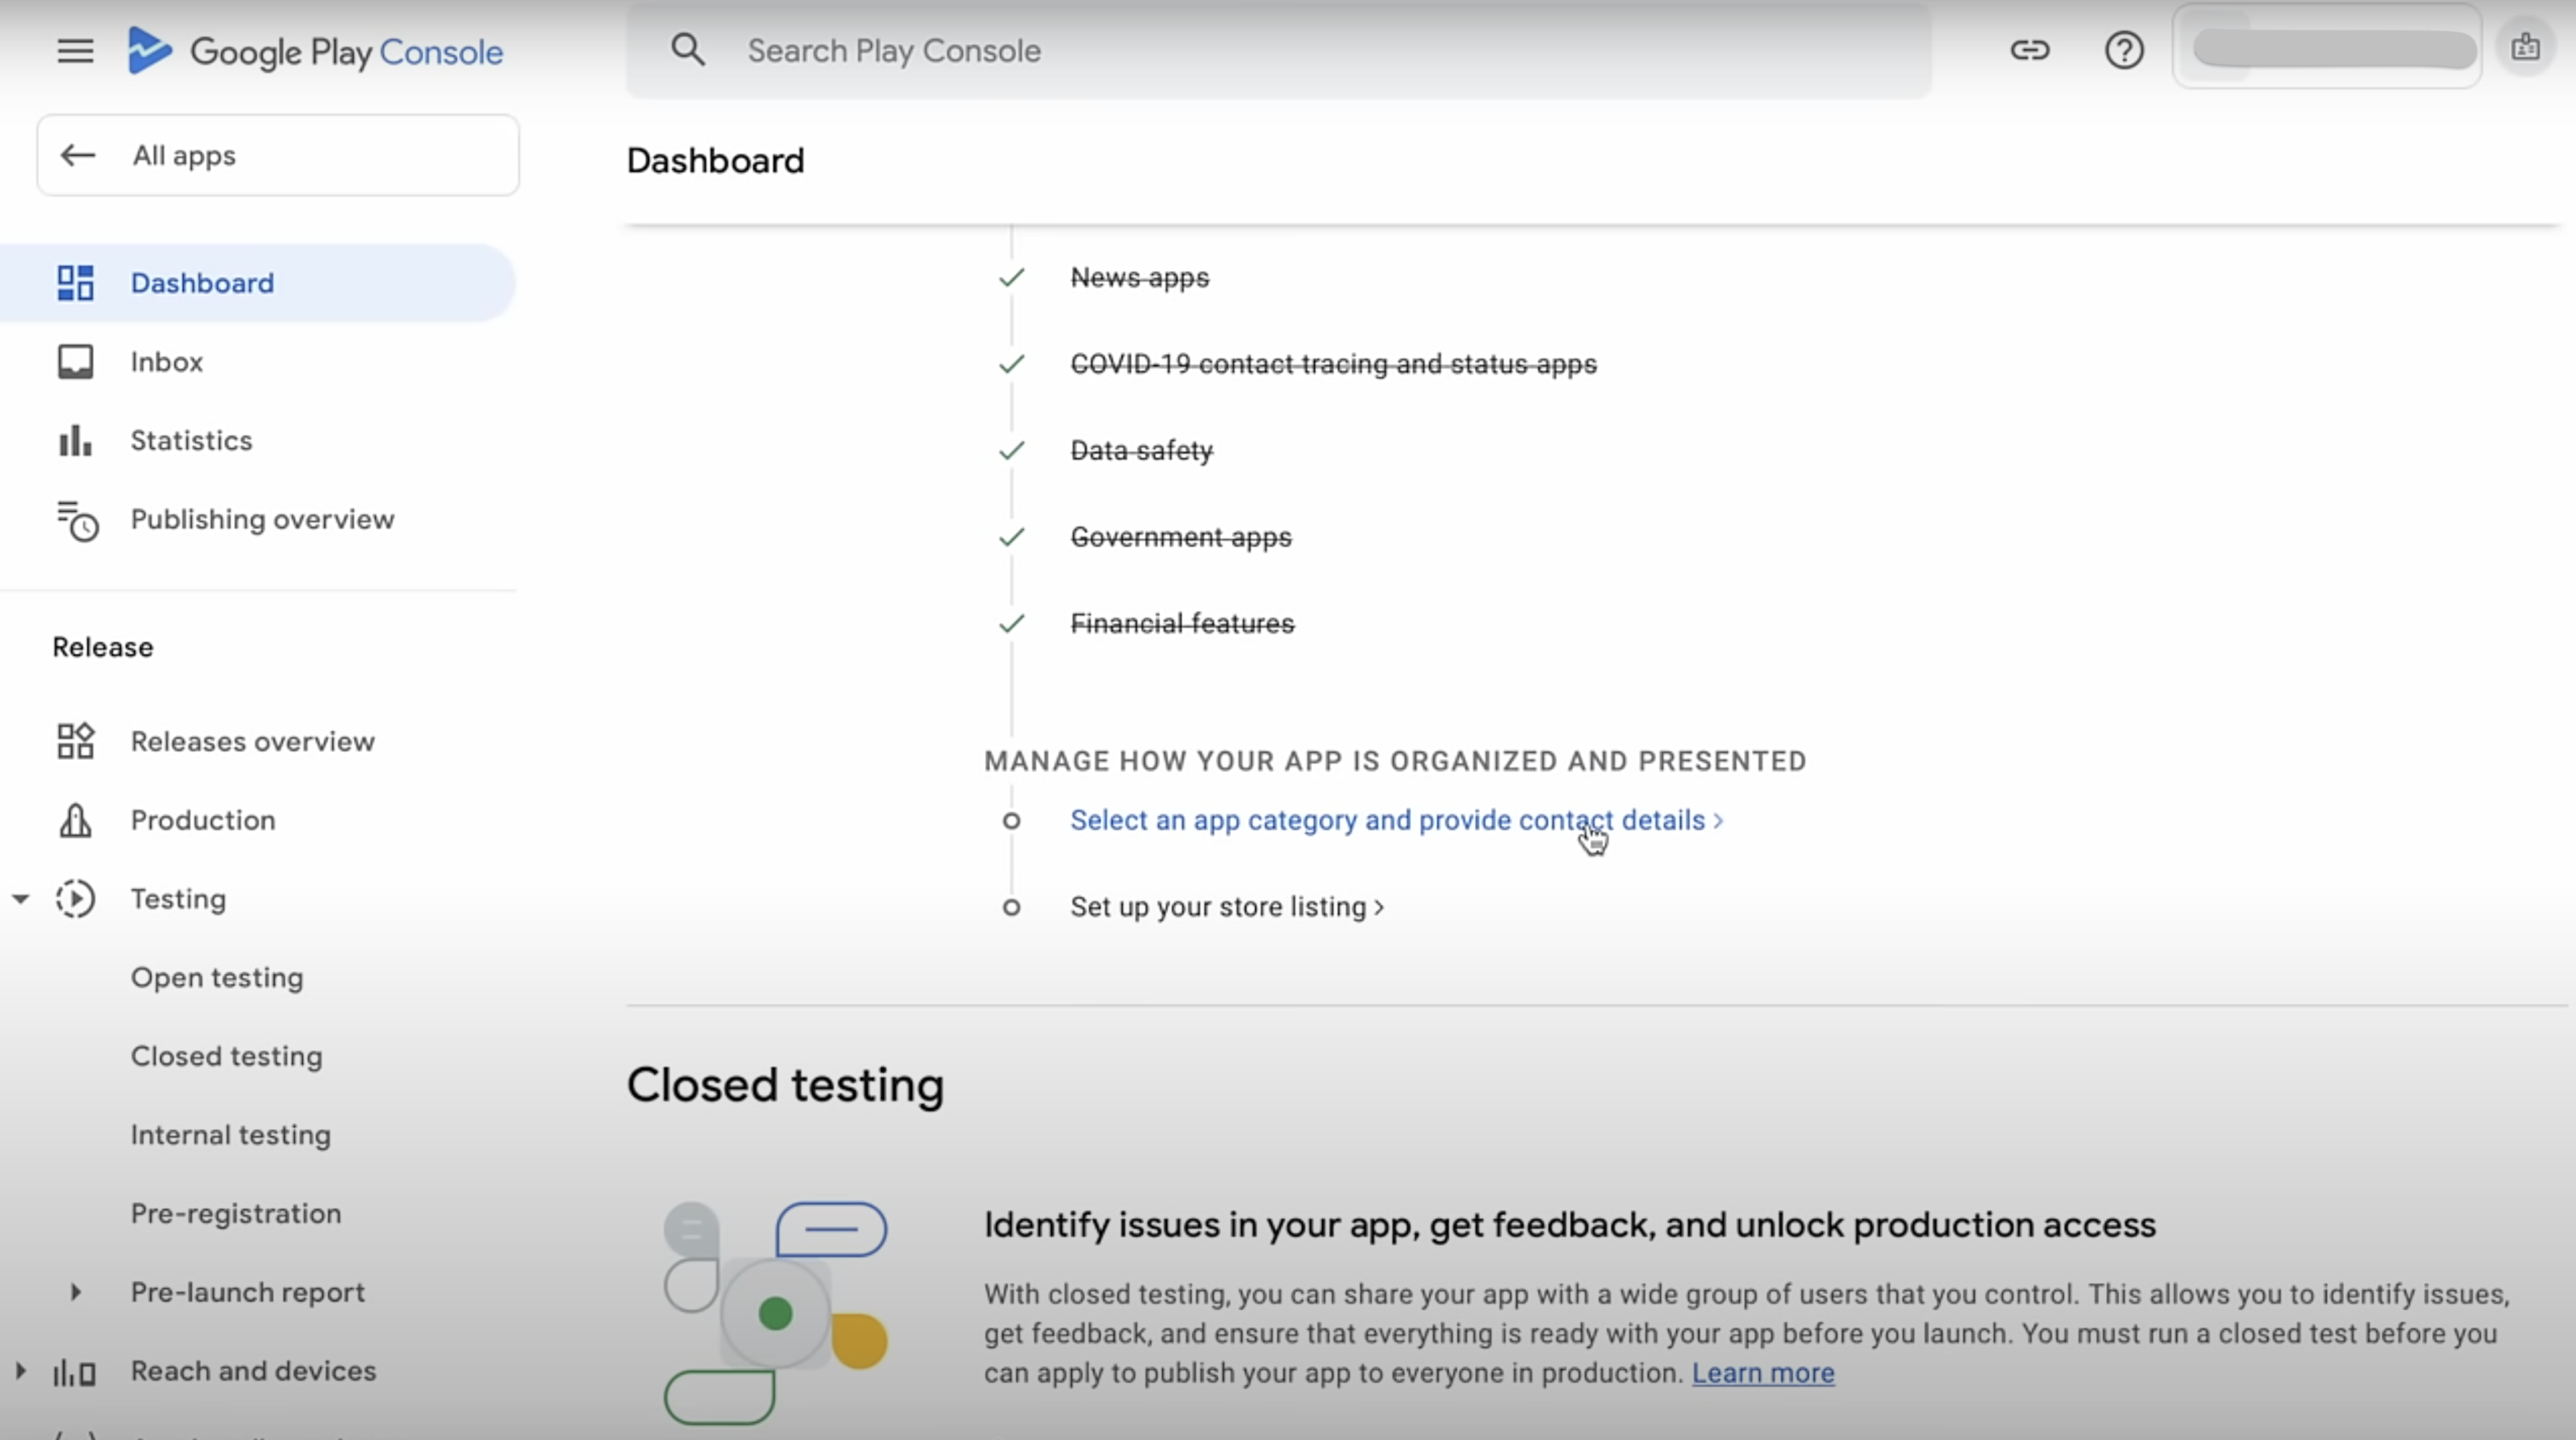
2. Under the "Manage how your app is organized and presented" Section
a. Select an App Category and Provide Contact Detail
- Choose the most relevant category for your app from the list provided. This helps users find your app more easily and ensures it appears in the right section of the Google Play Store.
- Provide accurate contact details, including your email address, phone number, and website. This information is crucial for user support and trust.
b. Click on “Set up your store listing” and fill up the form regarding your app
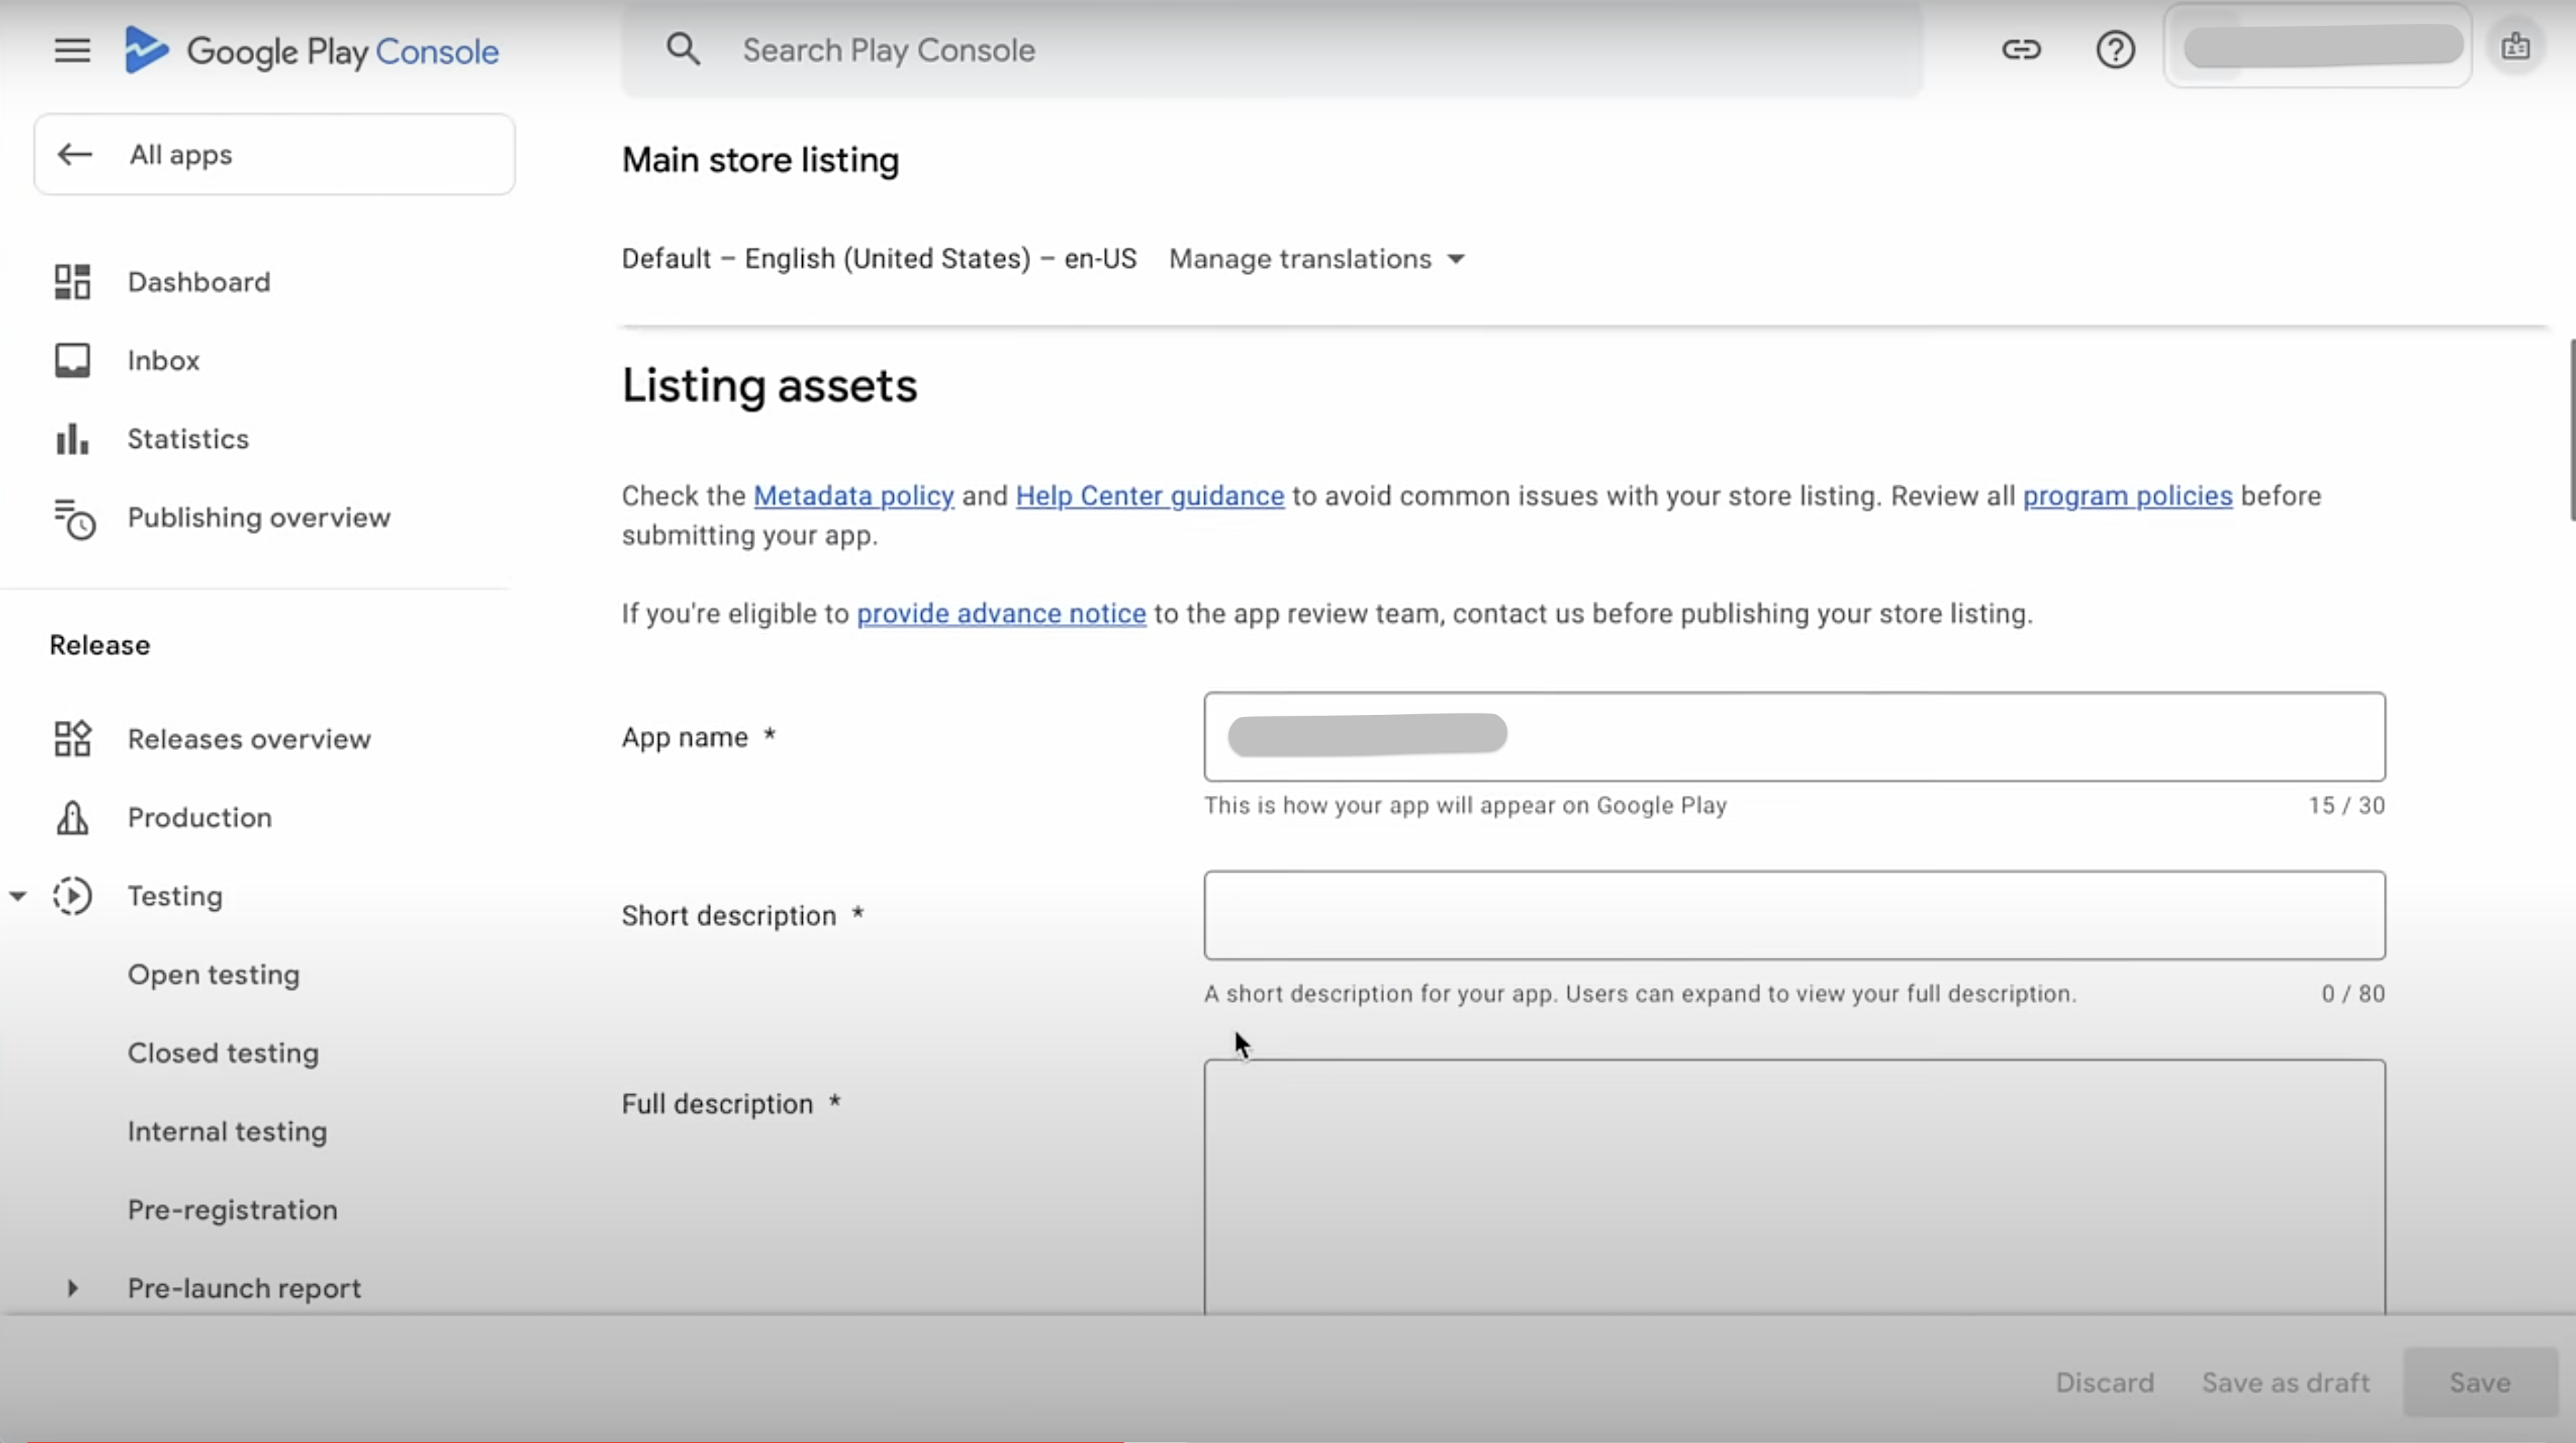
Under “Listing assets” fill up
- App Name: Enter the name of your app. This is the name users will see on the Google Play Store.
- Short Description: Write a concise, 80-character-long description of your app. This brief text should quickly convey the main benefit or purpose of your app.
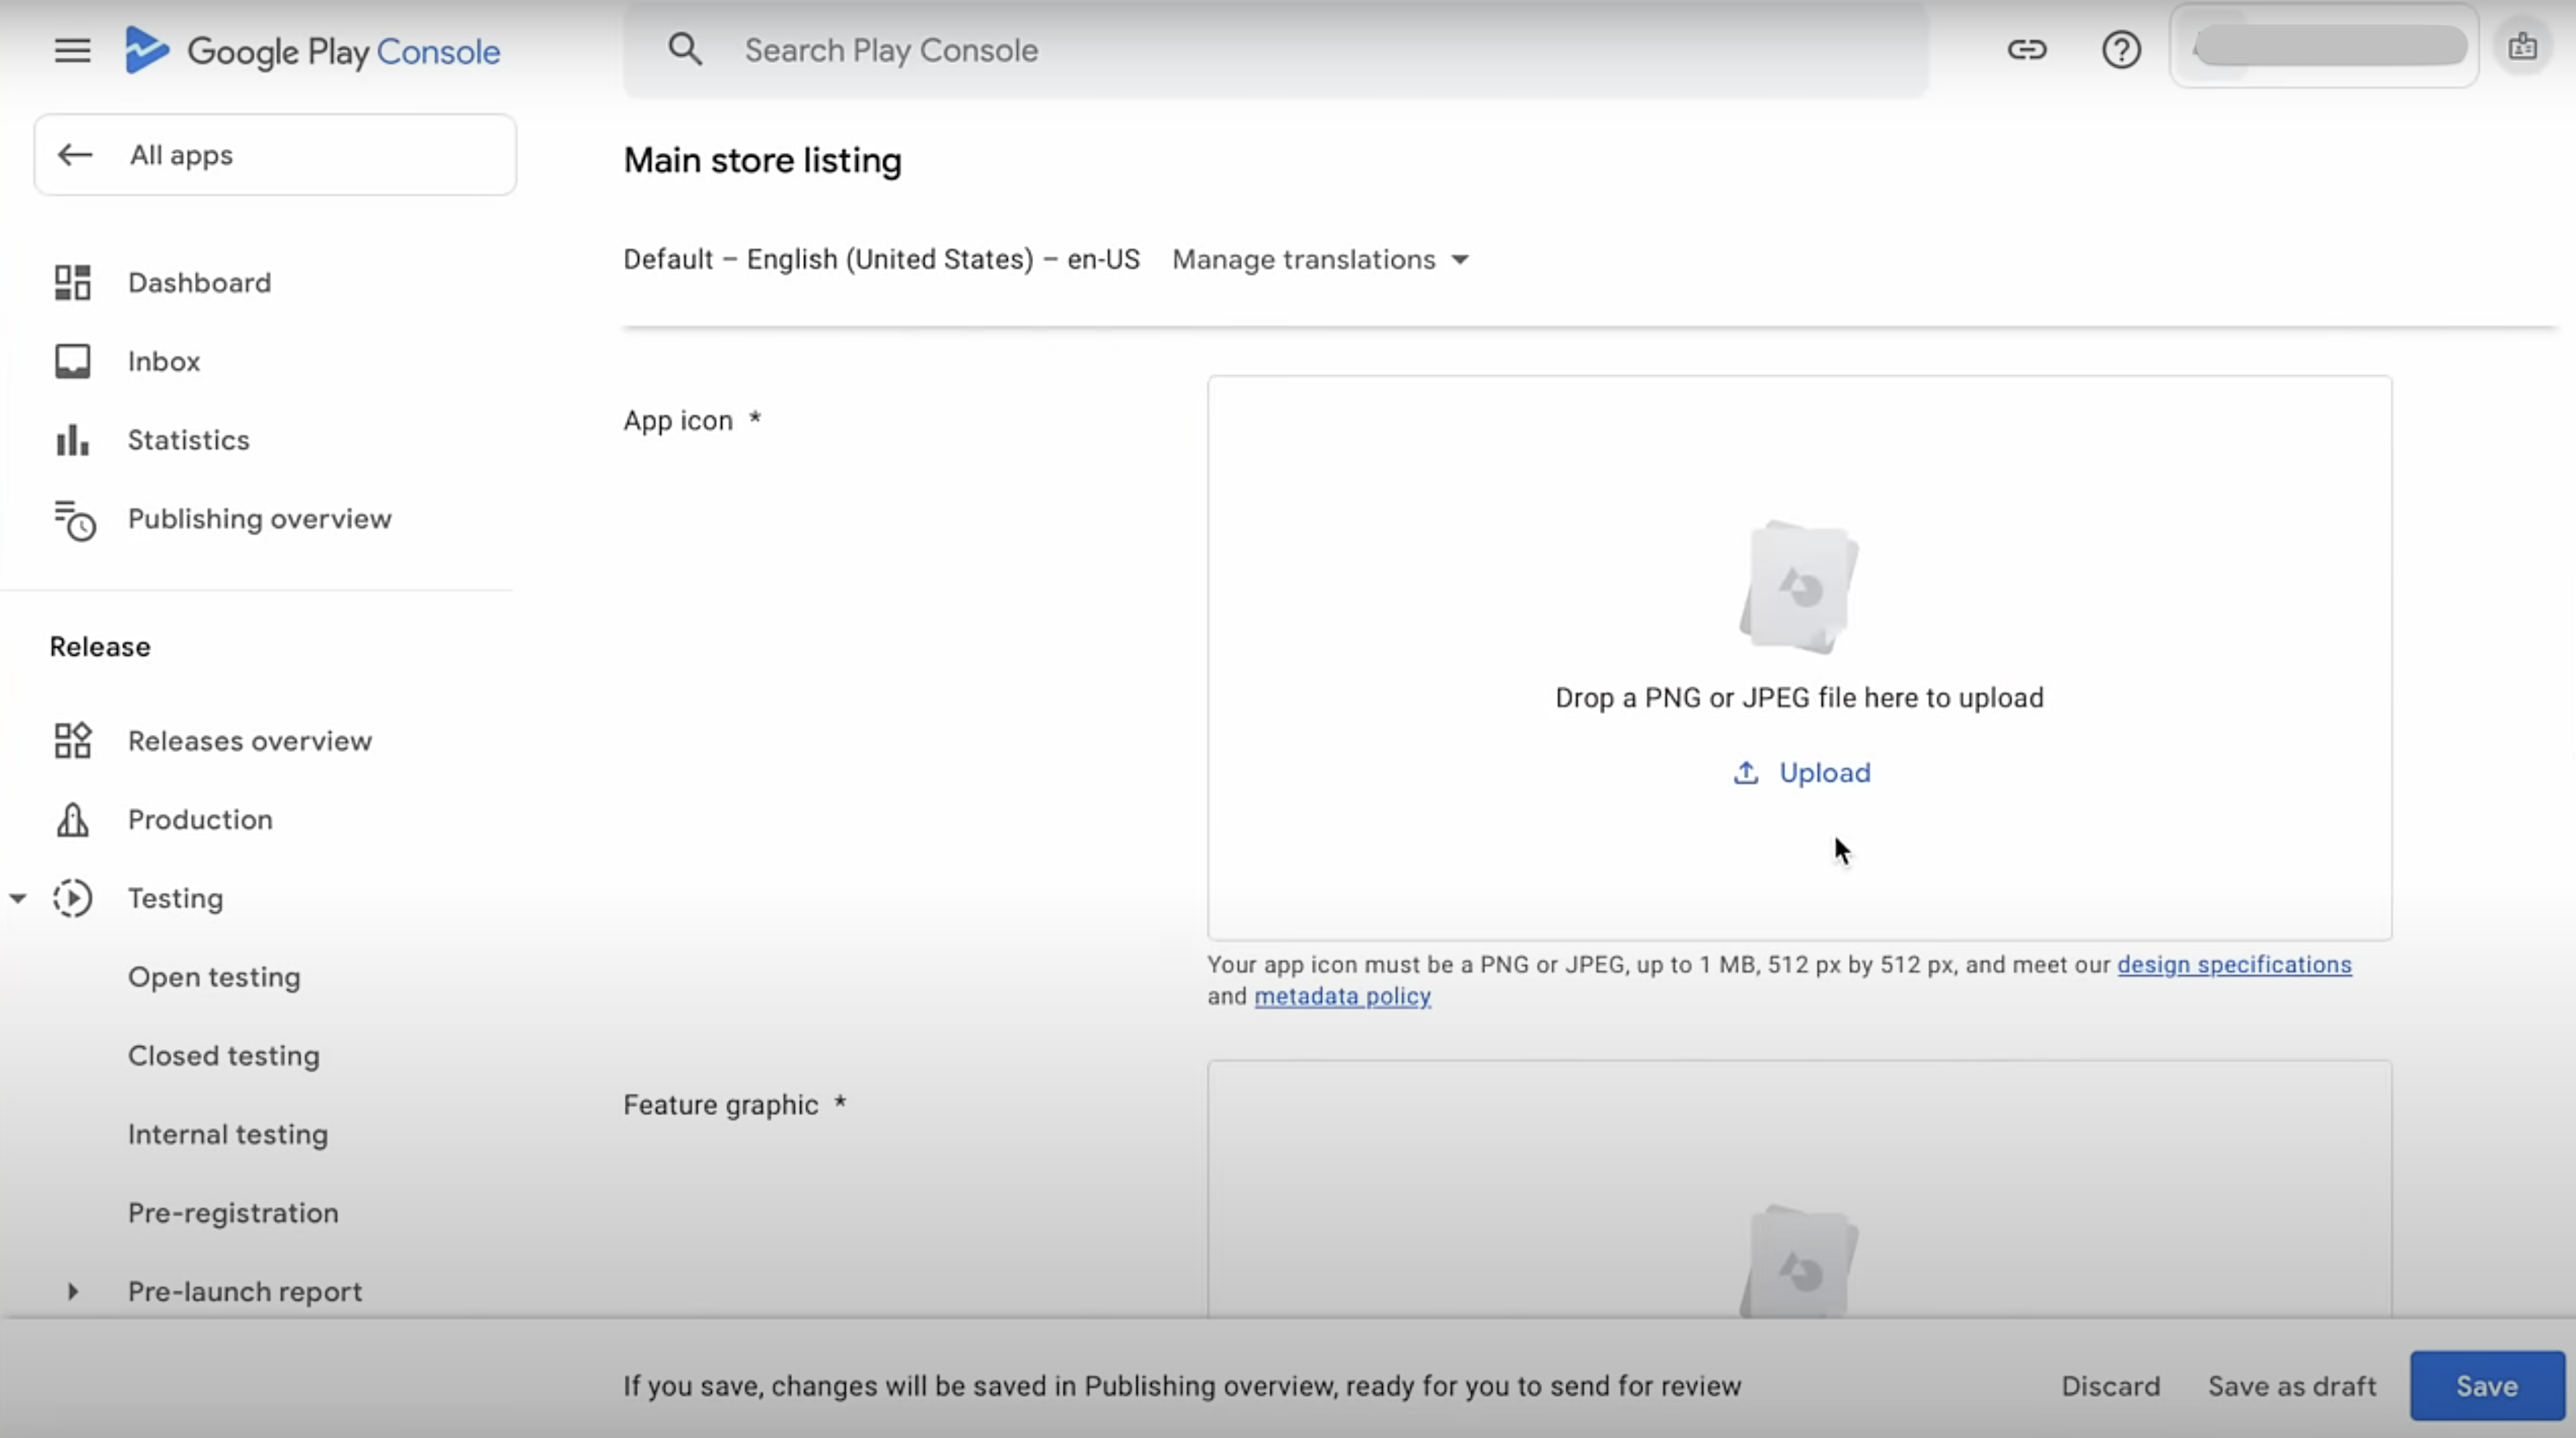
Under “Graphics” section
- App Icons: Upload a high-quality app icon in JPG or PNG format, up to 1 MB in size, with dimensions of 512 x 512 pixels. This icon is the first visual impression users will have of your app.
- Feature Graphics: Add a feature graphic in JPG or PNG format, up to 15 MB in size, with dimensions of 1024 x 500 pixels. This image is displayed at the top of your store listing and should be visually appealing.
- Video (Optional): You can include a promotional video by entering a YouTube URL. Ensure the video is public or unlisted and ads are turned off to provide a smooth viewing experience for users.
- Full Description: Provide a detailed description of your app, up to 4000 characters. Use this space to explain your app’s features, benefits, and unique selling points. Make sure to include targeted keywords to improve your app’s visibility in search results.
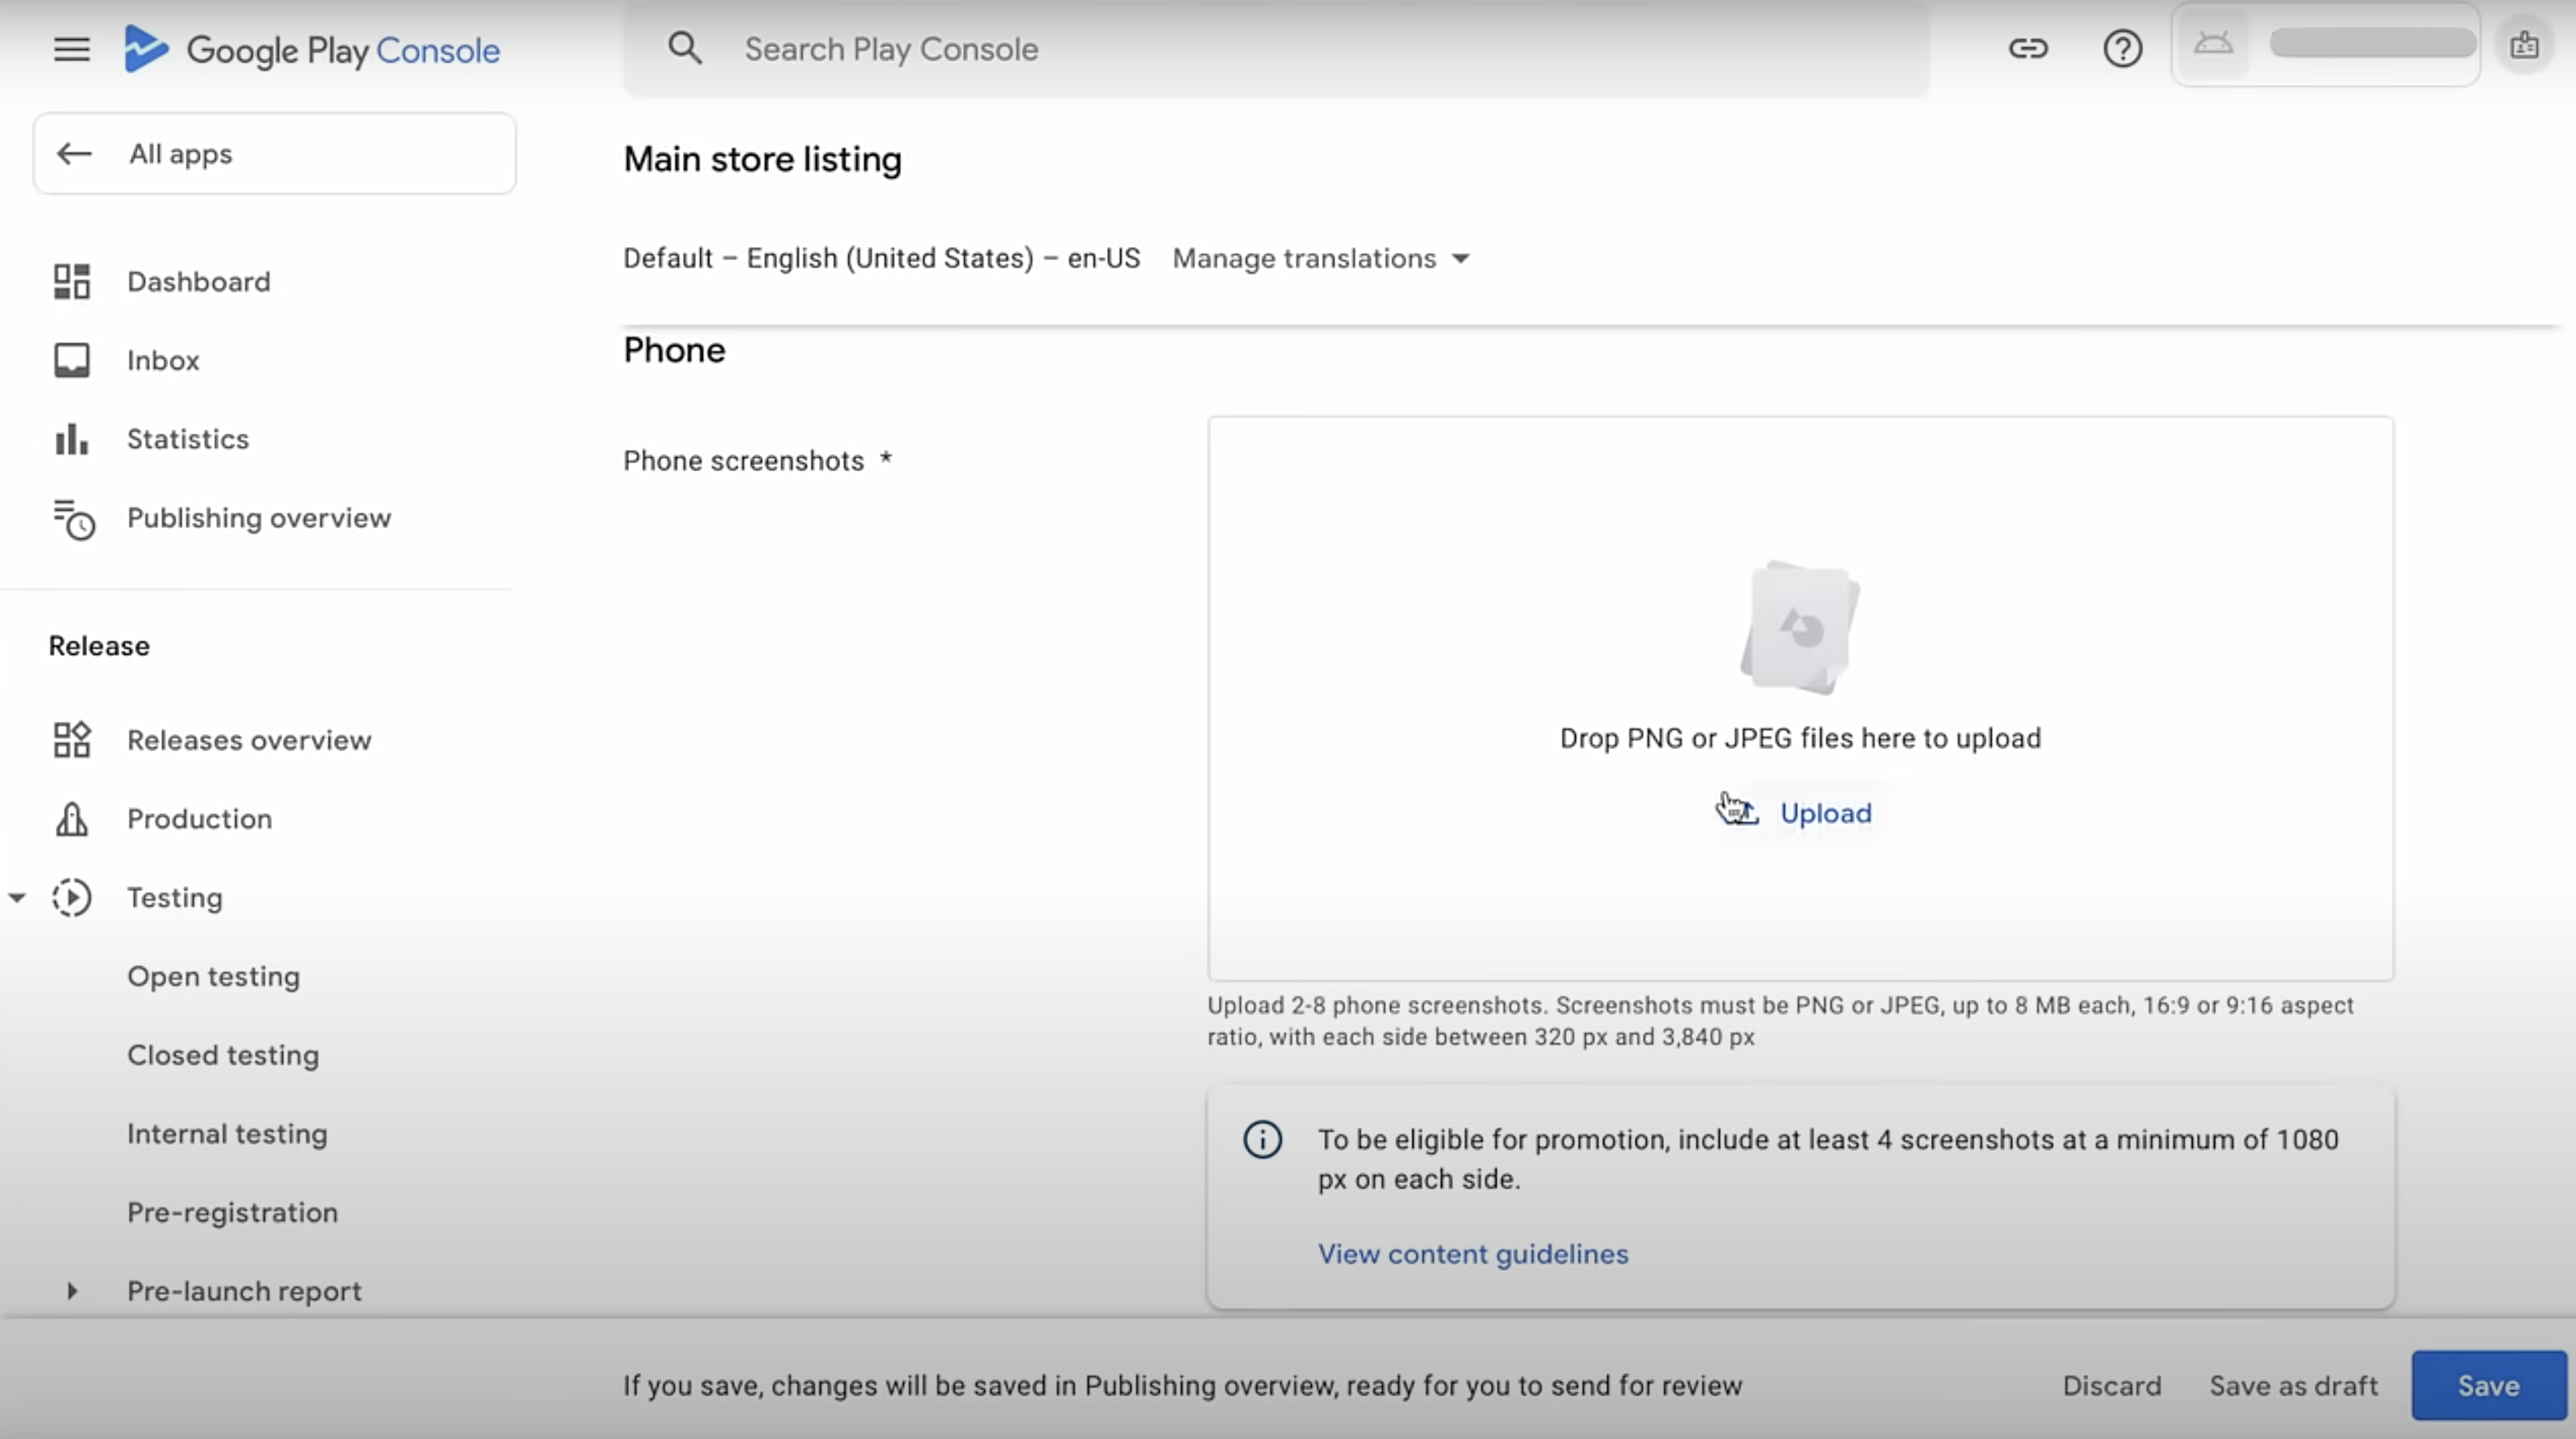
Under “Phone” Section
- Upload Phone Screenshots: Add 2 to 8 Play Store screenshots of your app. These images should be in JPEG or PNG format, up to 8 MB in size each. The resolution should be in a 16:9 or 9:16 aspect ratio, with each side between 320 pixels and 3840 pixels.
- Resolution Requirements: To be eligible for promotions, upload at least 4 screenshots with a minimum resolution of 1080 pixels on each side. These screenshots showcase your app’s interface and key features, helping users understand what to expect.
Step 4: Upload app bundle & Release app for review
Now that your app is set up and your store listing is complete, it's time to upload your app bundle and release your app for review. Here’s how you can do it. In your Google Play Console dashboard, find the "Create and publish a release" section and click on "View tasks." This will guide you through the necessary steps to publish your app.
1. Select Countries and Regions
- Click on the "Select countries and regions" section.
- Choose all the countries where you want your app to be available. This ensures that your app reaches the intended audience globally or in specific regions as per your preference.
2. Create a New Release
- Click on "Create a new release" section. This will start the process of preparing your app for submission.
- If needed, change the signing key under the app integrity section and select the appropriate options to ensure your app is securely signed.
- Upload the .abb file (Android App Bundle) that contains your app’s code and resources. This file is optimized for delivering your app to users in the most efficient way.
- Fill in the release details, including the release name and notes. These details help track the version of your app and inform users about updates or changes.
- Confirm all details and click on “Save” to save all changes to ensure everything is correctly set up.
3. Submit for Review
- Go to the “Publishing Overview” section in the left menu.
- Click on “Send 1 change for review.” This step prepares your app for the final submission.
- After reviewing everything, click “Send changes for review” to submit your app to Google for review.
- Once submitted, Google will review your app to ensure it meets all the guidelines and policies. You’ll receive notifications about the status of your app review.
Step 5: App Review Process
Your app is now successfully uploaded and submitted for review. This marks a significant milestone in the journey of getting your app live on the Google Play Store.
Here’s what happens next:
- Once you've submitted your app for review, Google's review team will thoroughly examine your app to ensure it complies with all their policies and guidelines. This review process typically takes around 7 days. During this period, it's important to be patient and keep an eye on your email for any communication from Google.
- The review includes checking for any potential policy violations, evaluating the user experience, and ensuring that the app functions as intended without any critical bugs or issues. If the reviewers find any issues, they will provide feedback and request necessary changes. You will need to address these issues and resubmit your app for another round of review.
- In some cases, the review process might be quicker, especially if your app is straightforward and adheres closely to Google's guidelines. However, it's good practice to plan for the full 7-day period to avoid any surprises.
- Once your app passes the review, you will receive a notification that it has been approved and is now live on the Google Play Store. Users worldwide can now discover, download, and use your app.
- By ensuring that your app meets all guidelines and submitting it for review, you are one step closer to sharing your creation with millions of potential users. The review process, while sometimes nerve-wracking, is essential for maintaining the quality and safety of apps available on the Google Play Store.
Resources & Communities
- Google Documentation: This resource provides detailed information on using Google Play Console. It includes guides on setting up your app, managing your account, and navigating the submission process.
- Google Play Developer Community: An official forum where you can discuss issues related to Android development tools and guidelines with other developers.
Tools for app analytics and marketing
- AppLaunchpad: App screenshot builder to create app screenshots for App Store and Google Play Store page for all required device sizes
- App Annie: Provides analytics and insights into app performance, market trends, and competitor analysis. It helps you understand how your app is performing and where improvements can be made.
- Firebase: Offers tools for app development, including analytics, crash reporting, and user engagement features. It is useful for tracking user behavior and optimizing app performance. By using these resources, you’ll be well-equipped to upload your app to App Store Connect and share it with the world. Good luck with your app release!