Step by Step Guide to Upload an App to App Store Connect
Step by Step Guide to Upload an App to App Store Connect
A comprehensive step-by-step guide on how to upload your app to App Store Connect, covering everything from app preparation to submission for review.

Introduction
Publishing your app on the App Store is a significant milestone in your app development journey. It not only signifies the culmination of your hard work but also opens the doors to a vast global audience, allowing millions of users to discover, download, and enjoy your app.
This guide will walk you through the detailed process of uploading your app to App Store Connect, helping you navigate each step to ensure a smooth and successful submission
Prerequisites
Before you start the process of publishing your app on the App Store, ensure you have the following essentials:
- Apple Developer Program membership: You must be enrolled in the Apple Developer Program. This program gives you access to all the resources and tools needed for app development and distribution. Enrollment involves a yearly fee, and you can sign up through Apple's developer website.
- Necessary software: Make sure you have Xcode installed on your Mac computer. Xcode is Apple's integrated development environment (IDE) for macOS, which includes everything you need to create apps for all Apple platforms. You can download Xcode from the Mac App Store.
- A completed app: Your app should be fully developed, tested, and ready for submission. This means it should be free of bugs, optimized for performance, and comply with Apple's App Store guidelines. Ensure that all the features work as intended and that the app provides a good user experience.
Step 1: Set Up Your App Store Connect Account
1. Sign in to App Store Connect
- Creating an Apple ID: If you need a new Apple ID, go to the Apple ID website (https://appleid.apple.com/) and follow the instructions to create one. Ensure this ID is the one you will use to enroll in the Apple Developer Program. Skip this if you already have an Apple ID.
- Login to App Store Connect: Go to App Store Connect and sign in with your Apple ID that is enrolled in the Apple Developer Program.
- Enrolling in the Apple Developer Program: After creating your Apple ID, visit the [Apple Enrollment](https://developer.apple.com/support/enrollment) website to enroll in the Apple Developer Program. Follow the steps provided, which include agreeing to the terms and paying an annual fee. The annual fee for the Apple Developer Program is $99, while the Apple Developer Enterprise Program costs $299 per year. This enrollment gives you access to essential tools and resources for app development and distribution.
Pro Tip: Ensure you use a reliable email address for your Apple ID that you check regularly. Important notifications about your app's status will be sent to this email.
Step 2: Create a New App in App Store Connect
1. Navigate to "My Apps"
- After signing in, you will be directed to the App Store Connect dashboard. Click on "My Apps." This section shows all your existing apps.
2. Create a new app
- Click the "+" button in the top left corner of the "My Apps" section to start creating a new app. This opens a new form for app creation.

3. Fill out the required information
- App Name: Enter the name of your app. This is the name users will see on the App Store. Make sure it is unique and represents your app well.
- Platform: Select the platform your app is built for, such as iOS, macOS, tvOS, or watchOS. Choose the correct platform to ensure your app is available on the right devices.
- Primary Language: Choose the primary language for your app. This is the language in which your app’s description and metadata will be primarily displayed.
- Bundle ID: Ensure this matches the bundle ID used in Xcode for your app. The bundle ID is a unique identifier for your app, and it must be consistent across all Apple services.
- SKU: Enter a unique identifier for your app. This can be any string you choose and is used internally to track the app. It’s important that this SKU is unique for each app.
- User Access: Set the user access level for this app. You can determine who on your team can view and edit the app’s information. Choose between "Full Access" or "View Only" based on their roles.
Pro Tip: Take your time to ensure all information is accurate and consistent. Errors in this stage can lead to delays in the approval process. Double-check your bundle ID and SKU to avoid conflicts later.
Step 3: Upload Your App Using Xcode
1. Open your project in Xcode
- Start Xcode and open your app project. Ensure that all your files and resources are in place.
2. Configure build settings
- Select your app’s target from the project navigator. Go to the "Build Settings" tab and ensure the build configuration is set to "Release." This configuration optimizes your app for distribution.
3. Archive your app
- Select `Product` > `Archive`. This will create a build of your app suitable for submission.
- Go to the menu bar at the top of the screen.
4. Upload your app using Xcode Organizer
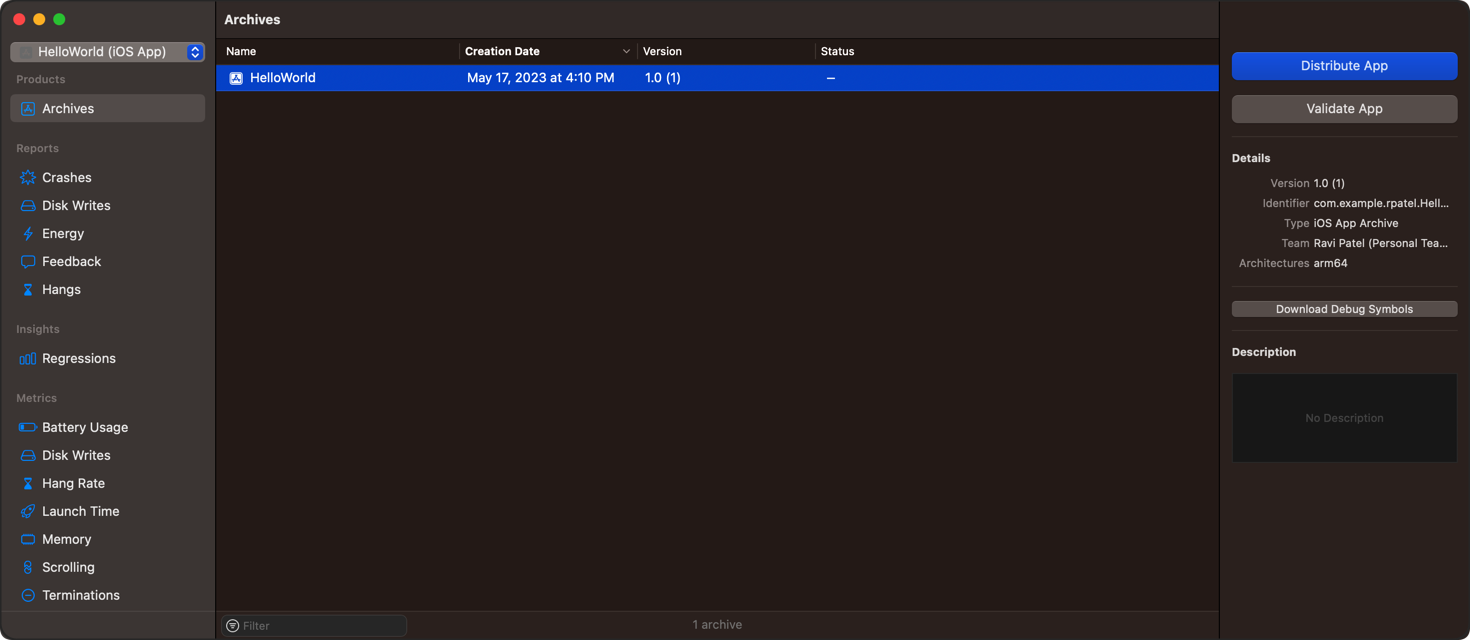
- After archiving, the Xcode Organizer window will open automatically. In the Organizer, you will see a list of your archived builds. Select the build you want to upload.
- Click `Distribute App` on the right side of the window.
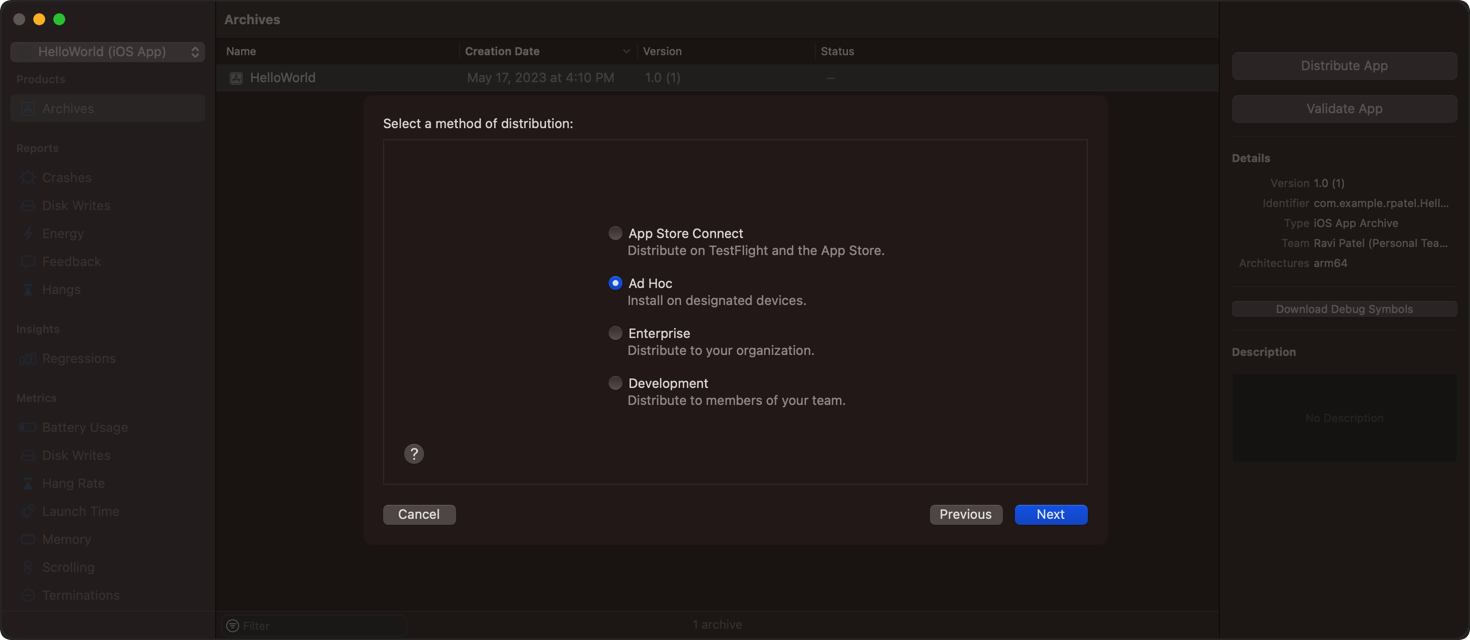
- In the "Select a method of distribution" popup, choose `App Store Connect`. This option prepares your app for submission to the App Store.
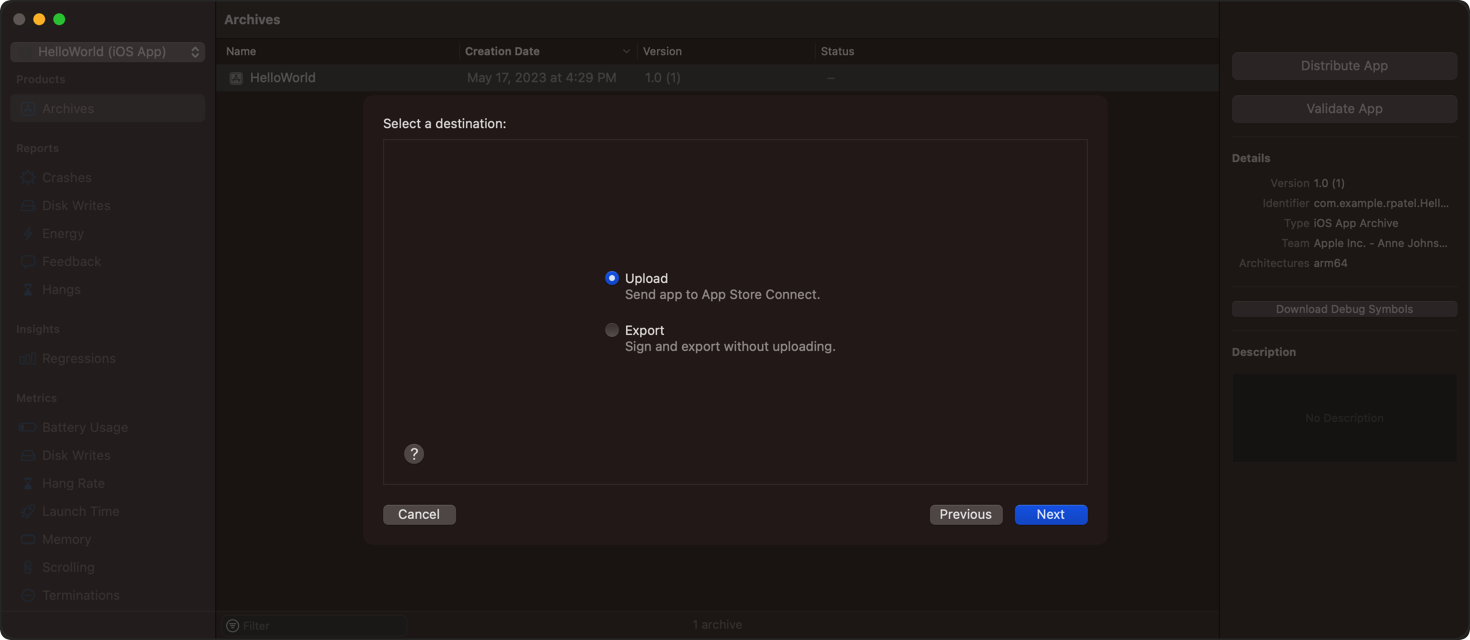
- In the "Select a destination" popup, choose `Upload`. This uploads your app directly to App Store Connect.
- In the "Preparing app record" popup, fill in the below required details
Name: Enter the name of your app.
SKU: Enter the SKU you defined in App Store Connect.
Primary Language: Select the primary language for your app.
Bundle Identifier: This will be pre-filled with your app’s package name.
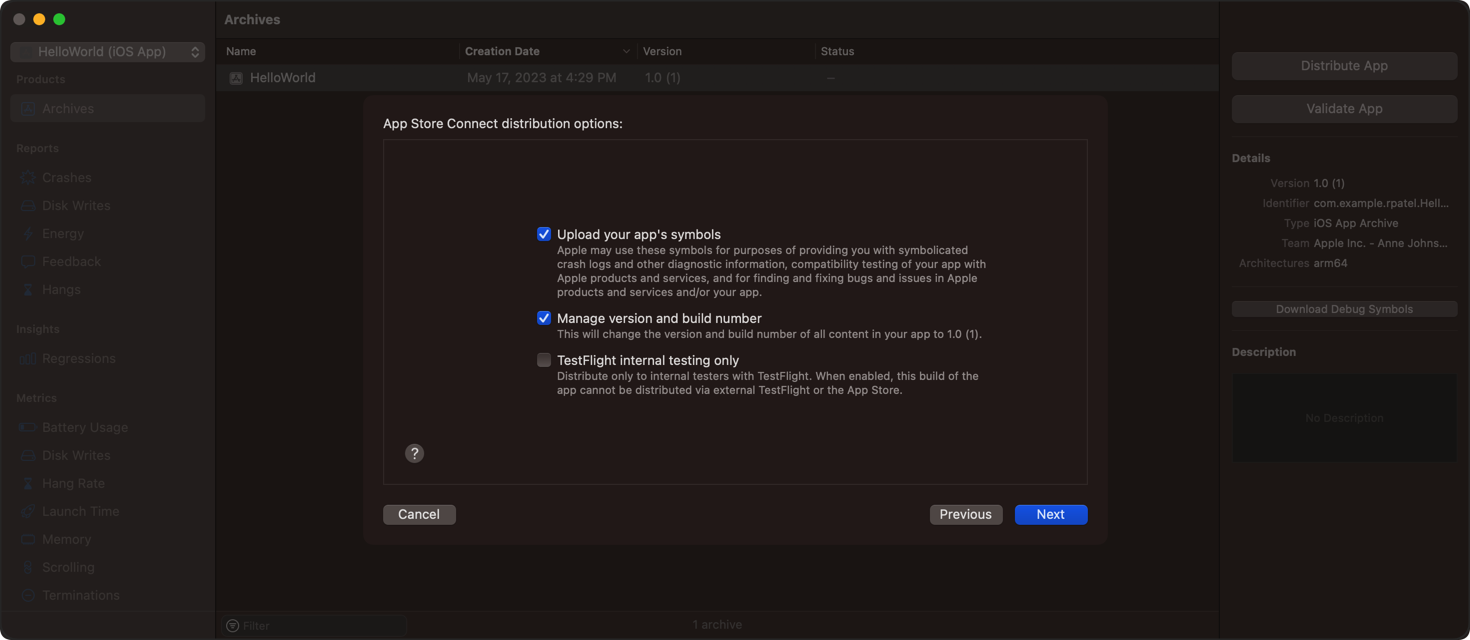
- Check both `Upload your app’s symbols` and `Manage version and build number`. These options help with crash reporting and version management.
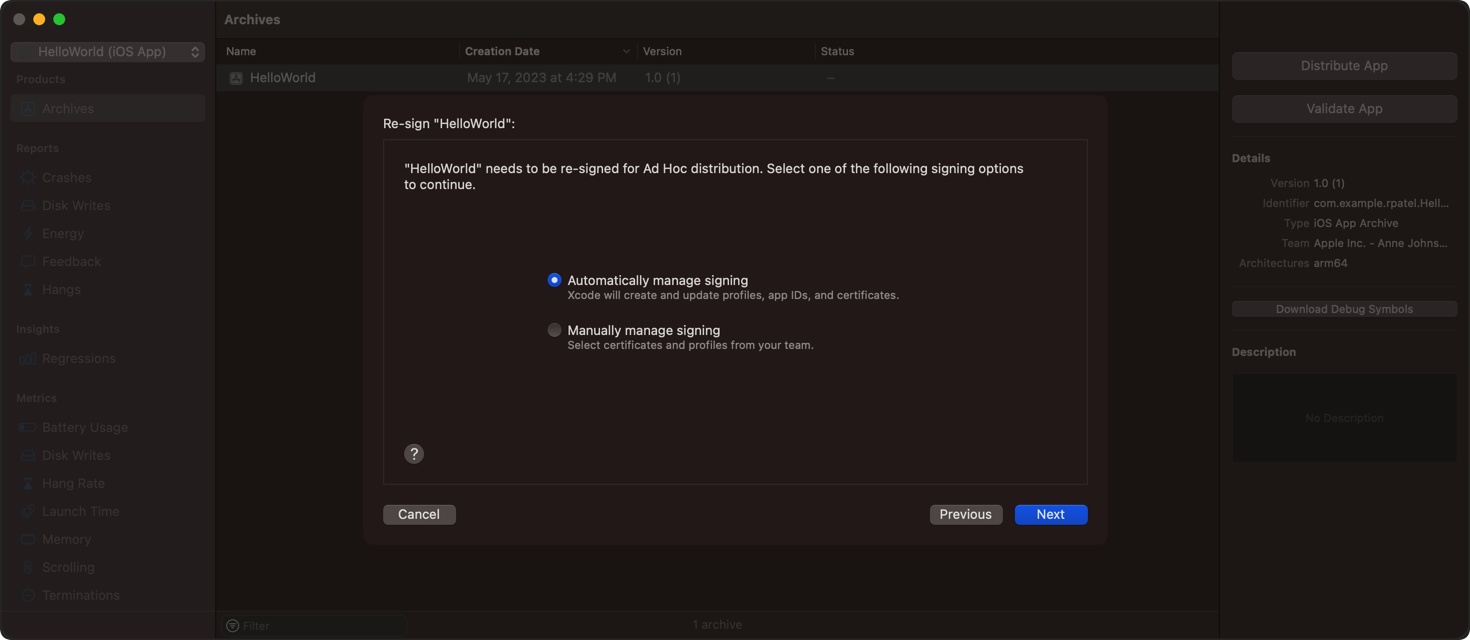
- Choose the appropriate signing option. Typically, you would select "Automatically manage signing" to let Xcode handle the process.
- Click `Upload to App Store Connect`.
- Review the upload summary to ensure all details are correct. Click `Upload` to finalize the process.
Pro Tip: Before uploading, perform a final test of your app in the release configuration to catch any last-minute issues. Ensure your app’s version number and build number are correctly set to avoid conflicts with future updates.
Step 4: Configure App Store Connect Listing
1. Access your App Store Connect account
- Go to , sign in with your Apple ID, and navigate to the "Apps" section. Select your app from the list of apps.
2. Prepare for submission
Under the "iOS App" section, click on "Prepare for Submission." This is where you will provide all the necessary information about your app. Fill out all the necessary details:
- iOS Preview and Screenshots
Uploading high-quality screenshots is essential for showcasing your app’s features and making a good first impression on potential users. You can upload up to 10 screenshots per device type. .
iPhone 6.7’’ Display - Must upload: This is a required screenshot size. Make sure to upload screenshots that are clear and show your app’s interface and features effectively.
iPhone 6.5’’ Display - Optional if iPhone 6.7’’ is uploaded: If you have already uploaded screenshots for the iPhone 6.7” display, uploading screenshots for the iPhone 6.5” display is optional.
iPhone 5.5’’ Display - Optional if iPhone 6.7’’ is uploaded: Similar to the iPhone 6.5” display, this is optional if you have already uploaded iPhone 6.7” screenshots. Including these can be beneficial for users with older devices.
iPad Pro 13’’ Display - Recommended to upload if you support iPad: If your app supports iPad, it is highly recommended to upload screenshots for the iPad Pro 13” display. This ensures that users can see how your app performs on larger screens, which is especially important for apps designed to take advantage of the iPad’s capabilities.
- Promotional Text: Enter any promotional text. This text will appear at the top of your app’s description on the App Store and can be updated without requiring a new app version.
- Description: Write a compelling description of your app. Highlight the key features, benefits, and any unique aspects. Make sure it is clear and engaging to attract potential users.
- Keywords: Add relevant keywords to help users find your app. Think about the terms users might search for when looking for an app like yours.
- Support URL: Provide a URL for app support. This should be a link to a website or page where users can get help and support for your app.
- Marketing URL: Provide a URL for app marketing (if any). This can be a link to your app’s landing page, promotional website, or any other marketing materials.
- Version: Enter the version number of your app. Ensure this matches the version number in your Xcode project.
- Copyright: Fill out the copyright information. This typically includes the name of the copyright holder and the year.
3. App Information
- Under the "General" section on the left menu, click on "App Information." This is where you provide additional details about your app.
- Fill out the app's name and subtitle. The name is the title of your app as it appears on the App Store. The subtitle is a brief summary of your app’s main features.
- Choose the primary and secondary categories for your app. Categories help users find your app based on their interests. Select the categories that best describe your app’s functionality and target audience.
- Set up the content rights and age rating according to your app's content. This involves answering questions about your app’s content to determine the appropriate age rating.
Step 5: Set Up Pricing and Availability
1. Set Up Pricing and Availability
- Under the "General" section in the left menu, click on "Pricing and Availability." This section helps you manage how much your app will cost and where and when it will be available.
2. Select the pricing tier
- Choose the appropriate pricing tier for your app. You can set it to be free or select from various paid options provided by Apple. Consider the value of your app, your target audience, and your competitors' pricing when making your decision.
Pro Tip: Starting with a free or lower-priced tier can help attract more users initially. You can always adjust the price later based on user feedback and market demand.
3. Choose the availability dates
- Specify the date range when you want your app to be available on the App Store. You can set a specific release date or choose to make your app available immediately after it is approved. If you have a planned marketing campaign, coordinate your app’s release date with it for maximum impact.
4. Configure distribution regions
- Select the regions and countries where you want your app to be available. App Store Connect allows you to choose from a list of countries and regions. Make sure your app complies with local regulations and laws in each selected region.
Pro Tip: Research the market demand and competitive landscape in different regions before making your selections. Focus on regions where there is a high demand for your app’s features and where you can provide effective support. This targeted approach can increase your app’s success in specific markets.
Step 6: Submit Your App for Review
1. Review app details
- Go through all the information you’ve entered in App Store Connect. Check that every detail, including the app description, screenshots, pricing, and availability, is accurate and complete. This is your final chance to ensure everything is correct before submission.
Pro Tip: Double-check that your screenshots match the latest version of your app.
2. Select the build
- In the "Prepare for Submission" section, choose the build you uploaded via Xcode. This is the version of your app that Apple will review. Make sure it’s the correct build and that it’s the one you intend to release.
3. Add a compliance statement
- If your app uses encryption, you must add a compliance statement. This statement informs Apple about the encryption methods used and ensures your app complies with legal and regulatory requirements. Follow the prompts to provide the necessary details about your app's encryption.
4. Submit for review
- Click the "Submit for Review" button to start the review process. Your app will be queued for Apple’s review team to evaluate. After submission, you will receive notifications about the status of your app and any feedback from the review team.
Pro Tip: After submitting, regularly check the status of your app in App Store Connect. Respond promptly to any feedback or requests from Apple to avoid delays in the review process.
Step 7: App Review Process
1. Overview of the review process timeline
- The review process for your app can take anywhere from a few days to a week. Apple’s review team will evaluate your app to ensure it complies with their guidelines and standards. They will check various aspects, including functionality, UI, and adherence to their policies.
Pro Tip: During this period, avoid making changes to your app or submission unless instructed by Apple. Frequent changes can reset the review process or cause delays.
2. Common reasons for rejection
There are several common reasons why apps get rejected, including:
- Incomplete app information: Missing details or incomplete descriptions.
- Crashes or bugs: Issues that cause the app to malfunction or not work as intended.
- Non-compliance with App Store guidelines: Violations of Apple’s guidelines, such as inappropriate content or misleading claims.
To avoid rejection, thoroughly test your app to ensure it is stable and free of bugs. Review all the information you’ve provided in App Store Connect to make sure it is complete and accurate. Familiarize yourself with Apple’s App Store Review Guidelines to ensure your app meets all requirements.
Pro Tip: Before submitting, have a few users test your app under different conditions. This can help catch issues that you might not have noticed during your own testing.
3. Check review status
- You can check the status of your app’s review by logging into App Store Connect and viewing the dashboard. Apple will notify you if there are any issues with your app or when it has been approved. Notifications will also include instructions if additional steps are required.
Pro Tip: Regularly monitor the review status and be prepared to respond quickly to any requests from Apple. Promptly addressing any issues or feedback can help speed up the review process and increase the chances of approval.
Step 8: Post-Approval Steps
1. Prepare for release
- Set a release date: Once your app is approved, you have two options for releasing it. You can set a specific date for the release, or choose to have it automatically released as soon as it is approved. Setting a release date allows you to plan a launch strategy and coordinate marketing efforts.
- Announce the release: Start promoting your app’s release to build excitement and attract users. Use social media platforms, send out press releases, and leverage other marketing channels to spread the word. Create engaging content to showcase your app’s features and benefits.
Pro Tip: Plan your announcement strategy ahead of time. Consider creating a press kit, preparing engaging visuals, and reaching out to influencers or bloggers in your app’s niche. Timing your announcement to align with significant events or trends can also help increase visibility.
2. Monitor performance and feedback
After your app is live, regularly check its performance using the analytics tools available in App Store Connect. This will give you insights into how users are interacting with your app, including download numbers, user engagement, and other key metrics.
- User Reviews: Pay close attention to user reviews and feedback. These reviews can provide valuable insights into what users like about your app and where improvements are needed. Addressing common issues or suggestions can lead to higher user satisfaction and better ratings.
Regularly updating your app based on user feedback can help maintain a positive reputation and encourage ongoing engagement.
Conclusion
Publishing an app on the App Store involves several detailed steps, but with careful preparation, you can successfully manage the process. Here’s a summary to help you through it.
- Detailed Process: The process of publishing an app requires careful attention to various steps, including setting up your account, preparing your app for submission, and configuring pricing and availability. Each step ensures your app meets Apple's standards and is ready for users.
- Adherence to Guidelines: Make sure to follow Apple’s guidelines closely. This includes ensuring your app complies with their content policies, providing complete and accurate information, and testing your app thoroughly to avoid rejection.
- Preparation for Submission: By thoroughly preparing your app, you increase the chances of a smooth submission process. This includes configuring app details, pricing, availability, and preparing marketing materials.
- Meeting Apple's Standards: Ensure your app meets all of Apple's technical and content standards. This involves checking functionality, design, and adherence to guidelines before submission.
- Discovery by Users: Once your app is approved and live, focus on promoting it to attract users. Use marketing strategies and monitor performance to ensure your app reaches and engages its target audience.
Additional Resources
- Apple’s Official Documentation: This resource provides detailed information on using App Store Connect. It includes guides on setting up your app, managing your account, and navigating the submission process.
Communities
- Apple Developer Forums: An official forum where you can discuss issues related to Apple’s development tools and guidelines with other developers.
Tools for app analytics and marketing
- AppLaunchpad: App screenshot builder to create app screenshots for App Store page for all required device sizes
- App Annie: Provides analytics and insights into app performance, market trends, and competitor analysis. It helps you understand how your app is performing and where improvements can be made.
- Firebase: Offers tools for app development, including analytics, crash reporting, and user engagement features. It is useful for tracking user behavior and optimizing app performance.
By using these resources, you’ll be well-equipped to upload your app to App Store Connect and share it with the world. Good luck with your app release!